 There’s a new arrows-on-circle Visio SmartShape for you to download. It plays nicely with Visio 2013 and newer versions.
Come on in and check it out!
Article Highlights
- The old Circular Multi-arrows shape doesn’t work as well as it could in Visio 2013/2016
- I’ve built a new version of the shape for Visio 2013 and newer (only!)
- I’ve added a bunch of features to the shape, and simplified some things
- Select from 1-25 arrows along the circle
- Select start and end formatting for the arrows that blends from beginning to end
Here are just some of the things you can do with this new offering:
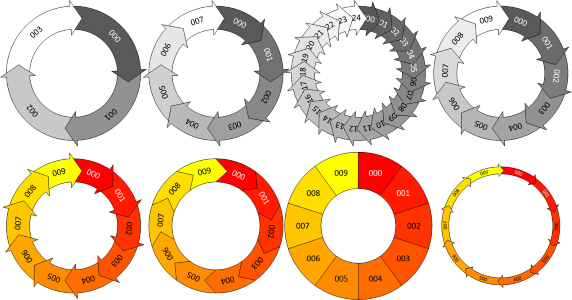
Picking wilder fill and line colors, and adding the new (in Visio 2013) blurred shadow effects makes things interesting:
The Old with the New
If you’ve used the old shape, but have upgraded Visio, you can continue to use it, but you’ll have to adjust how you interact with it a little bit. If you’re looking just for the new shape, skip the following section and start reading at The New “Circle Arrows” Shape.
The Problem (and Solution) with the Circular Multi-arrows
Users that moved to Visio 2013 were running into a problem setting the start- and end-colors for the arrows. This was due to a user-interface change that appeared between Visio 2010 and Visio 2013.
The old circular multi-arrow shape had a right-click option Change Colors…. This option does not work anymore because the Fill dialog that used to pop-up no longer exists, starting with Visio 2013.
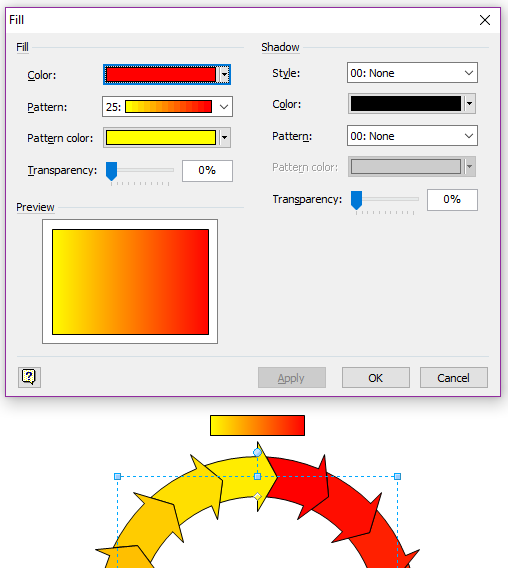
The Old Fill dialog is gone. *sniff* *sniff*
You can still change the start and end colors in Visio 2013/2016, but you have to use the new, built-in Format pane. The easiest way to get this window to show up is to simply press F3. You can also right-click a shape, then select Format Shape from the bottom of the menu. You can see below that the Foreground color is yellow and the Background color is red.
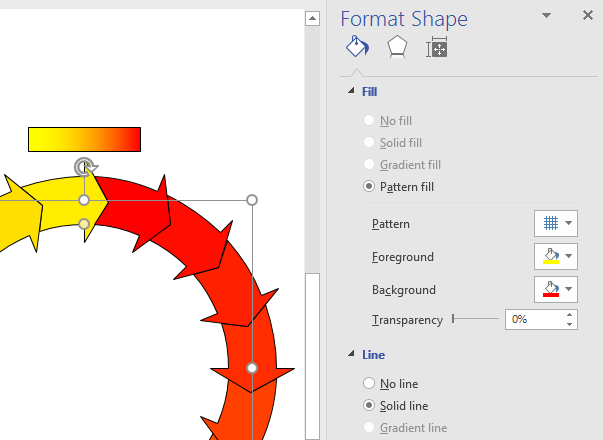
The New Format Pane has options for Fill, Line, Shadow, Glow and 3D effects
Take note, for some reason the colors seem to be reversed in order. The Foreground color matches the end arrow’s color, and the Background matches the start arrow’s color, whereas in the old dialog the top-to-bottom order of the colors matched the left-to-right, start-to-end design of the arrows in the shape.
The New “Circle Arrows” Shape
Even though the old shape wasn’t completely broken, I thought about making a new mechanism for changing the coloring of the arrows. And while I was at it, I put it a bunch (a ton?) of new features. Merry Christmas!
New Shape’s Features
Here’s a quick list of all the things that can be changed in the new shape:
- Subselect “start” and “end” squares and format them like you would any other shape to change their colors
- Change the fill, fill transparency and line color of the start and end squares, and this will propagate to the arrows
- Arrows smoothly blend fill color, fill transparency and line color from the starting values to ending values
- Edit text for each arrow individually
- Set text to be “along arrow” or level with respect to the page
- Pull text off of arrow to allow more space for longer expressions
The shape has quite a few options that I’ll discuss throughout the article. For those of you who like to learn-by-tinkering, understanding how to change the options is probably all you need to know. Almost all options are available via the Shape Data panel or by right-clicking the shape.
The only thing to be aware of is that the Number of Arrows must be set via the Shape Data pane.
Below, you can compare the Shape Data pane to the right-click context menu items:
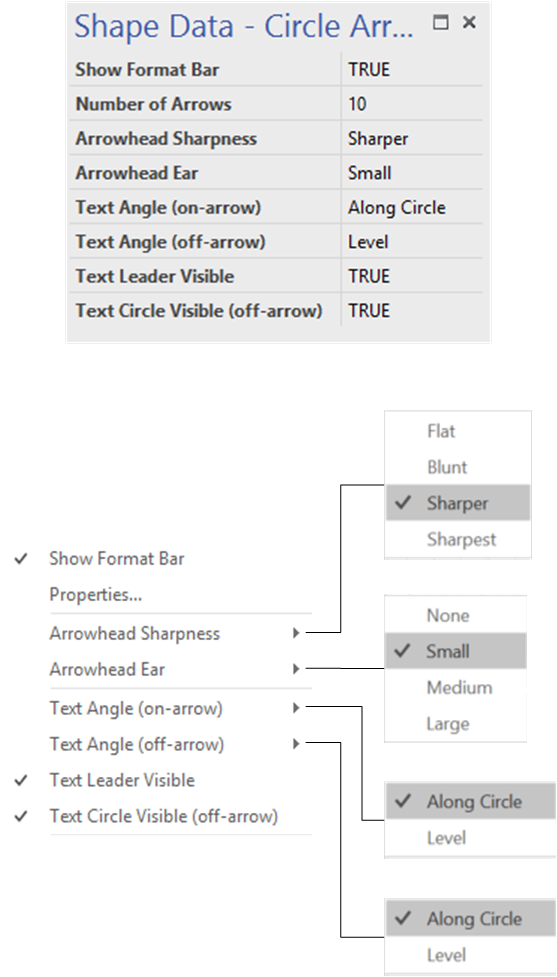
Options in the Shape Data pane (above) and right-click context menu (below)
Like most Visio shapes, just try clicking things and see what happens!
Formatting
To change the color, transparency and line color of the arrows in the circle, you need to use the Format Bar, which is built into the shape. The easiest way to turn it on and off is to right-click shape, and choose Show Format Bar.

When visible, you’ll see two squares, an arrow and some text atop the shape. Note, the format bar is set to not print, so it doesn’t hurt to leave it on when printing or exporting–although, as of this writing, I have seen some inconsistent behavior with Visio 2016, so there may be a bug!
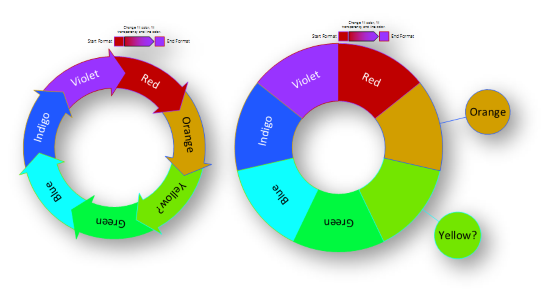
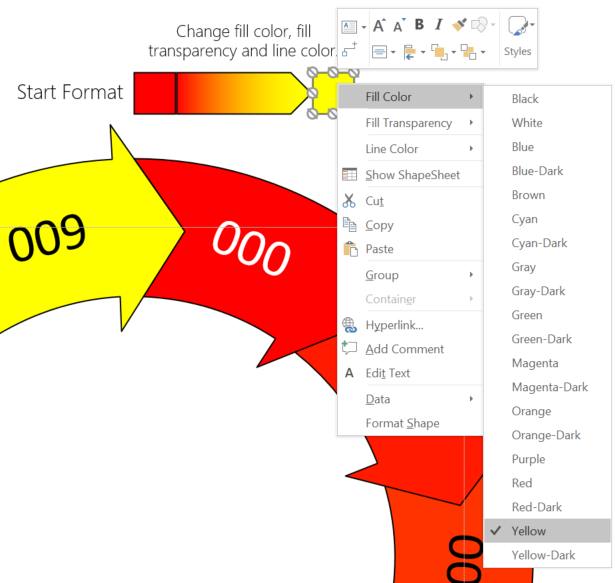
You can subselect each square (don’t bother with the bit in the middle) and change the fill color, the fill transparency, and the line color. You can use Visio’s standard formatting controls to do this – controls in the ribbon or controls in that show on right-click. The arrows will then be formatted with intermediary values that blend nicely from start to end.
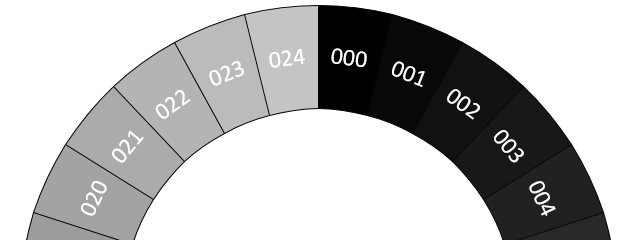
Colors will blend along the ROYGBIV scale (red-orange-yellow-green-blue-indigo-violet):
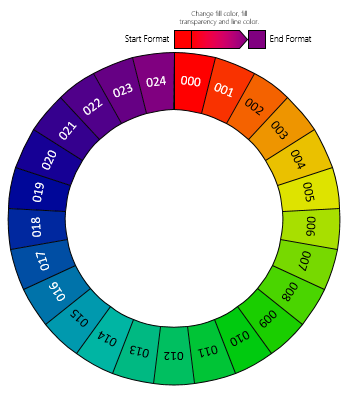
Transparency values will be linearly calculated:
![]() I’ve also built in some short lists of colors and transparency values that you can access by right-clicking the subselected squares. These options are also available in the Shape Data pane for the squares:
I’ve also built in some short lists of colors and transparency values that you can access by right-clicking the subselected squares. These options are also available in the Shape Data pane for the squares:
To change other formatting options, such as line weight, line pattern, font, and font size, simply select the whole circle arrows shape and change the formatting like you would for any other shape.
So you can’t change the fill color, fill transparency, nor line color of individual arrows. This is the main weirdness of the shape. You have to use the squares in the format bar. So using this shape is a bit complicated, but I hope it offers power and flexibility that you’ll find very useful.
Arrow Size & Shape
The size of the arrows (the thickness) is controlled visually by pulling on the yellow control handle that you’ll see below the top-center arrow:
![]()
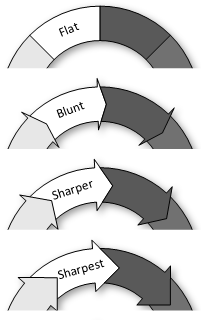
You can specify how pointy the arrows are by choosing one of the four settings for Arrowhead Sharpness:
And the size of the arrowhead wings or “ears” is controlled by the Arrowhead Ear setting:

Note: if the sharpness is set to flat, then the ear settings have no effect, since the arrows effectively become curved boxes.
Arrow Direction
If you want to change the direction of the arrows, simply flip the shape horizontally or vertically. If you like keyboard shortcuts, then [Ctrl] + H will flip the shape horizontally and [Ctrl] + V will flip it vertically.
You can also use the rotation handle to change the position of the first arrow. You can do quarter-rotations with keyboard shortcuts as well. [Ctrl] + L rotates the shape “left” or counterclockwise, whereas [Ctrl] + R rotates the shape “right” or clockwise.
Text
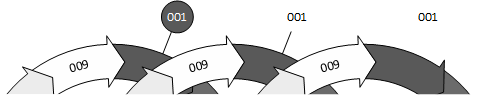
You can edit the text for the overall shape as well as for each individual arrows. By default, the individual arrows are numbered, and the main text is blank. The angle of the text can be specified and the position can be easily altered using control handles.
Characters
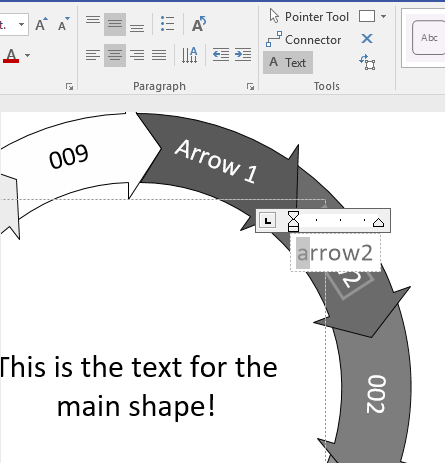
You can select-and-type to set the main shape’s text, or double-click to edit existing text on it. For individual arrows, you must firs subselect an arrow, then type. To edit existing text on an arrow, subselect the arrow, then press F2, or get the Text tool from the ribbon.
Here we are editing arrow 2’s text using the Text tool:
Position, Angle and Callouts
All text on the shape can be moved using yellow control handles. The text position for arrows can be reset to the default location by right-clicking and choosing Reset Text.
If you pull text off of an arrow, then a callout line and bubble appear around the text by default, but you can change the options:
You can turn off the bubble using the Text Circle Visible (off-arrow) setting, and you can hide the callout line using the Text Leader Visible setting.
The text angle can be either level, with respect to the page, or “along the circle”. The angle can be independently specified for text that is still on the arrow, and for text that is off the arrow. The settings Text Angle (on-arrow) and Text Angle (off-arrow) allow you this flexibility:
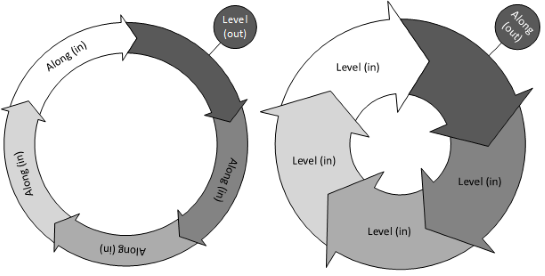
For shorter blobs of text, I think that along makes the most sense for in-arrow text, then level for off-arrow text. These are the default settings.
Note:You don’t have control over the text angle on an individual arrow basis.
Text Coloring
By default, the text coloring is set to be either black or white, depending on the darkness of the fill color behind the text.
If you manually set the text color–either for the whole shape or for individual arrows–then the automatic text coloring behavior will be broken and no longer function.
The technique for doing this is described in Make Your Text Stand Out!, in case you’re interested. Note however, that the auto-coloring isn’t smart enough to detect lightness that results from transparency. The shape below has very light coloring towards the end “arrows”, but the text remains white because the fill color is actually still black:
Adding the Shape to Your Documents
Rather than just offering you a stencil, which would require you to open up a blank drawing, then drag shapes out for testing, the download (link below) is a Visio drawing full of instances of the circle arrows shape in many different configurations, along with helpful notes.
When you open Circle Arrows 2013 – 2016.vsdx, you’ll see something like this:
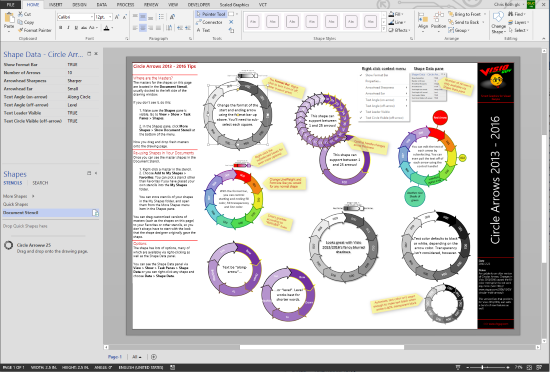
The actual master shape is called Circle Arrows 25, indicating that a maximum of 25 individual arrows can be displayed on the shape. You will find it in the Document Stencil, which is typically docked to the left side of the drawing window.
If you don’t see the Document Stencil do this:
- Make sure the Shapes pane is visible. Go to: View > Show > Task Panes > Shapes.
- In the Shapes pane, click: More Shapes > Show Document Stencil at the bottom of the menu.
Now you drag and drop fresh masters, with default settings onto any drawing page in your document.
Now, you won’t want to re-open this drawing and copy shapes to your other drawings every time. Instead, you should add the Circle Arrows 25 master to a stencil that you can easily access. Here is one way to do that:
- Once you can see the master shapes in the Document Stencil…
- Right-click the Circle Arrows 25 master in the stencil.
- Choose: Add to My Shapes > Favorites. You can pick a stencil other than Favorites if you have placed your own stencils into the My Shapes folder.
Now the master is in your Favorites stencil which is installed with Visio by default, in the Documents\My Shapes folder on your PC. Any time you are editing a drawing in the future, simply go to More Shapes > My Shapes > Favorites to open the Favorites stencil, and you’ll have instant access to the circle arrows shape.
You can also drag customized versions of masters (such as the shapes on the page in the download document) to your Favorites or other stencils, so you don’t always have to start with the look that the shape designer originally gave the shape.
Download “Visio Circle Arrows 2013 Shape”
s!Aj0wJuswNyXlhAKVBGAyUOU0PoVn – Downloaded 14505 times – 103.00 BMore Fun
I was playing with the 3D effects in Visio 2013/2016 the day after I posted the article, and came up with some interesting effects:
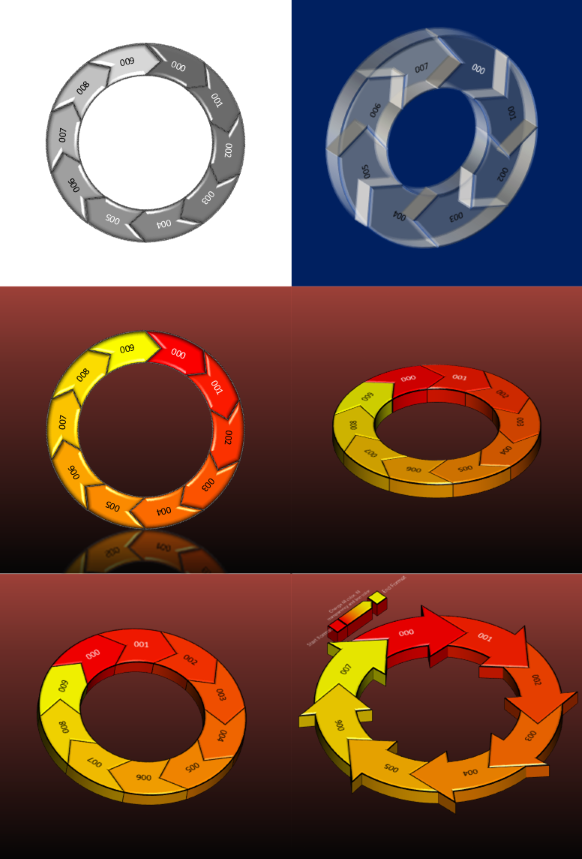
For the red-yellow circles at the bottom, I had to make a modification to the subshape arrows. In the ShapeSheet, I had to get the depth color to match the fill color. This was done by setting BevelDepthColor = GUARD(FillForegnd). If I ever get around to updating the shape, I’ll be sure to add this modification to the next version!
Download “Visio Circle Arrows 2013 Shape”
s!Aj0wJuswNyXlhAKVBGAyUOU0PoVn – Downloaded 14505 times – 103.00 B
how would you flip the text on a bottom arrow so that it is “on arrow” but not upside down?
Hi hillbr,
It’s not easy. I should have put in a “gravity” feature, which causes on-arrow text to be oriented towards the bottom or right side of the page, so you don’t have to read upside down.
The workaround for now is:
1. Subselect the arrow in question
2. Open the ShapeSheet
3. Locate cell: User.TxtAngle
4. Add 180deg to the formula, ie:
User.TxtAngle = 180deg + IF(User.IsTextOffArrow,IF(User.IsText….
I’ll see about adding the option to the shape, but can’t promise I’ll have the time to do it.
Tried to download Circle Arrows 2013, however I get a cannot connect error (on multiple tries). Same error occurred about two or so weeks ago and I quit, but back to try again. Willing to pay, but need the download to go through first. Any way to help? Thanks.
Ed
I was thinking of using your circular arrows and pulling out one arrow at a time on a straight line. So if I start with 6 arrows, the next slide will have 5 circle arrows with the sixth missing in the circle but showing the 6th as a straight arrow next to the circle. Eventually I will have 6 straight arrows with no circle left.
Any way of doing that?
I was thinking of using your circular arrows and pulling out one arrow at a time on a straight line. So if I start with 6 arrows, the next slide will have 5 circle arrows with the sixth missing in the circle but showing the 6th as a straight arrow next to the circle. Eventually I will have 6 straight arrows with no circle left.
Any way of doing that? Thank you
The download link seems broken.
Oh no! The plug-in for downloads was updated…
…OK, there was a migration process. I think most of the links are working again!
The download isn’t a .vsdx file?
Downloads that were links to cloud-storage have been broken due to a plug-in “upgrade”. Sorry for the inconvenience!
Hi, is this going to be fixed?
It should have worked days ago!
Is there an easy way to set just one arrowhead to flat?
You can make a single arrow flat by subselecting the arrow, and editing the ShapeSheet for the single arrow as follows:
User.rEarOut = Sheet.GRP!User.rBodyOut
User.rEarIn = Sheet.GRP!User.rBodyIn
User.AngBody = User.AngTip – User.AngHead*0
Note: that GRP is the id of the group, which will be readily visible from the other formulas. In the image below, GRP = 548, for example.
can i make all the arrows one colour?
Hi Lisa,
I think you just make the start and end colors the same!
I love this tool except for one thing. I need control of each arrow’s outline and fill color.
I took a quick look at it the other day, and I didn’t see any super-secret way of adjusting colors individually.
I’ve got some ideas on how I could allow user-formatting vs. the nice “smart formatting”, but I don’t have much free time to get it done. Hopefully, I can squeeze in an update soon, as it is an interesting problem!
Where do I purchase or download the Visio file, Circle Arrows 2013 – 2016.vsdx
Hi Lia,
There is a big, blue rectangle up near the end of the article that says
Download “Visio Circle Arrows 2013 Shape”
Just click that to get the download.
Seems great. So how do I get it? I’ve spent 6 mins on the page trying to figure out how to download/buy it, but no clue.
Hi RH,
There’s a big blue button that says “Download “Visio Circle Arrows 2013 Shape””. Google sometimes puts an ad right on top of it, so the button looks like part of the ad…suspicious! I’ve added some separating lines and added the download button a second time so it’s easier to see. Sorry for the confusion!