 Recent adventures with HTML, SVG and CSS have led me to create a new Visio SmartShape that will help you to easily define dash patterns for custom line patterns!
SVG Stroke-dasharray in CSS
I have been experimenting with Visio and its SVG export over the last few weeks (search this site for SVG.) As with most research endeavors, I inevitably ended up watching loads of YouTube videos on html and svg, yada, yada, yada.
In one video, the presenter added the stroke-dasharray attribute to a CSS style:

I was amused at how easy it was to establish a pattern of dashes and spaces, just by using numbers, separated by spaces. I also found it pretty cool that you can so easily change the look of SVG vector graphics via CSS styles.
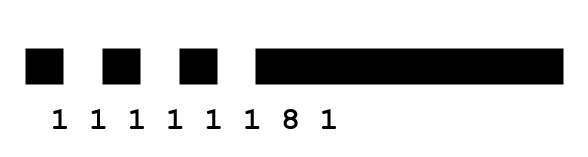
Anyway, in the example above, the 1 3 5 3 defines a pattern that goes like this:
- 1-unit dash
- 3-unit space
- 5-unit dash
- 3-unit space
The system then creates a dashed line where the lines and spaces have the relative lengths defined by the numbers.
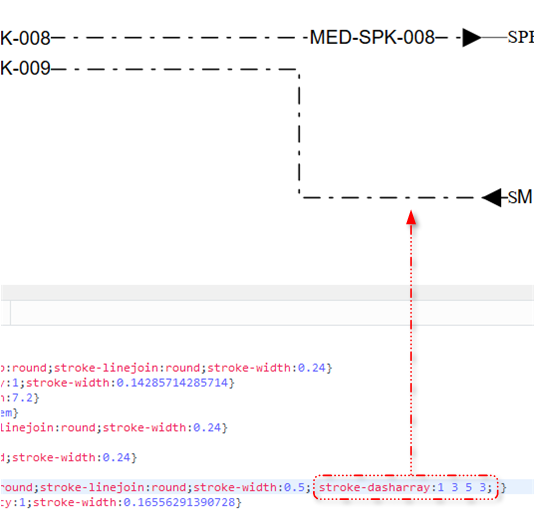
To try it out, I exported a Visio diagram to SVG, and added a stroke-dasharray definition to the “st9” CSS styles that Visio defines in-line, within the SVG file itself:
 Save.
Save.
Refresh.
It worked, as you can see above!
Stroke-dasharray Visio SmartShape
If you are a web-designer, then this is probably nothing shockingly new for you, and I believe AutoCAD has a similar format for defining custom line patterns. But Visio, doesn’t have anything like this (or if it does, I’ve forgotten where it is…)
Now, defining a custom line pattern in Visio can be as simple as drawing a few rectangles and leaving spaces between them (plus a bunch of other steps). But I wanted to create something that was as simple as stroke-dasharray–something that saved you a lot of steps, and a bunch of math!
This is what I came up with:
Yup, just select the shape, type some numbers and spaces, then copy the thing into a pattern master container. You can then apply it to any line in your diagram!
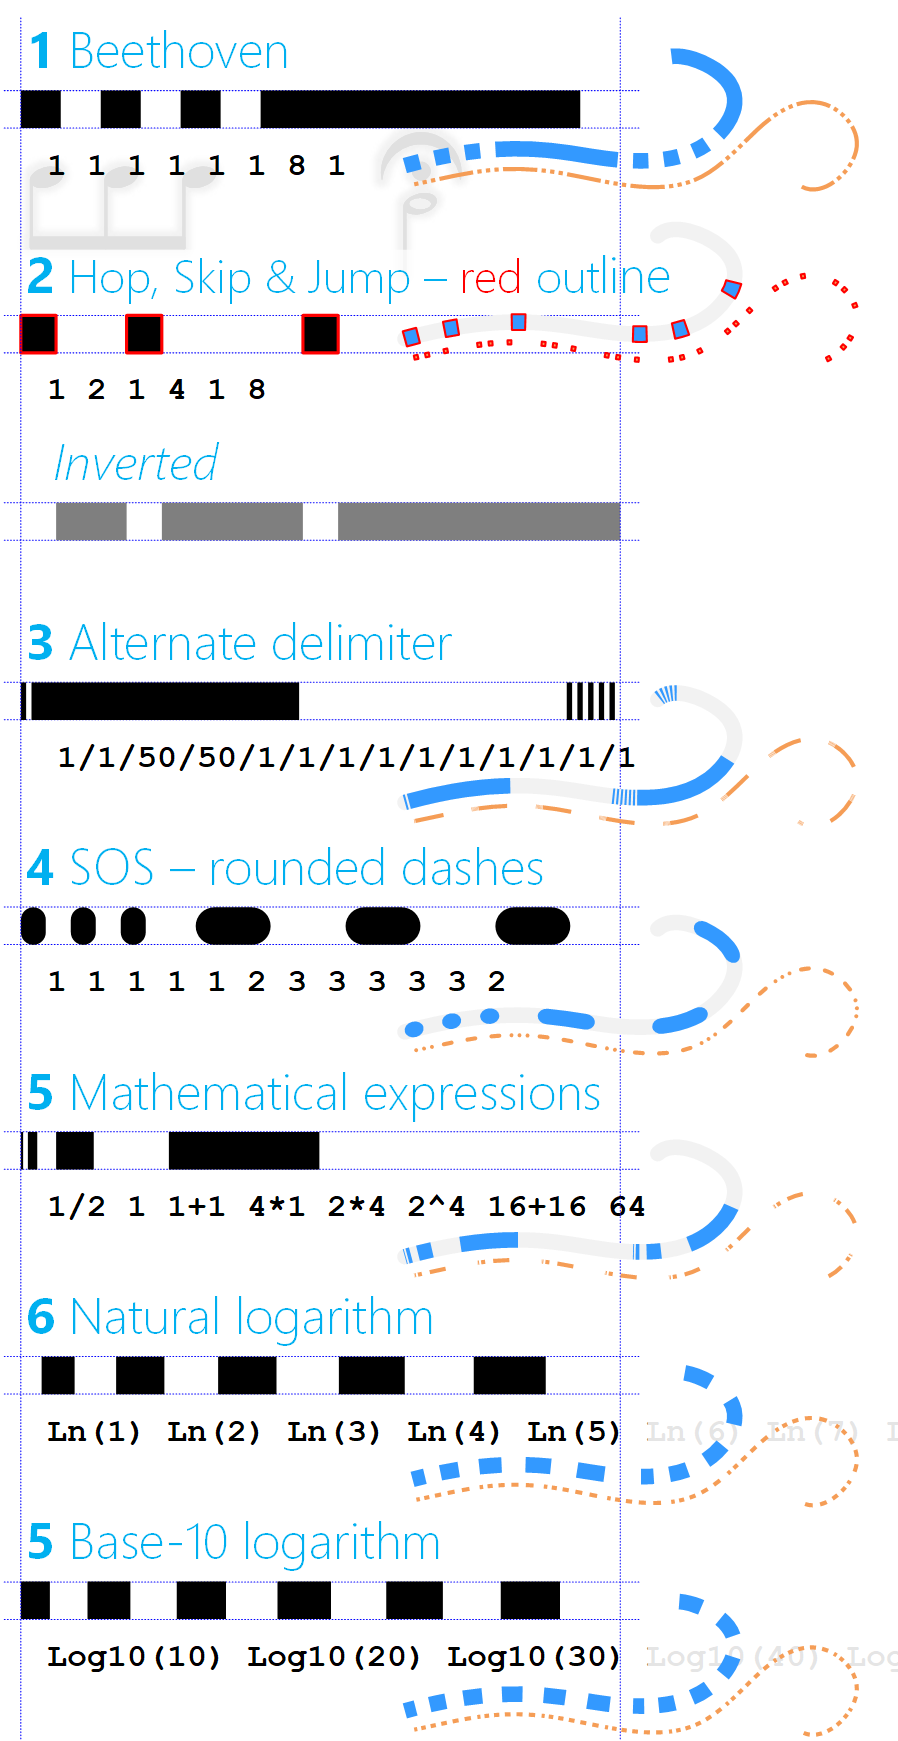
Did you recognize the rhythm from the opening of Beethoven’s Fifth Symphony? Or the Morse-code for “V”?
The shape lets you add up to 10 line-segments and 9 spaces, although you usually want to end with a space if you start with a line. Inside the shape’s ShapeSheet, a bunch of calculations are done to divide the width of the shape into segments that match the pattern that you specify. If you type in too many arguments, the text will turn red, but the shape shouldn’t react in any adverse ways.
Note: since a dash-array is all about proportions, “1 2 1” will give you the same result as “400 800 400”.
Here are some examples I’ve coddled together using the new SmartShape:
click to view larger image
The shape also comes with a number of options, which you can access via the Shape Data panel, and via right-clicking:

Show Text
You can turn off the text. This isn’t super-important, because when you dump the shape into a line-pattern master, the text is ignored. But you may want to look at your pattern “in peace”, so to speak. You can still edit the text when it is hidden: just double-click the shape, or select the shape and press F2, or select the shape and just start typing.
No Outline
Custom line pattern definitions can have a fill color as well as an outline color. When you apply the pattern, anything that is black in the pattern definition will take on the line color. So if you have a fixed outline color, you won’t be able to change that when it’s applied to a shape. Also, the weight of the outline may obscure the filled parts of the pattern when applied to thinner lines. In principle, custom line patterns should have no outline.
See pattern 2 Hop, Skip & Jump in the examples above to see an outlined line pattern.
Inverted
You can easily swap the space and dash portions of the pattern by right-clicking or flipping the Inverted Shape Data field. Look just below pattern 2 Hop, Skip & Jump to see an example of an inverted pattern.
Rounded Dashes
Example pattern 4 SOS above, has rounded dashes, which look pretty cool, in my opinion!
Delimiter
You can choose to have a custom delimiter, if you don’t like the space. Maybe 1/2/1 is easier for you to type or read. Built-in choices include: space, slash ( / ), and vertical pipe ( | ), but you can type in any delimiter that you want, and it should work.
Note, your choice of delimiter may affect results if you enter mathematical expressions (see examples 4, 5, and 6 above)
Creating Custom Line Patterns with the Shape
So once you’ve created a new dash array, how do you create a custom line pattern that you can apply to your Visio shapes?
Well, there are a few references on the internet:
- Release the Power of Visio Custom Line Patterns
- Visio Guy: Custom Line Patterns
- Chapter 10: Custom Patterns from Developing Visio Solutions
But I’ll recap the steps briefly here, in case you need a refresher:
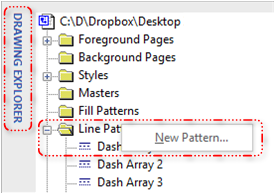
- Make sure you’ve turned on the Developer tab
- Show the Drawing Explorer from the Show/Hide group on the Developer tab
- Copy your dash-array shape
- Right-click the Line Patterns leaf in the Drawing Explorer and choose New Pattern…
- Set the Pattern Properties in the dialog that pops up.
Enter a name, choose the Line pattern radio button, and choose the Behavior that you want.
Generally, the left-most icon, which is the default, is the best choice.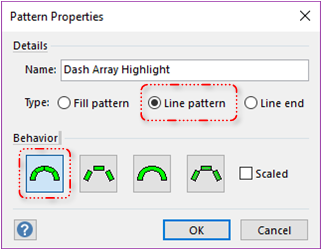
- Double click the new entry under Line Patterns to open the pattern-master-editing window
- Paste your shape into that window, then close the window.
Did you notice that I used may own custom line pattern–made with this shape–to highlight areas of the screen shot?

Applying a Custom Line Pattern
Once you’ve created a custom line pattern, you apply it to shapes in a similar fashion to using any of Visio’s 23 built-in line patterns.
- Select any number of shapes in the drawing window
- Press F3 to show the Format Shape panel, if it is not already showing.
Alternatively, right-click a shape and choose Format Shape at the bottom of the context menu. - Expand the Line leaf under the “Bucket” tab of the Format Shape panel
- Scroll to the very bottom of the Dash type list. Custom line patterns are listed by name at the end of the drop-down list.
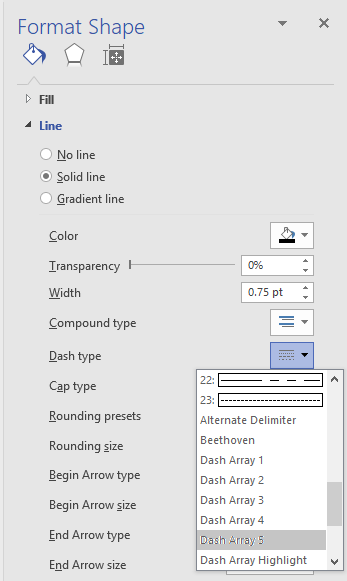
Note: custom line patterns don’t show as a preview in any of Visio’s UI. And they don’t show up in any of the short lists that you can use, such as on Home > Shape Styles > Line or when right-clicking a shape and using any of the formatting shortcut menus.
Transferring Patterns
Custom line patterns are stored as hidden masters inside of the Document Stencil. The Document Stencil is a local repository of masters that have been added to a document. These masters can be used on any page within the document, and the don’t require the original stencil from whence they came. This allows Visio documents to be portable. You can send just a drawing file to a coworker, without including stencils that they might not have–the masters you’ve used have been copied to the local Document Stencil!
When you apply a custom line pattern to a shape, the line pattern master becomes “referenced”, so to speak. If you then copy the target shape to another drawing, it will bring the pattern master along with it. You won’t see anything happen, unless you are monitoring the Drawing Explorer. So you don’t need to explicitly and manually copy pattern masters from one document to another.
However, what if you want a whole set of custom line patterns to be available in another document, but they are not all being used in the document? There are two methods you can use:
Leave the Source Document Open
When you use the Dash type drop-down in the Format Shape dialog, ALL custom line patterns in all open documents are available. So just leaving a “source” document open makes it easy to access a set of custom patterns.
You can even make a “pattern stencil” and save it to Shapes > More Shapes > My Shapes. One way to do this: delete all the pages and page-content in a copy of your source drawing file. Delete all local masters in the Document stencil, but not the pattern masters! (Hint: go to: Shapes > More Shapes > Show Document Stencil, then delete all of the masters.) Then, just save the document as a stencil, instead of as a drawing file. You can save it to your My Shapes folder, which is located at: %userprofile%\Documents\My Shapes, and the stencil will be easily accessible from any drawing you edit in the future.
Create a Pattern-Transfer Shape
Draw a bunch of straight lines, and apply each of your custom line patterns to a different line. Select the lines and group them together (grouping shortcut: Ctrl + G). Now you can copy and paste this shape into any drawing, and all of the custom patterns will come along for the ride.
Better yet, add the pattern-transfer shape to one of your stencils (perhaps located in My Shapes), and you can access the pattern-transfer shape by opening a stencil, and dropping the master onto a page. Then you can close that stencil, as it won’t be needed any more, and you can delete the pattern-transfer shape, too! The custom pattern masters have been copied to the Document Stencil, so you don’t need the shape anymore!
Or, you could just leave the stencil open, and all of its custom patterns will be available to all open documents–no need to drop the pattern-transfer shape into the document.
Keep in mind, a well-built pattern-transfer shape can serve as a legend for complex drawings that use lots of custom dash arrays!
![]()
Get the Dasharray Shape!
You can get the Stroke-Dasharray SmartShape here. Note: the download is in the Visio 2013 and newer format (VSDX)
Download “Stroke-Dasharray Shape for Visio Custom Line Patterns”
s!Aj0wJuswNyXlhiqlUhGPWqf4bx-r – Downloaded 3843 times – 103.00 B


Very informative article!!!
Thank you very much for this.
This is exactly what I need for the project I’m working on.
nice post