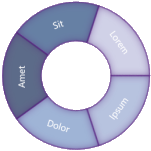
Visio list shapes are pretty cool, but they only work in straight lines. I’ve attempted to make a list shape that allows you to place and reorder items around a circle. It’s a bit of a hack, but it works!
Edit: 2022.04.07 I’ve fixed the file so you can now edit the text of the items and the new download is hooked up. See the download button at the end of the article!
Introducing the Radial List Shape
Simply put: the shape uses a Visio list shape to arrange arc sections in a radial pattern:
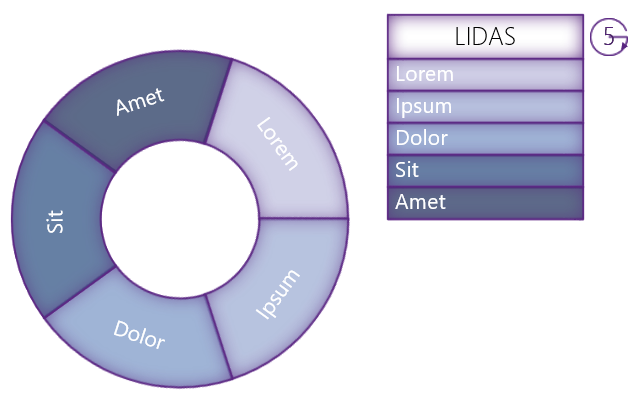
The “LIDAS” box on the right contains the list items that you can add, remove, and rearrange. You can edit the text of each item and change it’s formatting. These changes are reflected in the arc segments on the left.ffra
You can change the size of the circle, specify the ring thickness, and move it all relative to the list. You can set the starting angle, and arrange the item in a clockwise or counterclockwise direction. When you’re done tweaking the items, you can hide the list and display just the circlular list.
The reason for the abstraction is that Visio only supports straight-line list shapes. There is no option for easily placing items in a circle, and retaining the ability to easily rearrange them.
Containers and Lists
Visio 2010 added new structural diagraming shapes, which included callouts, containers, and lists. Containers and Lists basically added the concept of “soft grouping” to Visio, allowing you to manage sets of related shapes without having to bury them in groups.
Lists are of particular interest this post, because I made use of a custom-built list shape to help in ordering the radially-distributed arc shapes.
Lists easily carry around non-grouped member shapes just like containers. And, they allow you to quickly re-order members with no fuss! Visio automatically makes space for list items as you drag them, and collapses the gaps left behind.
Lists and containers duplicate their members when copied, and delete the members along with the list or container. You don’t have to remember to select everything before duplicating or deleting.
The animation below shows how you can add items to a list, re-order them, and easily duplicate/delete entire lists along with their members:
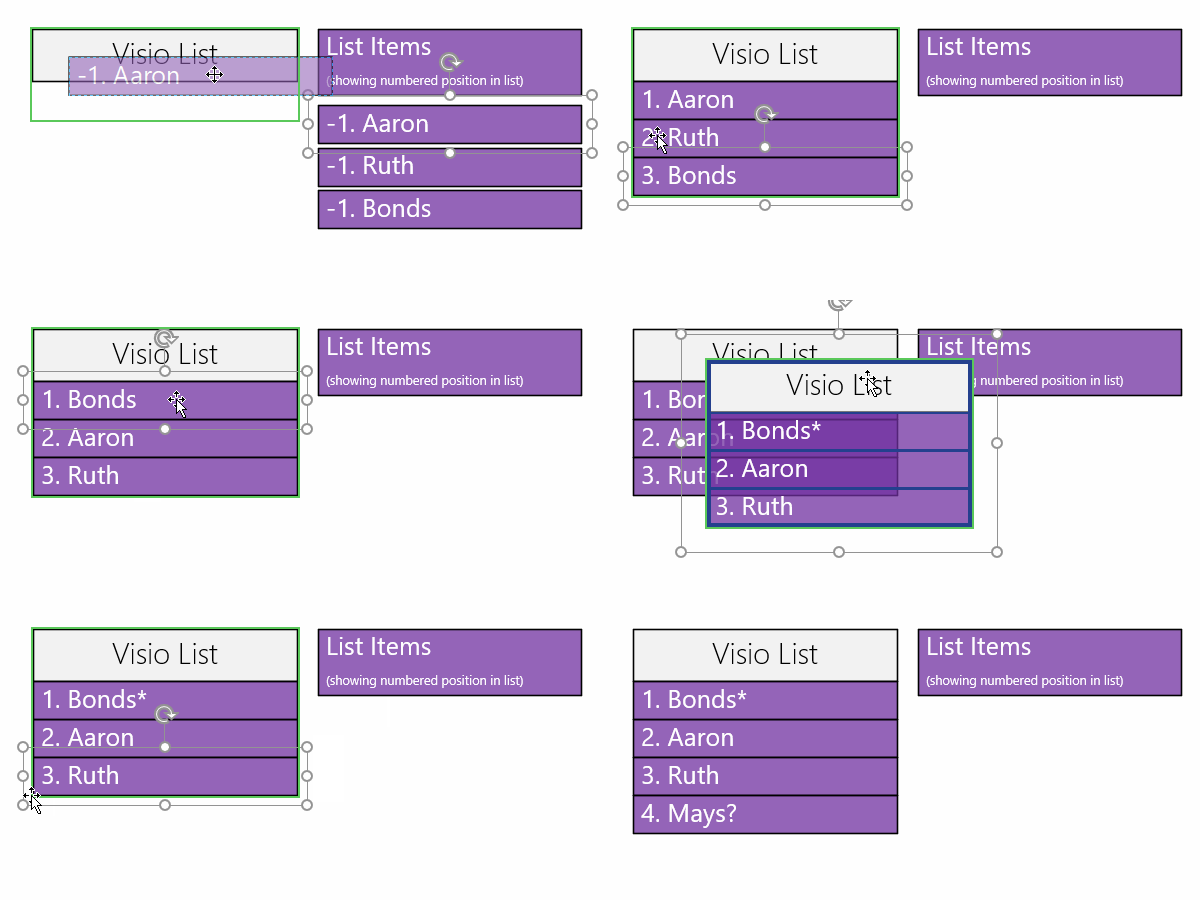
Note that a bit of ShapeSheet magic was used to get the list-position to show up at the beginning of each text block. It’s not a built-in feature available to end-users, but i9t’s simply a matter of putting the LISTORDER() ShapeSheet function to use, or using it as part of a custom formula in an inserted field.
If you’ve not discovered these features, check out these videos that accompanied my Visio 2010 book:
3.1 Organizing Visio Shapes with Containers
8.2 Using UI Enhancements for Cross-functional Flowcharts in Visio 2010 (the swimlanes use the list feature)
Containers and lists offer improved user-interaction over grouped shapes in that they allowed related shapes to be moved as single units without being buried inside of groups. Users could still access container and list member-shapes without having to understand subselection. The member shapes remained at the “top-level”, so to speak, and users could continue to easily access Shape Data fields, right-click context menus, and formatting for the individual shapes.
Lists are really cool because they maintain a tight ordering of shapes in horizontal or vertical directions. You can easily move shapes up or down in the list order, and Visio manages the sliding of the other list members to maintain a compact order.
Radial Lists
As the popularity of my Text on a Circle Visio Shape product and a glance at the d3 data visualization js library Gallery will attest, “circular stuff” is all the rage these days. So I thought it might be neat to create a circular list in Visio.
As delivered from Microsoft, lists are straight-line affairs only. You can get them to go left-to-right, right-to-left, top-to-bottom, or bottom-to-top, but you can’t get them to go in circles.
So I came up with a bit of a hack: use a top-to-bottom list, but associate an arc with each list item shape.
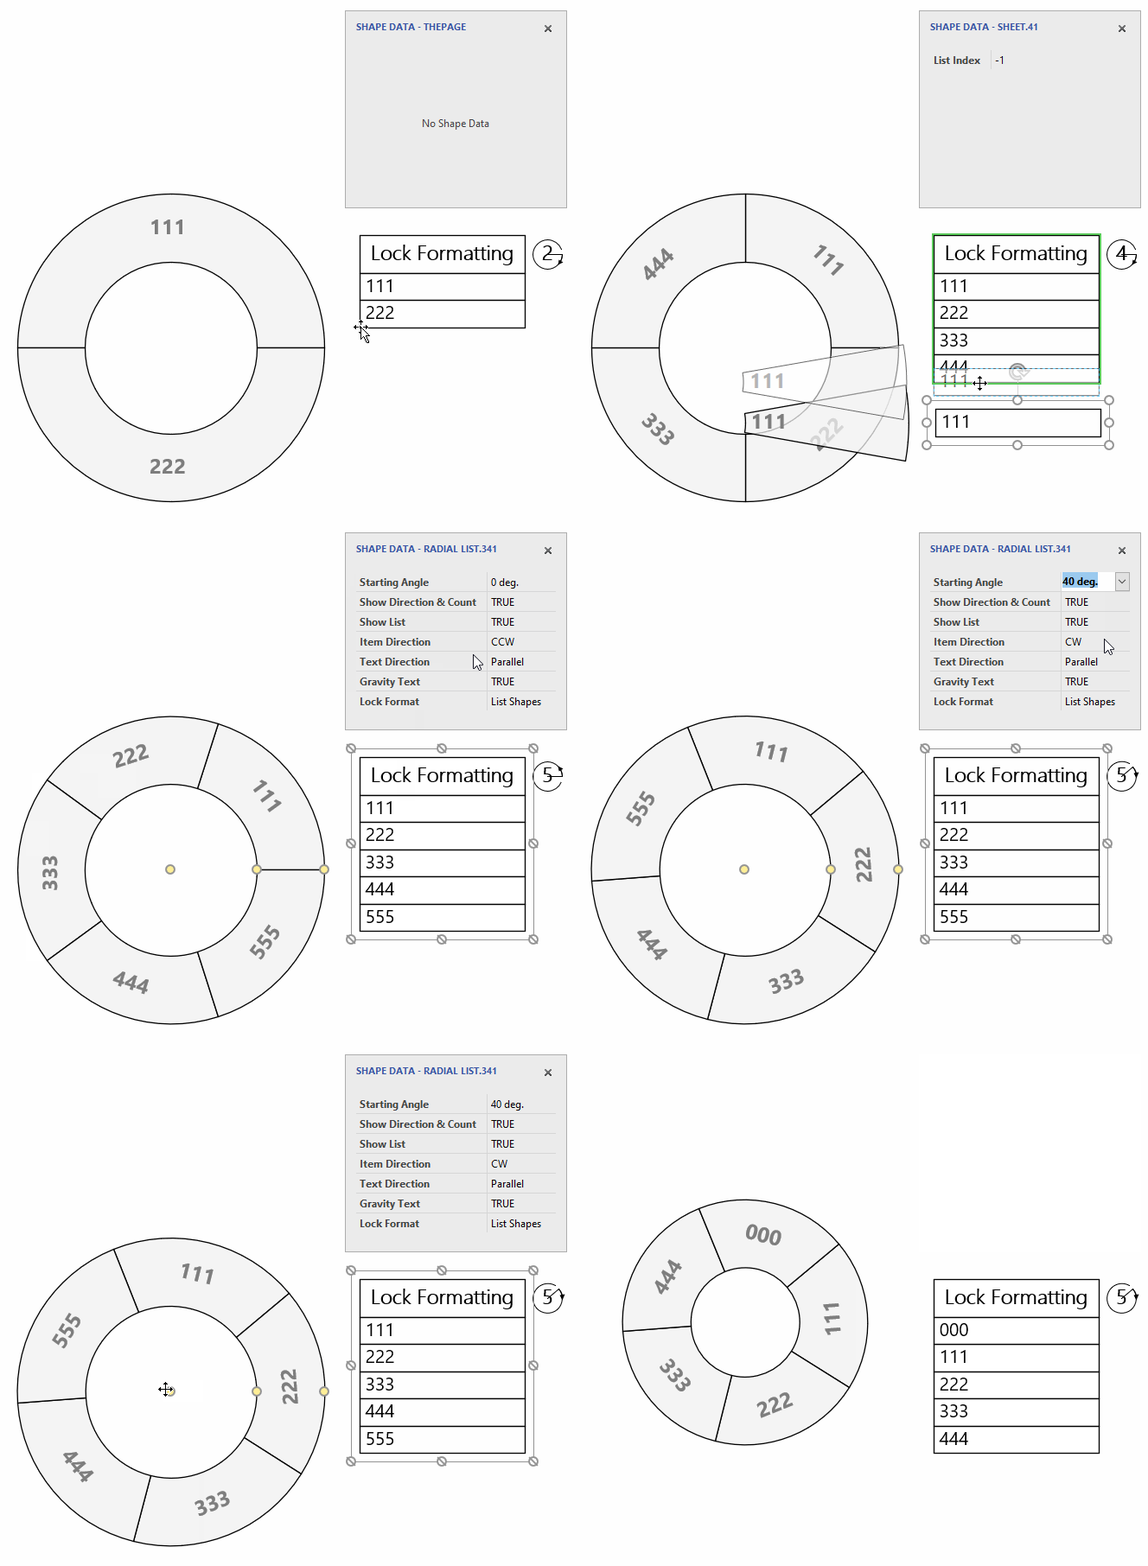
Here’s a little animation that shows it in action:
Features
As is usual with my offerings, the shape has quite a few features, which will hopefully help you to adjust the shape to your liking. A look at the shape data panel and the right-click context menu for the list frame give you an idea as to the options that this shape system offers:
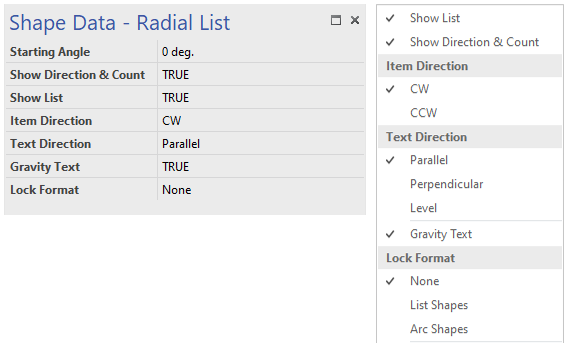
When you right-click one of the arcs, most of these features are also accessible. Note: using the wedge context menu options affect all of the list items, not just the individual arc.
Control Handles for Ring Thickness and Postion
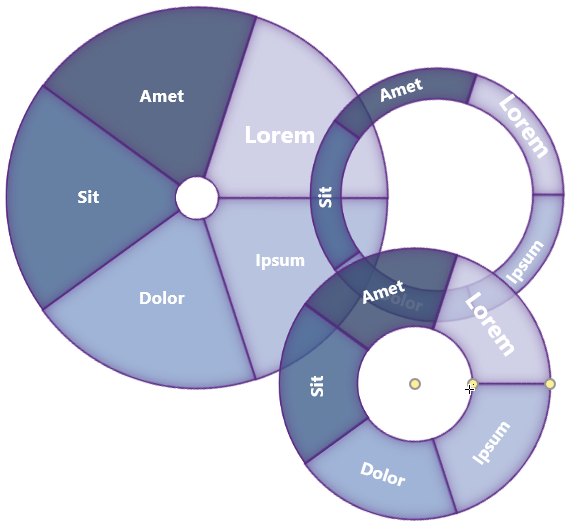
When you select the list frame, you will see three yellow control handles. These allow you to adjust the center of the circle relative to the list, as well as the inside and outside radii for the arcs. Yes, it is a bit weird to have to select the list frame to get these handles, but I couldn’t think of an easier way to control these aspects of the system.
Showing and Hiding the List
When you’re done arranging and tweaking the size of the rings and the order of the items, you can hide the
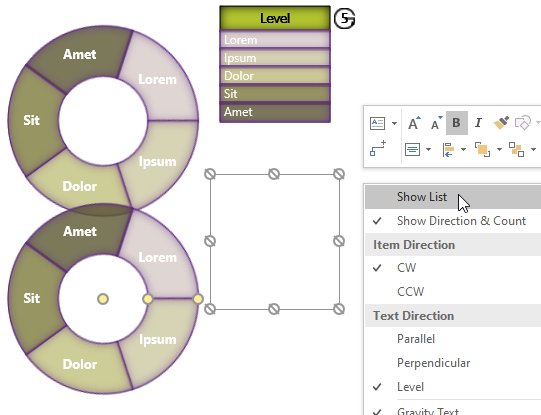
If you use the graphic in another application, it is probably best to paste as a metafile, picture, or bitmap. If you just use the default paste, you might be embedding a Visio object, which could preserve a bunch of empty space around the circle (where the list used to be…)
Item Direction
The list items are always ordered from top to bottom in the list frame, but on the circle, you can choose to order them in a clockwise or counterclockwise direction. You can use the shape data panel (for the list frame) to specify the starting angle as well.
The little squiggle next to the top-right of the list frame indicates the direction that the items flow around the circle, the starting angle, and the number of items. The red and blue below highlight the link between shape structure and the adornment icons:
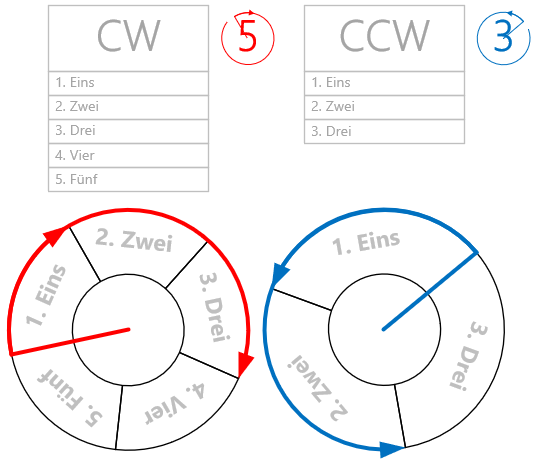
You can show and hide this adornment via Show Direction & Count in the context menu for the list frame.
Text Direction
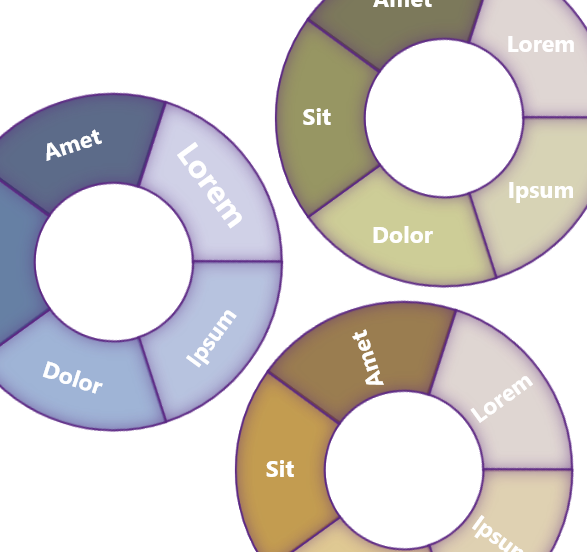
You can pick from three styles of text orientation: parallel, perpendicular and level. If you have the Gravity Text option checked, then text will orient itself so that it is readable from the bottom or right-side of the page. This keeps text from appearing to be “too upside down”.
Formatting
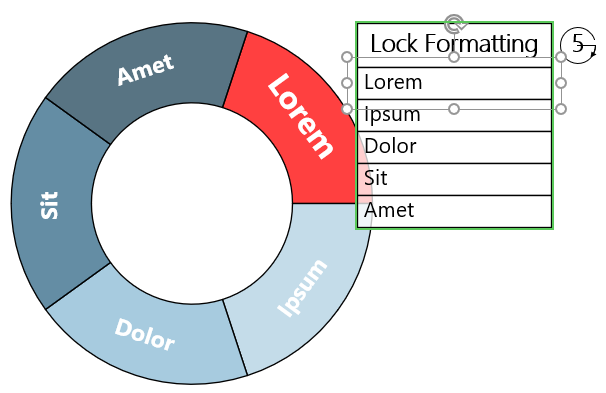
You can Lock Format for none of the shapes, for the arcs only, or for the list items only. This can help keep your working drawing a bit simpler. You can format the whole thing to be something simple, like black text on white fill. Then you can choose Lock Format: List Shapes. Now when you select an item and apply formatting, it will only affect the arc shape, as shown here:
Limitations
As I alluded before, this shape system is a bit of a hack, but I think it works well for what it is. However there are limitations, and they might not all be obvious from reading the examples above. They include:
- Arcs are all the same size–there’s no option to link the arc to any kind of data, that controls their arc-lengths.
- Text on arcs is straight-line only. For this reason, fairly short strings work better than long ones–especially for the parallel text orientation.
- Hiding the list via right-click is awkward, but better than nothing. (Espcially when you realize you need it to be visible more often then you think!)
- Moving the circle relative to the list using the control handle also feels awkward, but I think it’s necessary to ensure the portability of the shape. A system of loose shapes could be built, but it would be hard to distribute them via a stencil.
- Pasting into other documents might include a puzzling invisible area that the hidden list occupies, so be sure to Paste Special as metafile, picture, or bitmap.
- Fiddling with items in a straight-line list in order to create a circular layout might be an odd abstraction and a conceptual headache for some users.
Related Reading
If you’re intrigued by Visio’s container and list shapes, be sure to check out these other Visio Guy articles:
- How to Count the Number of Items in a List
- Using Visio 2010 Containers & Lists to Create Server Drilldowns with Excel Data
Get the Radial List Shape…For Free!
Download “Radial List Shape”
s!Aj0wJuswNyXliCqgQUzoONpz5dRp – Downloaded 3479 times –If this proves to be a popular download, I’m considering adding a bunch of features and making a for-sale, “pro” version. Additional features would probably include:
- Actual text-along-arc, like the Text on a Circle Visio Shape
- Option to span less than a full circle arc (ie: any angle between 0° – 360°)
- Mechanism to allow for different arc sizes
Leave a comment below if you’d be interested in such a beast!

Hi – Quick question – is there a maximum to the number of wedges or list items that the radial list can take?
Each shape contains all the necessary elements for the list part and the circle part, so theoretically unlimited – or whatever Visio’s limitation of list members is (if any). At some point, it will become practically unmanageable, of course!
Please how do I change the numbers in each of the list shape to text? I want to add my own texts but couldn’t. I saw that you have different texts in each of the circle list in the example. Thank you
Hi Lydia,
Please read the article, it is all painstakingly outlined there. The idea is that editing text in the actual wedges of the circle is a pain, especially if you want to re-order items.
That is why there is a LIST shape, where you can easily enter text into the rectangles, and re-order them by moving them up and down. This is much easier than fiddling with the circle itself.
Hope this helps!
Chris
I’m with Lydia. Running Visio 365 Pro and can’t for the life of me work out how to change the numbers in the list to meaningful text.
Oops, I see that the text IS locked for some reason. Sorry for that. I must have done some odd step just before I published the thing.
I’m looking into it right now to see how I had intended it to work, so that I fix it properly!
So sorry for all of you who have struggled to edit the text. I must have been rather frazzled when I posted this originally. Also, for some of my responses to the earlier comments–I think I had a different article in mind, and didn’t read very carefully.
I’ve just fixed the file so you can now edit the text of the items! Just double-click a list shape to edit the text. The numbers will auto-update, but you can easily overwrite them if you don’t need auto-indexing.