 If you create your own Visio shapes or make drawings that have elements arranged circularly, then you may have experienced frustration.
Visio has the tools to draw circular-arrays of objects, but learning to do it takes time. There are no direct “arrange stuff in circles” functions. You have to cleverly use other functionality to get the job done.
To make things easier for you and me, I invented the Radial Elements Tool solves some of these problems. With this tool, you can create circular arrays of customizable tick marks in seconds!
The easiest way to understand this shape is to watch the animation or the video. The shape has some non-conventional features, which are hard to understand from static images.
Here’s an animated GIF (click to view animation!)
Click to view full-size, animation!
And here’s a narrated video on YouTube:
If you enjoy reading, a full explanation follows…
A Shape With Design Mode, Cool!
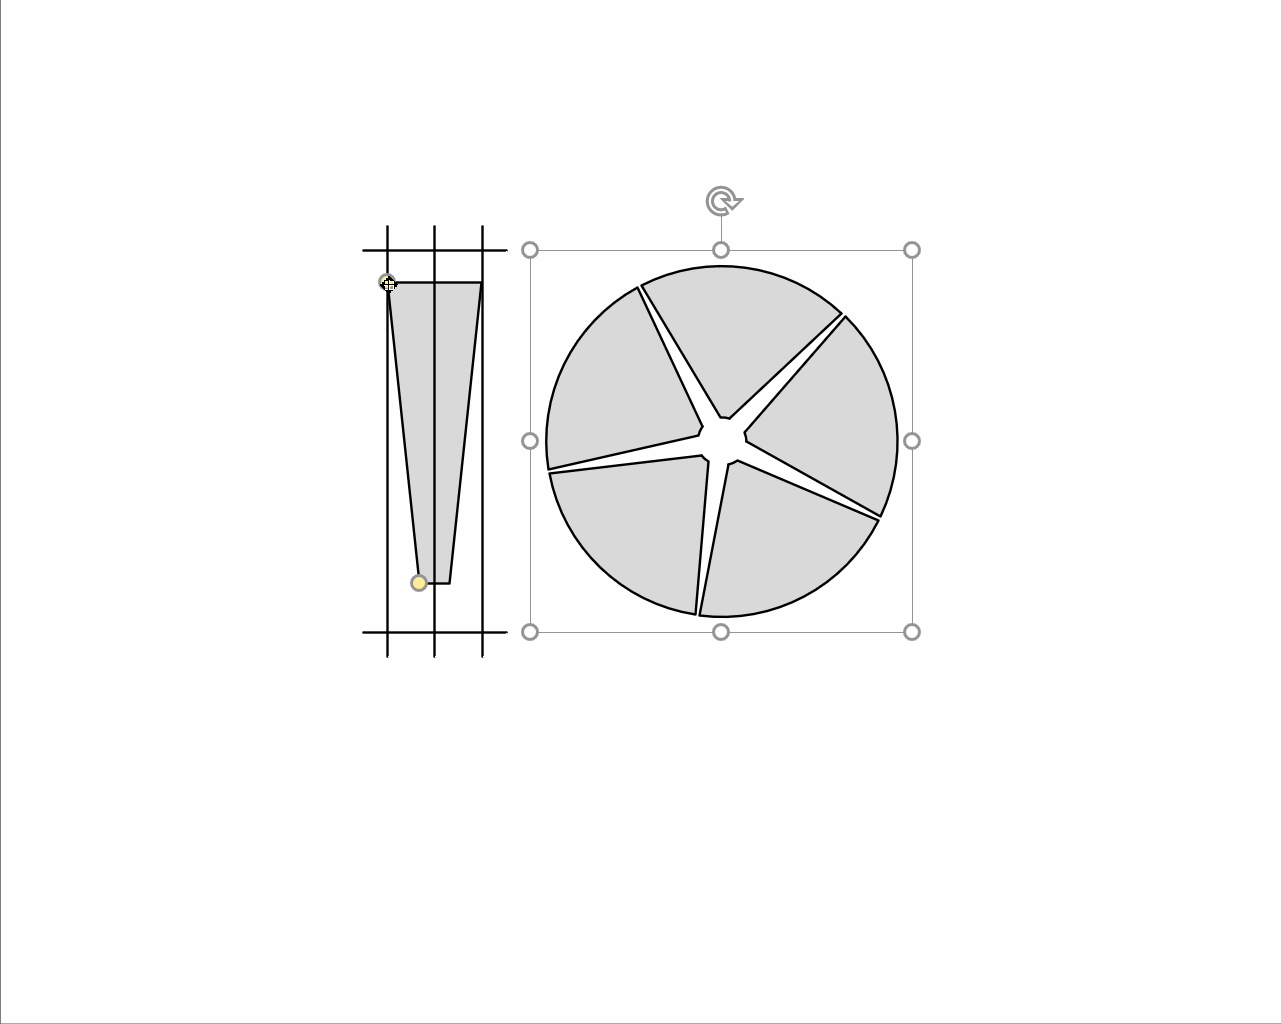
When you first behold the the Radial Elements Tool shape, you’ll notice the useful-looking right side, then you’ll wonder at the left side, which requires some explaining:

That frightening bundle of lines on the left represents the design area. The little yellow control handles let you specify the look of the tick marks. If we pull on the handles, we change the shape of all the marks simultaneously!
The faded gray version in the background shows what the shape would look like if we moved the handles to different locations. The five orthogonal crisscrossing lines serve as guides to show you the maximum size that a tick mark could occupy.
This illustration shows how the design area maps to the actual shape:

More on Tick Mark Design
The easiest way to understand is to download the Visio file and play with the shape. But if you’re enjoying a nice cup of coffee at your favorite locale, and don’t feel like proper computing right now, read on as I try and explain with pictures.
If the design area has a full-sized rectangle, that maps to a perfect wedge in the shape:

If we move the handles up to have a half-height rectangle, we get perfect wedges that form a ring:
If we make a wedge in the design area, then the wedges in the ring become even more…well…wedgey!

Features of the Radial Elements Tool
But wait, there’s more! The sharp eyed reader will have noticed different numbers of wedges in the shapes shown above. That’s because there are four more features that you can control via Shape Data fields.
Just open the dialog via View > Shape Data Window, and you’ll see them, just waiting for you to tweak:
- Items – specify from 2 to 20 tick marks around the circle
- Design Mode – turn the design area on and off
- End Caps – make the ends of each wedge square or arc-shaped
- Starting Angle – offset where the first wedge is drawn. With zero, the first wedge is centered on the right horizontal, at “3 o’clock”
Here are two variations, with all four properties changed in each example. This guy has seven items, Design Mode hidden, rounded end caps, and a starting angle of 25.7 degrees, which centers the gap between the last and first wedge at 3 o’clock:

Here we add more items, turn Design Mode on, make square end caps, and set the starting angle to zero:

Using the Radial Elements Tool to Design Shapes
Once you know how to control the shape, you can use it as part of more complicated shapes. When I create shapes with the tool, I usually don’t include the shape in it’s smartened form. Instead, I use the Boolean operations under the Shape > Operations menu to create something simpler.
To see what I’m talking about, check out the way I create a gear using the tool:
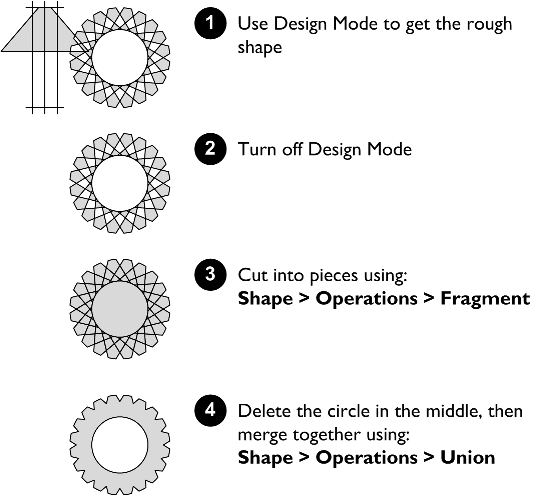
click to view larger image
The final gear shape can’t be configured any more. It has been lobotomized–it’s smarts lost forever. But the resulting shape is neatly and accurately drawn, is compact, and is ready to become an element in a more sophisticated graphic!
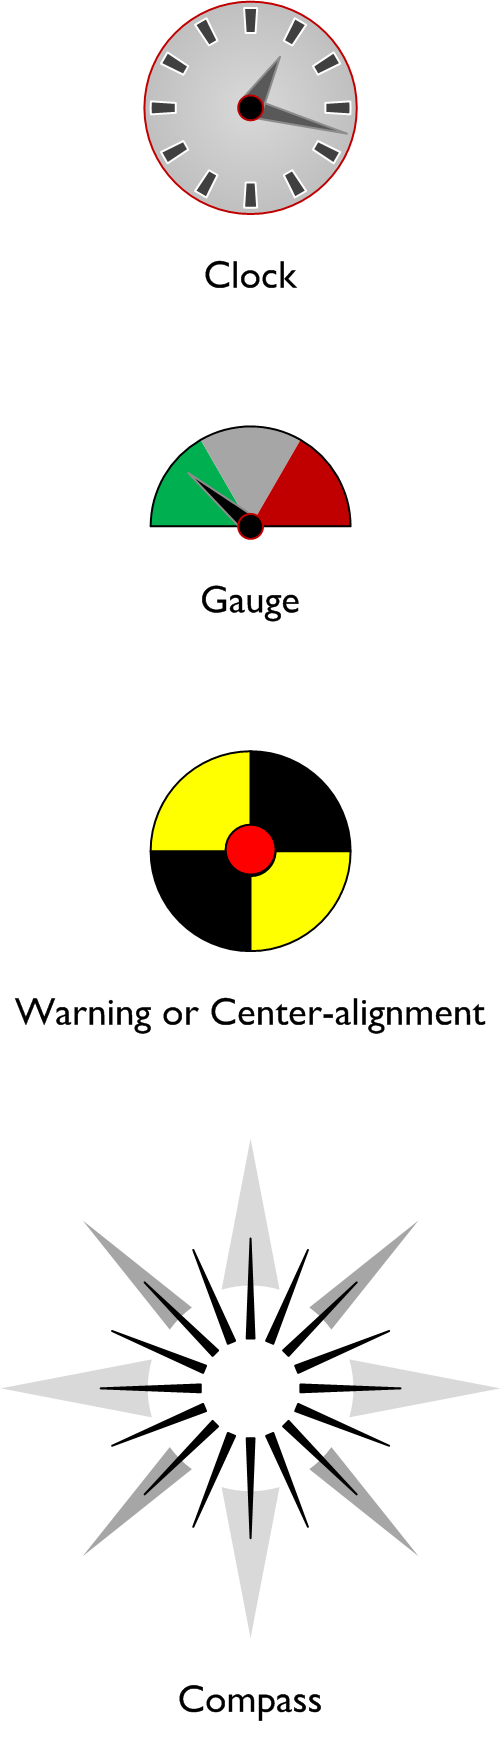
Example Shapes Built from the Radial Elements Tool
Here are some shapes that I quickly designed using the tool as a basis:
 click to view larger image
Get the Radial Elements Tool (free!)
So here’s the download you’ve been looking for! The free version will let you fiddle with a maximum of 20 wedges.
Note: because this SmartShape uses User-defined ShapeSheet Functions, it can only be used with Visio 2007 or newer!
Enjoy!
Download “Visio Radial Elements Tool”
s!Aj0wJuswNyXlhyaoiHkNDWGj_Ova – Downloaded 7848 times – 103.00 BOnce you’re familiar with the shape, and decide you need more, more, more! wedges, then check out…
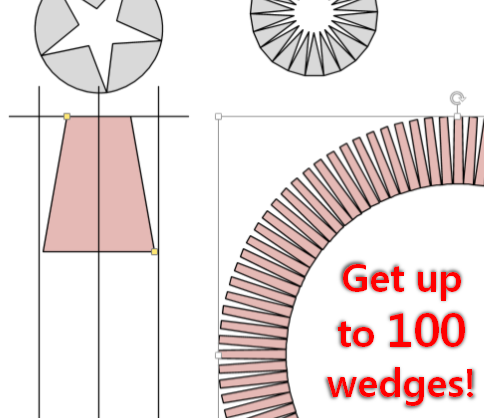
Radial Elements Tool “100”. More Wedges! Not Free!
So you need more wedges, and I gotta eat. So I’ve got a Bigger Version that handles up to 100 wedges, for a nominal fee.
The tool/shape works just like the free version, with the same, easy-to-use interface. So you can test out the free version without commitment, without registration, and decide to upgrade at a later time.
You can get the RET 100 from my store at Gumroad. Just click this link:
Radial Elements Tool with up to 100 Wedges

Any thought to allow user to drop a shape in the “square” and then the tool uses that shape to do the radial stuff.
Since “square” is present and assuming drop shape would be added to the “square” group, the tool could pick up the subshape and apply and user could alter the subshape (smaller/bigger) in the “square”) and apply it to the radial stuff.
Actually have a project where this might be very useful so glad this tool was created (did this manually and boy its tedious!!).
Wow. Impressive work Chris.
Very cool shape! The “Design mode” is quite clever and I love the visual nature of its configuration.
Thanks John! Glad to see you stopped by,
– Chris
Hi Ted,
For this tool, I wanted to make something that was “shape only”, that could then be blasted by fragment and union and used in other shapes. Shapes are so much more portable than code, and no one has to trust your VBA project.
But your idea is a good one. I could probably modify the Visio Network Server Shape Icon Customization Tool to get a “hot region” like you suggest.
You might also check out the Visio Snowflake Generator. This might do what you want already, although I think it only does 6 * 2 repetitions. 6 mirrored sets of your original element…
I have opened the Radial Elements Tool and I do not get the Shape Data Window item in the the View drop-down. What am I doing wrong?
Hi Falizar,
Right-click the shape and choose Data > Shape Data. If you don’t see these items, you might be using an older version of Visio. If so, try looking in the main menus for View > Shape Data or View > Custom Properties.
You are correct, I am using 2003!!!!!
This shape is magnificent! I’ve been playing with some VBS to increase the number of geometries to create calendar-like radial shapes where each geometry represents one day.
I noticed that if are trying to radially distribute circle shapes, that you cannot “spoof” the shape by changing the bend setting to arc. The shapes that are generated are cool looking but asymmetric.
Why the limit of 20 geometries? Can shapesheets spawn geometries without vbs using say on a user.Items_Count row?
Nice Nice Nice Nice Nice
Hello All,
I’ve run into a paradox… Is it possible to manipulate the fill properties of geometries independently?
Thanks,
Nick
Hi STHBRDG,
No, a single shape can only have one combination of line and fill attributes. If you need different colors, line weights, line patterns, fill patterns, etc. then you need to group several shapes together.
Also, on the geometry section topic – no Visio shapes can’t generate geometry sections. They have to be pre-built, then hidden or shown as needed. That’s why the limit is 20. I could make one with 40, 60, or 100, but it’s a matter of time and how much I want to give away for free. 🙂
With code, you can generate more geometries. I think it would be interesting to come up with a generic framework and create an add-on that shapes could call with a very simple set of parameters. This would enable lots of shapes built by lots of people to have this type of capability, without a proliferation of add-ons.
Hi mate thanks for this have been making circle shapes manual until now this is a big time saver.
Great Tool
How do I gain access to this tool?? Help, Please!
Click the link in the blue box?
Clicking the link in the blue box takes me to the “NO Access” tab.
Hi Scott,
I had to change download manager plugins, so things have been a bit haywire. I believe that this download requires that you are logged in. The old plug in told you that, the new one just gives you the weird error, what fun!
So you have to have an account on this site to get this download. I’m trying to clean this all up, but I have a day job as well…sorry for the mess!
Chris
I would love to use this extension, but I CANNOT download it. When I click on it my browser tells me I have NO ACCESS to it.
Can you please let me know where can I download it from?
thanks and good job!!
Nevermind, just read I have to logon… I tried yesterday but couldn’t find how to do it. Now I did, so all clear. Sorry for the inconvenience.
Hi PG,
I unchecked “members-required” from all the downloads, so let’s see what happens! 🙂
Thanks a ton Visio Guy! This is great, it has already saved me a lot of time. I am dealing with radial images for my research and I needed to visualize things. Drawing things by splitting the circle was too time consuming.
I am working with Visio 2010 Professional. I am soooo very excited to find a tool that give me equally spaced Tick marks. It is so much harder to evenly space when you have an odd number. I downloaded the Radial Elements Tool and all I got was a 1 page document showing some of the things the tool can do. My ShapesData box is empty and says “No Shape Data”, What did I miss doing??
Hi Terry,
I don’t really understand your problem. The documents I provide usually show the ACTUAL SHAPES in action. So all of those examples are real Radial Elements shapes that you should be able to play with.
Try watching the video as well:
https://www.youtube.com/watch?v=2cUHCKbNF38
You can drag one of the shapes onto your favorites stencil (More Shapes > My Shapes > Favorites), or any stencil for that matter, so that you have convenient, quick-access to the shape from any drawing.
Do you have a similar radial elements tool that allows non-symmetrical shapes to be arrayed,such as fan blades?
Hi Chris,
No, I don’t have any asymmetrical versions of the shape. I wonder if you could use several of these shapes, stacked on top of each other, with different profiles, and perhaps radially offset to get the job done?
Visio has boolean operations that are good for combining or slicing overlapping shapes. You could stack your various profiles, then use Developer > Shape Design > Operations > Union to make one shape.
Hi Chris G,
I sent you a link to a prototype of what you were asking for on June 23. Not sure if you received the email, or if it went to junk. If you replied, I didn’t see it.