
Today’s post, like the Visio Guy web-site, is all about creating smart graphics.
We’re going to create an evergreen tree shape that fades as its size decreases. With this one single SmartShape you’ll be able to illustrate an entire forest-scene that fades into the mist. And you won’t have to format each tree individually.
You will learn how to cut Visio shapes into pieces and union the bits together to form new shapes. You’ll learn how to add parameters to shapes, and fill them with Excel-like ShapeSheet formulas create sophisticated graphical behavior. And you’ll create a context menu that resets the shape with a click of the mouse.
The Added-value is Learning
Now I know what you’re thinking: I need to create Business Graphics! I need to improve my processes, achieve Six Sigma, ensure TQM, improve my score-card, analyze my KPIs, and focus on many things! Trees are for the Art Department, Adobe Illustrator and Mac Users!
Well, um…well, yes.
But smart BPM shapes are rather boring to look at, no matter how smart they are. Plus, everything you’ll learn in this article will help you to create smart, parameterized Visio shapes for any application.
So turn your monitor away from the corridor, go get a Venti Mocha Frappucino and hunker down with me for twenty minutes or so.
The Graphical Todo:
As winter descends upon the northern hemisphere, some of you may be tempted to use the office color printer to create holiday greeting cards for co-workers, acquaintances, friends and loved-ones.
Well, no Seasons Greetings card would be complete without a forest of evergreen trees, fading into a misty, snowy background!
So let’s translate the flowery phrase: forest of evergreen trees, fading into a misty, snowy background into the terse, bullet-point-filled language of the Smart Graphics Engineer:
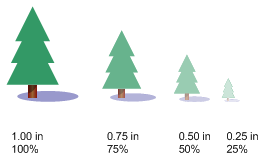
- Tree further away look smaller
- Tree further away look whiter
That means, we want to create this:

But we don’t want to select lighter colors for each individual tree (because we would go stark-raving mad if we had to…)
Make Like a Tree
Before we get busy creating smart graphics, we need to have some dumb graphics to work with. So let’s create our evergreen tree.
The tree consists of four parts:
- Bushy Part
- Trunk
- Trunk Shadow
- Ground Shadow
Build the Bushy Part and Trunk
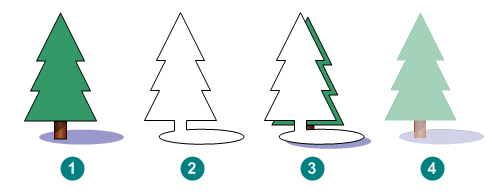
We can reduce the Bushy Part set of three elemental triangles that we will Union together. So let’s first create a single triangle. We do this by using the rectangle tool and the line tool or pencil tool. These can be found on Visio’s Drawing toolbar:
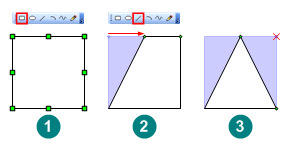
- Select the rectangle tool
- Draw a square (1)
- Select the pencil or line tool
- Select the top-left vertex of the square
- Slide the vertex to the middle of the shape (2)
- Select the top-right vertex of the square
- Delete this vertex by hitting the Delete key (3)
You should have a triangle! Now let’s finish off the Bushy Part:
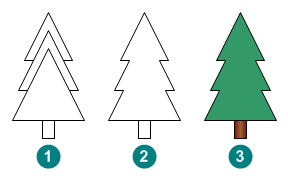
- Ctrl+Drag two more copies of the triangle
- Increase the size of each new triangle
- Position them directly underneath the first triangle, as shown in (1)
- Select all three triangles
- Choose Shape > Operations > Union from the menu to create a single Bushy Part shape (2)
- Draw a rectangle underneath the Bushy Part to form the Trunk
- Format the shapes using the menus: Format > Fill…, Format > Line… or the buttons on the Formatting toolbar
The use of the boolean operation Union (used in step 5) demonstrates a powerful way to build complex shapes from simple primitives. Also note that when we format the trunk, we use Fill Patten 26 to give the trunk a graduated fill that makes it look round. Just select brown for the Color, and a lighter brown color for the Pattern Color.
Build the Trunk Shadow
The Trunk Shadow is the little bit just under the Bushy Part that adds depth and realism (stop laughing) to our shape.
We create this piece using a process similar to that of the triangle:
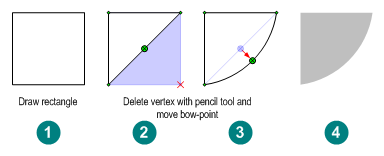
- Select the rectangle tool
- Draw a square (1)
- Select the pencil or line tool
- Select the bottom-right vertex of the square
- Delete the vertex (2)
- Select the pencil tool
- Drag the bow-handle down and to the right (3)
- Using Format > Fill, give the shape a black color, with 50% transparency (4)
- Align the shape on top of the Trunk, just under the Bushy Part
By giving the shadow a black, transparent fill, we automatically darken the colors of the underlying Trunk shape. We don’t have to worry about selecting two more shades of brown. No matter how the trunk is formatted, the transparent black will simply create a darker version.
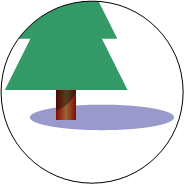
Build the Ground Shadow
The ground shadow is pretty straightforward, just follow these steps:
- Select the Ellipse Tool from the Drawing toolbar
- Draw a long, short ellipse
- Format the ellipse with a dark blue color and 60% transparency
- Send the ellipse to back using Ctrl+B or Shape > Order > Send to Back
- Position the ellipse under the trunk
We’ve completed the basic tree. Now on to the more sophisticated parts of the solution…
Build the Overlay
To make the tree fade as we reduce its size, we’ll create an overlay shape that covers all the tree, trunk and shadow shapes that we’ve just created. Then we’ll set the overlay’s transparency, depending on the size of the whole assembly.
This is how we create the overlay:
- Select all of the shapes
- Ctrl+Drag a copy of them all, or hit Ctrl+D to duplicate them all
- Select Shape > Operations > Union to create a single shape
- Format the shape so that it is white, with no gradient fills using Format > Fill…
- Align the overlay with the original shapes using Shape > Align Shapes…
- Give the overlay a transparent fill, say 50% to see how we’re doing
- Remove the outline from the shapes by:
- Selecting all shapes
- Using Format > Line…, give them a line pattern of None, or select No Line under the Line Weight or Line Pattern toolbar buttons (Formatting toolbar)
The easiest way to align the shapes (in step 5) is to select the Bushy Part, hold down the shift key, then click the Overlay. When you choose Align Shapes…, all shapes in the selection will be aligned to the primary selection–i.e.: the first shape that was selected.
Group the Shape
The last thing we have to do is group the shapes together. To do this, simply:
- Select all five shapes
- Hit Shift+Ctrl+G or Shape > Grouping > Group
You now have a single Tree Shape, with a transparent overlay that is ready for smartening!
Fade to Smart Shape
Now we need to figure out a way to get the overlay shape become whiter as the tree becomes smaller. When the tree is close to us, it appears to be larger, and less faded. When it is far away from us, it is smaller, and there is more mist between us and the tree, which makes it look whiter.
We are looking for something like this:
Another way to think of whiter is as less transparent. So 100% transparent is 0% white, and 0% transparent is 100% white!
Add User Cells
This calculating-the-transparency business will clearly require some math. Luckily, every Visio shape has a an Excel-like ShapeSheet behind it. This ShapeSheet is full of cells and values and formulas, just waiting to be put to good use by a shape developer like yourself! To find the ShapeSheet, just select a shape, then choose Window > Show ShapeSheet.
The ShapeSheet is what makes Visio different from so many other graphics applications. It allows shapes to store data and react to graphically to changes in the data, as well as to changes in the size and position of the shape itself. There’s some good ShapeSheet introduction information in an article by John Goldsmith: Just for starters. But for now, you can just follow the tutorial steps, and it will start to make some sense.
Add Custom Cells
In order to do our transparency math, we’ll need to add some custom fields to our shape’s ShapeSheet. So let’s go ahead and do that now by adding sections to the ShapeSheet that can hold our data and calculations:
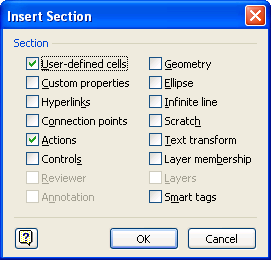
- Select your grouped Tree shape
- Open it’s ShapeSheet window using Window > Show ShapeSheet
- Select Insert > Section… from the menu
- Click User-defined cells and Actions in the dialog.
- Place the cursor in one of the User-defined cells
- Right-click and select Insert Row
You should now have two User-defined cell rows and one Action row:

click to view larger image
Rename Rows
The row names for our User-defined cells and Action rows aren’t very attractive or useful, so let’s give them some new names.
- Click on the left-most cell in the first row of the User-defined Cells section. This is the cell with the red text: User.Row_1
- Rename this row to: startingHeight
- Similarly, rename User.Row_2 to: transparency
Notice that you don’t have to type in the User. portion of the name. - Rename Actions.Row_1 to setStartingHeight
Set Smart formulas
Now that we’ve got some pretty cell-names, lets enter some formulas:
- User.startingHeight = 1.0 in (…or whatever the current height of your shape is)
- User.transparency = MAX( 10%, MIN( 100% , Height / User.startingHeight ))
- Actions.setStartingHeight.Action = SETF( GetRef( User.startingHeight ), Height )
- Actions.setStartingHeight.Menu = “Set Current Size as Starting Height”
- Actions.setStartingHeight.Disabled = ( User.startingHeight = Height )
You should have a ShapeSheet that looks something like this:

click to view larger image
User-cells explained
The user-cells allow us to relate the current height of the shape to the original height of the shape. And this allows us to create an expression that decreases the transparency of the overlay as the height of the tree decreases.
User.startingHeight holds the starting size of the shape. This is the height at which the transparency of the overlay will be 100%. We are essentially defining the size of the foremost tree in the scene – the tree that has Zero Fading.
User.transparency then calculates a ratio between this starting height and the current height of the shape. You can see the height of the shape in the Height cell of the Shape Transform section, located at the top of the ShapeSheet window. The Max and Min bits limit the transparency so that a shape doesn’t become 100% white.
Action row explained
The Action row creates a right-mouse menu on the shape, with the text Set Current Size as Starting Height. Try right-clicking your shape and see for yourself!
This action will allow us to re-define the starting size for our tree. If we decide in the future that a 3in tall tree should be the foremost tree in the scene, we can resize our tree to 3 in, then right-click this action menu item to redefine User.startingHeight. The SETF function in the Actions.Action cell overwrites the value in User.startingHeight with the current Height of the shape.
Keeping the ShapeSheet window open, try resizing your shape, then right-clicking this set starting height menu item. You can actually see the value change in the ShapeSheet!
Notice also, that the menu item becomes disabled after the first time you click it. That’s because the starting height and actual height of the shape are the same. When the two values are equal, the formula in Actions.Disabled evaluates to TRUE, thus disabling the menu item.
Hook-up the Transparency
We’ve got this nifty context-menu item, but it doesn’t do anything yet. That’s because we haven’t linked the FillForegndTrans cell of the overlay sub-shape to the User.transparency cell in the group.
To do this, we’ll need to learn about shape ids, cross-sheet references in formulas, and how to sub-select shapes inside of a group.
Sheet ID
In order for a sub-shape to refer to a cell in another shape’s ShapeSheet, you need to know the id of the other shape. So let’s get the id of the group shape first. Simply select your tree-group-shape, then choose Format > Special from the menu. You should see a dialog that looks like this:
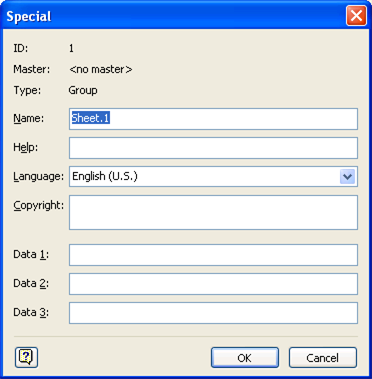
The id of the group is 1 in this example. From other shapes, you can reference cells using the prefix: Sheet.1!.
Sub-select a Shape
To get to the ShapeSheet of the overlay shape, you need to sub-select it. You do this by first clicking the group, then clicking again where the overlay shape is. If you look closely, you’ll see light-green selection handles that have a little x inside. This indicates that you’ve selected a sub-shape:
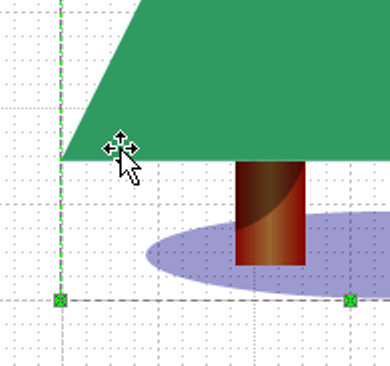
Set the Transparency ShapeSheet Formula
Now that we’ve sub-selected the overlay shape, we can view its ShapeSheet and scroll down to find the FillForegndTrans cell:
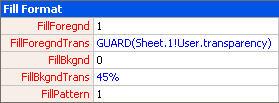
Once you’ve found it, set its formula to: GUARD(Sheet.1!User.transparency)
Remember that your shape’s id might be different than 1, so you should change the Sheet.1 portion of the formula appropriately.
You’re Done!
Your smart fading tree shape is now complete! It should turn whiter as you reduce it’s size, and you should be able to reset the starting size by right-clicking the shape:

click to view larger image
We hope you’ve learned a bit about creating smart graphics in Visio, and that your head is full of ideas on how you can apply this technology and these techniques to your own projects!
Happy Holidays!
Download “Visio Smart Fading Tree Tutorial”
s!Aj0wJuswNyXlhhrsqITg7rJMk57Y – Downloaded 4572 times – 103.00 B
Very nice intro tutorial, as a newcomer to the backend of visio it helped in adding some context to the initial Shapesheet gibberish, very much appreciated.
Hi Al,
Glad to hear this was helpful to you!
– Chris
I’m using ShapeStudio but cannot find “Format > Special” in Visio 2007. How do I figure out my Shape IDs?
Found the solution. Apparently you must explicitly set Developer Mode (I erroneously assumed if I was running ShapeStudio, that meant I was already in Dev Mode.)
Tools > Options > Advanced > Run in Developer Mode
After that, “Format > Special” appears.
Hi Justin!
Funny, I just gave a talk at the Visio Conference about developer Pain Points. One of these is the fact that running in Developer Mode (Tools > Options > Advanced Tab) adds some menu items to the Format menu. One of these is Format > Special, which is the easiest and best place to find shape IDs and shape names.
You can find a shape’s name in:
– The caption of the ShapeSheet window,
– Document Explorer window (View > Show Document Explorer)
– Format > Special dialog
Cheers,
– Chris
Just amazing how much we can learn nowadays through “distance learning”
I particularly like the Build the Trunk Shadow part;-)
“The Trunk Shadow is the little bit just under the Bushy Part that adds depth and realism (stop laughing) to our shape.”
Cheers!
Suzanne
Great post.
FYI – in Visio 2010 the “Format/Special” option doesn’t appear to exist anymore.
It appears the dialog box has changed names to “Shape Name”. It can be accessed on the developer tab (which has to be enabled) by clicking on the “Shape Name” button.
Thanks KK.
Visio 2010 users, if you want to work with the ShapeSheet or do other advanced stuff, such as that discussed in this article, be sure to turn on the Developer tab in the Customize the Ribbon dialog.
It’s nice to add to the landscape of the houseplan i made.
🙂
Thank you, Visio Guy!