 Multi-shape capability is one of the qualities that make Visio SmartShapes something special. A single shape can alter its appearance at the click of a context-menu, or the change of a data value.
While Visio shapes are often vector based, you can also create Visio multi-shapes using images. Using the simple panning-and-cropping technique described in this article will help you to quickly build efficient image-based Visio multi-shapes! So if you have a set of icons just aching to become a SmartShape, read on!
SmartShapes From Images
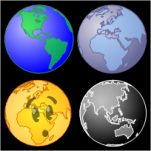
Generally, Visio shapes are vector-based, which enables the smooth, resolution-independent output that vectors offer. A vector-based multi-shape is usually full of ShapeSheet formulas that control visibility and position of geometric vertices. We’ve seen examples on Visio Guy before in the following articles: Consumer Reports Rating Shape, Multi-Earth Shape , Forefront Icons and Data Graphic Shapes
You can use also images in your Visio diagrams. And you can create ShapeSheet formulas to do clever things with these images. If your target shape-size is relatively small, you won’t have to worry too much about The Jaggies. And if the source images are also small, you won’t have to worry about your Visio file sizes ballooning
Visio Guy Face Images Multi-shape
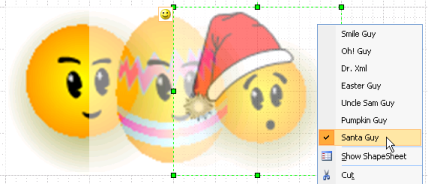
The multi-shape that we’ll be building allows us to dress our buddy, Visio Guy, in seven different outfits. By clicking on the Smart Tag in the upper-left corner, or by right-clicking the shape, we can choose the look we want:

This shape was created from imported images. But instead of messing with 7 different images (and seven separate sub-shapes), we used another trick…
Taking a Tip from Tinseltown
Yes, we’ve taken inspiration from Hollywood and combined the seven faces to create a “film strip” of Visio Guy images! Yes, this is a single image, with all seven faces lined up neatly in a row. With the use of our trusty Crop Tool, the shape can become a “window” that has the width of one face. Then, we can pan to each pane of our strip to see each individual face. This technique not only simplifies our shape, but also makes it smaller on disk!

If you’ve never seen Visio’s Crop Tool, then have a look at the Picture toolbar. You’ll find the crop tool just there underneath the button with the two opposing right-angles:

When you select a shape that is an imported image, Visio will activate the crop tool button so you can select it. Then you can crop by pulling on the object handles of the shape, and you can pan by dragging the image itself.
Here, we’ve cropped the image to the width of one face, and panned the image to the left so that Dr. Xml shows his handsome face:

Note that it’s important that each image occupy the same space, so that we can correctly shift image. I actually used Visio to create the image: I placed each image in the center of a 1-inch block, then saved the whole thing as a .png file. So the whole image is 1 inch tall by 7 inches wide, and each face fits in a 1 inch x 1 inch square.
Smartening Your Film Strip
When you import an image, Visio wraps the trappings of a shape around the image object, complete with a ShapeSheet of it’s very own. However, this ShapeSheet has a few extra image-related sections. Of importance to us is the section that controls cropping and panning. This is the Foreign Image Info section. The default version looks like this:

These are the formulas for an image-shape that has no cropping nor any panning. The cells ImgWidth and ImgHeight control the cropping. ImgWidth and ImgHeight specify the panning.
In order to get our multi-shape functioning properly, we’ll need to smarten-up some of the formulas in this section. But before we do that, lets parameterize the shape a bit by adding some user-defined cells to the ShapeSheet:
- User.pane = 0 ( or: 1, 2, 3, 4, 5, 6 )
- User.panes = 7
User.pane holds the zero-based index of the face that we want to display, so this will hold values from 0 to 6. User.panes holds the total number of image-units. We don’t have to create these cells, but it makes our smart formulas cleaner and easier to read.
Now that we’ve set up the user-cells, let’s add the smart formulas to the Foreign Image Info section:
- ImgWidth = Width*User.panes
- ImgOffsetX = – ImgWidth * User.pane / User.panes
Or if you prefer, in living color:

When you enter these two formulas, you’ll immediately notice that something doesn’t look right:

Uh…the shape is too wide! That’s because we still haven’t adjusted the width of our shape to be one pane wide. It is still as wide as the original seven panes, although it now correctly displays just one pane.
So we can manually resize the shape to be 1/7th as wide, or we can type “/User.panes” in the ShapeSheet, just after the current value for Width. This will precisely divide the width of the shape by 7.
Our shape is now functional! We only need change the value of User.pane to shift the images. This can be done using SETF from Action or Smart Tag rows, or by linking User.pane to a Custom Property value. You can look at the shapes in the companion download to see examples on how to do this, or read Forefront Icons and Data Graphic Shapes.
About the ShapeSheet Formulas
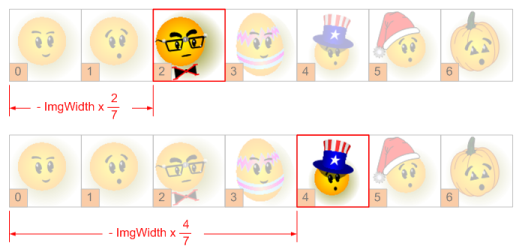
The first formula, ImgWidth = Width*User.panes, controls the cropping of the image. It tells Visio that the image is 7 times bigger than the width of the actual shape. This makes sense, since the shape is only one pane wide — a window onto one of the seven faces.
The second formula, ImgOffsetX = – ImgWidth * User.pane / User.panes, controls the panning of the image. The minus sign shifts the image to the left. User.pane specifies how many panes we want to shift, and ImgWidth/User.panes gives us the per-pane distance to shift.
The illustration below shows what’s happening when the 3rd and 5th images are shown:

Data Graphics & Icon Sets
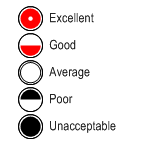
With the introduction of Data Graphics in Visio 2007, there is even more reason to be interested in creating film strip shapes. The Icon Set data graphic item allows you to link a series of up to five symbols to a data value in a shape. Examples of icon sets include: trend arrows, signal-strengh bars, faces, hot-to-cold colorations, stop-go-caution lights, warning and alert icons, and many more. The drop-down list of built-in icons sets looks like this:
![]()
Well, actually, there’s one custom-built set in there… 🙂
It’s easy to see that Film Strip shapes like those discussed in this article are perfectly suited for conversion to data graphic icon set items. We won’t go into the nitty gritty details of how to do this, because there are plenty of other articles out there, but we’ll happy to give you a quick-and-dirty list of steps for getting the job done:
To convert a Film Strip shape into a Data Graphic Icon Set item:
- Create a new (temporary) Data Graphic that includes an Icon Set such as “Faces” or “Status icons”
- In the Document Explorer window, duplicate the master named “Faces” or “Status icons”, depending on which one you used in step 1
- Rename your new duplicate to “My Icon Set”
- Delete the Data Graphic that you created in step 1
- Open the My Icon Set master
- Open the group window to the shape inside this master
- Delete any shapes that may be inside
- Paste your Film Strip shape inside, and position it correctly. Group properties may lock sub-shape movement, so just edit the Width, Height, PinX, PinY ShapeSheet formulas.
- Link your Film Strip to the Icon Set smarts by setting User.pane = Sheet.5!User.msvCalloutIconNumber, where Sheet.5 is the ID of the icon set group (it may be other than “5”…)
- In the Group’s ShapeSheet, delete any geometry sections that might be present – you don’t want them messing up your film strip!
For more details on creating data graphics and icon sets, read the following:
- Visio Insights: Make Your Own Data Graphic – Icon Sets
- Visio 2007: More on Customizing Data Graphic Items: Icon Sets
- Visio 2007: More on Customizing Data Graphics: Icon Sets with Images
Shhh! Icon Set (Secret) Web Service
Update 2009.04.30: thanks to Fabien for pointing out that this isn’t a secret anymore. The Visio 2007 Icon Set Builder has been officially posted on Visio Toolbox. You can find it here:
English: Visio 2007 Icon Builder
German: Visio 2007 Ikon Builderapparatgerätwerkzeug
Now that you’ve mastered the theoretical intricacies of creating a Film Strip shape, you might be interested to play with the not-ready-for -prime-time Visio 2007 Icon Set Builder.
This experimental web site automatically creates Data Graphic Icon Sets from (up to 5) images that you upload to the service. It utilizes the concepts discussed in this article, plus an interesting blend of ASP.NET and Visio XML The enthusiasts who built the site have stated that it is still in experimental stages and hasn’t been officially released. So go easy on them, remember what you paid for it, and don’t complain too much! 😉
And last but not least, here’s the download that accompanies this article!


Hi!
Thanks for this nice article
Just to let you know that the secret link doesn’t work anymore..
The new adress is:
http://visiotoolbox.com/de/IconSet.aspx
It seems it’s official now!
🙂
Hallo Fabien,
Danke für die Korregierung! Ich hab’s geändert!
– Chris
Hello,
Thanks for the article, a real timesaver.
Since the site seems to be down for quite a while now, is there any other place I can find this “icon set builder” ?
Thanks !!