 Visio has tons of keyboard shortcuts, including modifiers for constraining the resizing and moving of shapes. For instance, with the Shift key depressed, you can constrain a shape to move only vertically or horizontally. Neat-o!
But unless I have totally missed something (which does occur occasionally), there is one feature that Visio could really use: the ability to resize shapes on-center.
The Problem Issue
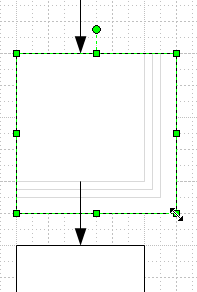
Currently, when you resize a shape, it grows in the direction in you pulled: left, right, upwards, downwards. If you wanted your shape to stay centered at it’s current location, then you have to move it back after resizing.
Below, we can see what happens in Visio in the case of flowcharts. We’d like the rectangle to stay centered with the flow of the diagram, but resizing moves it down and to the right.

Wouldn’t it be nice to be able to stretch the shape (say, to accomodate more text) without losing the in-line position?
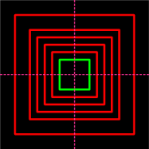
In my own case, I frequently create Visio drawings that use a lot of concentric circles and “concentric” rectangles–along the lines of the squares shown in the thumbnail for this article. Having to align the shapes can get tedious after awhile.
The keyboard shortcut: Alt + S, A can help speed things up a bit by getting you to the Alignment dialog more quickly, but sadly, my brain only has so much space for keyboard shortcuts.
The alignment toolbar buttons aren’t much help either, because there is no “bullseye” alignment feature. You have to center-align in the X-direction, then center-align in the Y-direction. Two toolbar buttons that are accessible via a drop-down, so four clicks in all. (Well, I suppose I could build a custom toolbar…)
Curiously, even Locking X position and Y position via the Format > Protection dialog doesn’t fix this problem. The shape translates on resize, but then remains locked in position! So to stay centered, you’d have to resize half the way in all four directions. Not a good solution.
Download to the Rescue!
I’ve created some shapes that you can download that solve these problems to some extent. They are really designed with drawing in mind, more than for flowcharting, but they could be used for the latter drawing type.
You can quickly lock the position of each shape by one of three methods:
- Set the Shape Data field: Position Guarded to True or False
- Right-click the shape and choose Guard Position menu item
- Click the Smart Tag drop-down icon and choose Guard Position
You can lock or unlock multiple shapes by selecting them all, and setting the Shape Data field.
Once the shapes are locked, you can resize them in-place. Their positions won’t move. When you are done, simply right-click and unlock the position!
Below, we can see the shapes with their various editing options. You can see the smart-tag icons, which change from arrows to padlock depending on the locked-state. The smart tag drop-down menu shows the Guard Position option, and also has some handy options for bringing the shape forward, or sending it backward.
click to view larger image
Under the Hood
For the ShapeSheet faithful out there, I thought I’d say a few words about how these shapes work. The first thing was to define a boolean-type Shape Data field. The significant cells look like this:
Prop.GuardPos.Type = 3
Prop.GuardPos.Value = False
When you change the value in the drop-down field of the Shape Data dialog, Prop.GuardPos.Value changes between true and false.
Next, we needed to define a right-mouse Action cell that toggled the value of the Shape Data field. The interesting cells look like this:
Actions.rmaGuardPos.Menu = “Guard Position”
Actions.rmaGuardPos.Checked = Prop.GuardPos
Actions.rmaGuardPos.Action = SETF(GetRef(Prop.GuardPos),NOT(Prop.GuardPos))
Notice how the .Action cell uses SETF to push a value into Prop.GuardPos? The NOT( ) function makes sure that we toggle false to true, or true to false.
Now, when Prop.GuardPos.Value changes, we need to GUARD or un-GUARD the PinX and PinY cells, which control the position of the shape. We do that with a user cell that depends on the value of Prop.GuardPos and writes to the PinX/Y cells when Prop.GuardPos changes:
User.watchGuardPos =
SETF(GetRef(PinX),IF(Prop.GuardPos,”GUARD(“&PinX&”)”,PinX)) + SETF(GetRef(PinY),IF(Prop.GuardPos,”GUARD(“&PinY&”)”,PinY))
To unlock the position, the SETF function simply writes the current value of the PinX/Y cell to the cell itself. This will overwrite any GUARD() formula that might be there.
To lock a Pin cell, the SETF function writes the formula GUARD( pin_value ) to the cell. This keeps the shape from being moved, and allows the center-oriented resizing feature to work!
Download “Center-sizing Visio Shapes”
s!Aj0wJuswNyXlhShZsNFEVkE2PmkR – Downloaded 5384 times – 103.00 B

Don’t let’s forget the infamous “Shape – Operations – Offset”.
Do you have an idea why they chose to give us 2 sides by default ?
Excellent tip, Philipe!
You can quickly make an “inner” and “outer” duplicate of a shape by choosing Shape > Operations > Offset Then, you can select one of those shapes and hit F4 F4 F4 to repeat repeat repeat the process. But watch out for duplicate shapes of the same size!
I can’t remember ever hearing any discussions of why the center-based resizing was never implemented. For all the time we spent looking at ABC/Micrografx Flowcharter, it is truly amazing this feature was never implemented.
– Chris
Just to note, you can also open the Alignment dialog Alt + S, A using F8
This dialog box is a fav of mine and have also grumbled about the lack of centre resizing.
And thanks for the wonderful work you do! I always look forward to your articles.
Matt
A quick and simple way to ‘resize on the spot/Pin’ is to simply type the size you want straight into the [Size and Position] window. Since you are typing only in one field at a time (the ‘WIDTH’ or ‘HEIGHT’ field), and since these directly update the WIDTH and HEIGHT cells respectively (unless you have GUARDed formulae), then the shape changes size without changing PinX/Y or LocPinX/Y.
More interestingly, you can type a formula straight into these fields, which goes straight into the cell. What’s ever more interesting is that you don’t have to type ‘=’ at the start of the formula. So, if you want to resize by multiplying the existing value by some fraction/percentage, you can just type ‘*0.75’ (or whatever value you want to use) following the existing value!
A very useful little trick I just discovered…
I currently use Visio Professional 2003 as I haven’t yet seen much in the way of improvements that are worth the upgrade, but I would love to know if I’ve missed a really useful feature enhancement that is worth having.
I hope this helps.
Thanks skeetabomb, great tip!
Visio 2007/2010 upgrades? Depends on what you do with it. If you’re into data linking or process modeling, there’s a lot of new stuff. For people who do floorplans and measured layouts, it’s a harder questions.