 If you enjoyed the first version of the Visio Radial Grid shape, well I’ve got a new version for your enjoyment and productivity enhancement!
Update 2021.07.17: a third version of this shape has been published. See Visio Radial Grid v3. This article, as well as the version 1 article are still important for understanding how to use the shape, however!
Overview
At the end of the article about the first version of this shape, I added a bullet list of TODO items. I couldn’t resist implementing them, so here we are, a few days later with another post and download!
I’ll point you to the first article as the “help file” for this shape, and use this article to highlight the improvements to the shape.
In general, the shape is intended as a radial grid to help you visually align shapes in circular arrays. It isn’t intended to be a tool for auto-aligning and distributing shapes, although you can glue shapes to the built-in connection points and get a bit of auto-alignment to happen. You can choose the number of rings and the number of sectors (or “grid” lines), plus set the shape to be non-printing or non-non-printing.
v2 adds a bunch of features that some of you might find really useful. If you’re just using the basic functions, the new version won’t be super-exciting for you.
About a Bug in Visio
Edit 2018.10.09: this bug has been fixed in the shape for the current download! You can skip straight to New Feature List, if you’d like!
Note: Visio still has a bug with IF statements that point to user-defined expressions that involve the EVALCELL and ARGS functions, but a workaround was concocted, so that the shape works without any user-tweaking.
Before we go any further, I need to point out a bug and workaround, so that you don’t download the shape and immediately think; “This sucks! It doesn’t even work!”
This version of the Radial Grid Shape, as well as the original one have a problem: if you drag a master on to a page, then try to set the number of sectors using the control handle at the bottom, nothing happens!
The simple fix: resize the whole shape. That seems to trigger recalculations in the shape, and everything works fine after that.
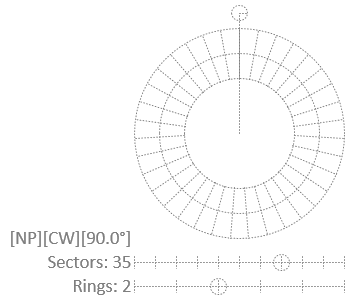
Look! It says; “35 sectors”. That sure doesn’t look like 35 sectors to me!
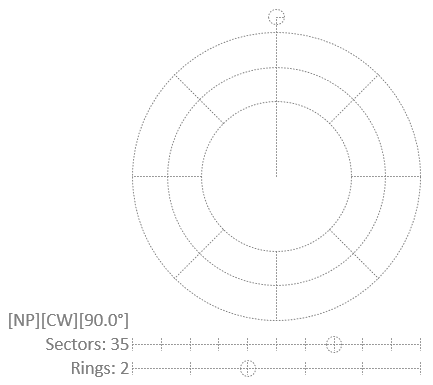
Let’s pull on a corner handle and make the shape a bit smaller. Voila! There are the 35 sectors!
For the nerds: the shapes uses some advanced ShapeSheet functions to work its magic, namely user-defined ShapeSheet functions, as well as some fancy SETATREF/SETATREFEXPR-containing formulas. I suspect that the user-defined functions are somehow cached improperly in instances of masters (shapes on a page that were dragged from a stencil), but I can’t prove it yet. I’ve submitted a bug description to the friendly folks on the Microsoft Visio team.
New Feature List
Here’s a quick list of the features that have been added to version 2 of the Visio Radial Grid shape. I’ll add screenshots afterwards for clarification.
- Added circles over control handles, so you can see positions when the shape isn’t selected.
- Right click to set/unset the shape to be a Container (a kind of “loose group” feature added in Visio 2010.)
- Added more information to the “text icons” (the abbreviations in [brackets] ), for showing container status, direction of rotation, and starting angle, in addition to non-printing status.
- Improved the tooltip on mouse hover, to display all of the pertinent information about the shape.
- Moved the “text icons” above the sector and ring labels to make the shape more compact.
- Added right-click item for setting the rotation direction to clockwise or not-clockwise (counterclockwise).
- The “Action tag” menu now shows on mouse-over when the shape is visible. When the shape is hidden, the menu icon is always visible. Now you can access all of the features by right-clicking the shape, and by clicking the ring icon that appears at the top-left of the shape.
- Added a control handle for specifying start angle. Within the circle around control handle position is a small tick that points in the clockwise or counter-clockwise direction, depending on the direction setting–another nice UI touch.
- Added a context menu flag to show/hide the starting angle line/circle/control handle.
- Removed the hyperlink to Visio Guy article which interfered with the info-reporting in the comment/tooltip. Replaced with a context-menu hyperlink instead.
Examples
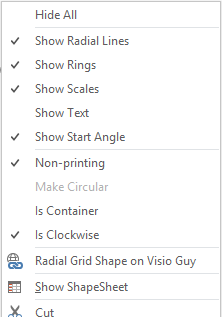
Context Menu
Here’s the new context menu, which hints at the new features. Show Start Angle, Is Container, and Is Clockwise are the newcomers:
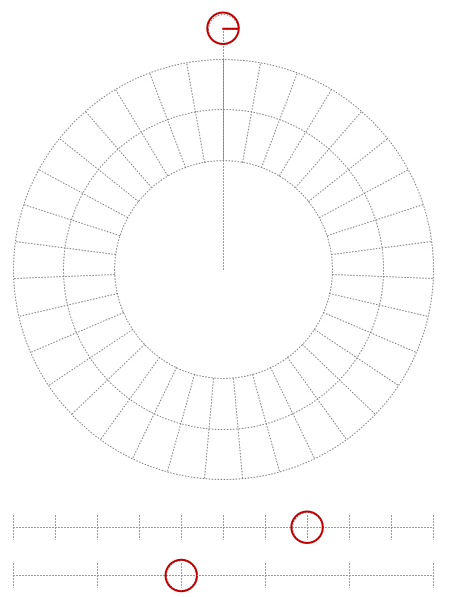
Circles Over Control Handles
Now you can see “where the control handles used to be”, even when the shape is not selected. I’ve highlighted them in red just for this screen shot. Note also the tick in the “start angle” circle. It points in the clockwise direct, which is another cue as to which way the radial lines progress:
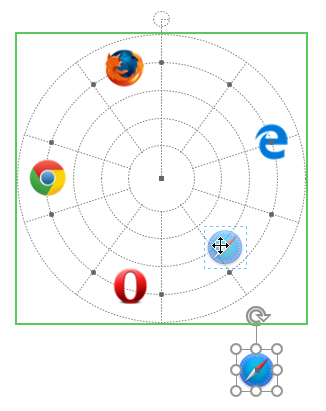
 Make it a Container!
Right-click the shape and check Is Container. Boom, your shape is now a container! See the green outline as I drag Safari into the grid’s rectangle? That means the Safari will become a child or member of the container. Think of it as a soft-grouping of shapes that don’t bury the members inside of a group.
Status Abbreviations, aka: “Icon Text”
The new features also show up as status text enclosed in brackets. The text now shows non-printing status, whether the shape is a container, which direction the radial lines progress, and what the starting angle is:
![]()
“Action Tag” and Tooltip
The “action tag” now shows on mouse-over when the shape is visible. Previously, it was only visible when the shape was hidden. If you click it, you’ll see the full list of options that you see when you right-click the shape. If you don’t like right-clicking, or are using Visio with a touchscreen, this might be an easier way to configure the shape.
If you hover the mouse over the shape, you will see a summary of all the important bits of configuration information:

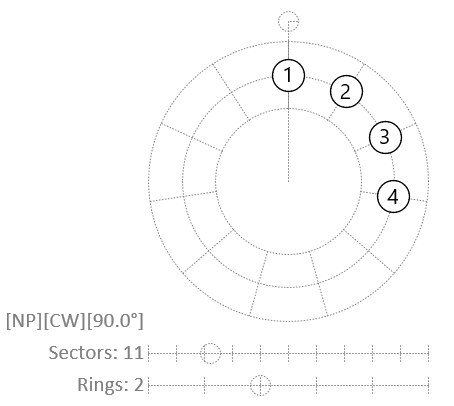
Starting Angle Control Handle
If you are using the 2D glue feature and gluing shapes to the grid in a specific order, AND you may need to change the number of points, then controlling the starting location and the direction that the radial progress could be useful.
Here we’ve got a shape that starts at 12 o’clock and progresses clockwise. Note the lollipop pointing straight up. There’s a control handle there (when the shape is selected) that allows you to move the starting point:
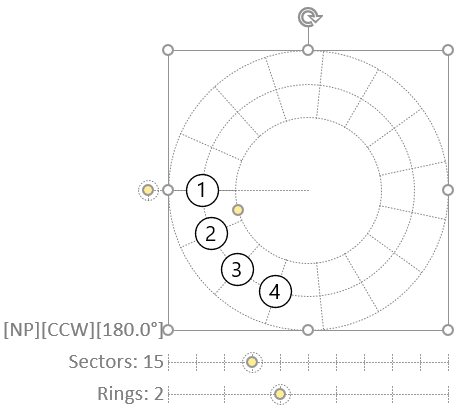
Here we’ve right-clicked and unchecked Is Clockwise (therefore Is Counterclockwise, note the [CCW] in the status text). We’ve moved the starting point to 9 o’clock using the yellow control handle on the left:
That’s pretty much it for version 2. Hope you enjoy it, and I hope you find it useful! Let us know what you do with it in the comments below!
Get the Visio Radial Grid v2 Shape!
Click the link below to download a zip file that contains both a VSDX and a VSD file for those of you with older versions of Visio. No guarantees on how well the VSD version will work, but I believe most of the features will survive the downgraded save.
Download “Radial Grid Shape v2”
s!Aj0wJuswNyXlhH3KfYFKZXLGfZMK – Downloaded 5762 times – 103.00 B
This is of great help, but after viewing the tutorial video and using it for a few hours, I feel compelled to say that I disagree with the lack of perceived usefulness to having more than one ring. I have started using it to draw network diagrams, and I would really like to be able to snap shapes to several concentric rings without having to superpose several radial grids (what would make them a pain to select). So my question would be: why not automagically create connectors to all rings of the shape instead of only the second one ?
Hi Xavier, thanks for the feedback! Maybe I need to create a “v3” or “Über” version…
Hi
I am Abu Taha. This is really helpful. But how can we get more than 50 sectors ?
Hi AT, the way Visio shapes works, you have to pre-build elements and hide them. So this shape is limited to 50 sectors because I only built in 50 sectors, max.
To add to what Xavier said, I would love to be able to add connectors to every ring since I have been working on networking diagrams as well. Any plans for a v3?
I’ve got v3 working – just need to clean it up and publish! Up to 300 connection points for your gluing pleasure!
