If you’ve ever needed to constrain a Viso SmartShape’s control handle to a circle or other curve, then you’ve finally found the right article!
Control handles are one of the features that make Visio SmartShapes, well, smart, as well as useful and fun to work with.
They can be programmed to reposition text, change the sizes of margins, headers arrowheads, open and close door shapes, and much, much more. It’s not even that difficult to use them to radially position the hands of a clock! But it is not clear how to actually limit control handles to the boundary of a round clock, or to constrain them to a circle of a given radius.
This article will show you how. While the technique isn’t exactly rocket science, it also not obvious. So don’t kick yourself if you have tried to do this, but come up short.
Prerequisites
To keep this article less than book-length, I’ll assume you know your way around the ShapeSheet, including:
- How to activate developer mode, so that you can right-click shapes to Show ShapeSheet
- How to add sections and rows to a shape’s ShapeSheet
- How to right-click in cells and change row types
- How to switch between viewing formulas and values (hint: press F5)
Building the Shape
Experienced ShapeSheet nerds are likely to suspect that the BOUND function can somehow be used to get control handles to stick to circles or other curves. But it isn’t quiet up to the job.
The technique we’ll explore uses the ShapeSheet formulas SETATREFEXPR and SETATREF to get the job done. These formulas allow you to capture values that are set via UI elements such as control handles, then redirect them to other cells for further processing. They also allow you to ignore the input values in favor of recalculated values. These characteristics allow you to take the position of a control handle as a user manipulates it, calculate the nearest point on a circle, then override the mouse-position to force the control handle on to the circle.
First Steps
So let’s roll up our sleeves and git to gittin’! The first thing you’ll want to do is draw a line and a circle, then combine them. You combine shapes via Developer > Shape Design > Operations > Combine with both shapes selected. You should have something like this:
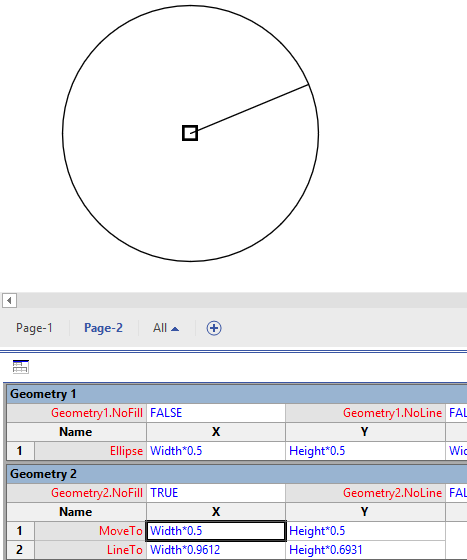
Note that I’ve changed the row types in the line’s geometry section from RelMoveTo and RelLineTo to the old-fashioned MoveTo and LineTo row types.
Add User and Control Handle Sections
You’ll now want to add the following sections:
- User-defined cells
- Controls
This is simply a matter of right-clicking anywhere in the ShapeSheet, choosing Insert Section…, then checking the appropriate boxes.
Now, name the control handle row PntPerimeter, and set the formulas in the line’s geometry section as follows:
Set one end of the line to be at the circle’s center:
Geometry2.X1 = Width*0.5
Geometry2.Y1 = Height*0.5
And set the other end to refer to the control handle’s position:
Geometry2.X2 = Controls.PntPerimeter
Geometry2.Y2 = Controls.PntPerimeter.Y
Back in the drawing window, you should now be able to tug on the control handle, and the line should follow it nicely around the page:
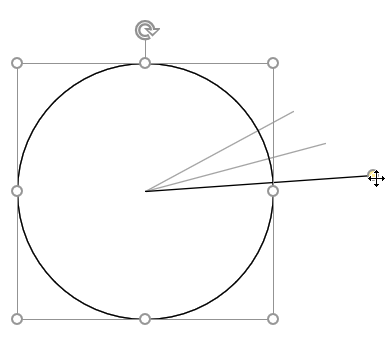
It’s fairly easy trigonometry to get the line to end at the edge of the circle, regardless of the position of the control handle, but it leaves the user feeling that the system is a bit sloppy. Ideally, we would want the handle to stay on the perimeter of the circle.
Create User Cells
To set up the rest of the shape, let’s create the following four user-defined cells in the User-defined cells ShapeSheet section:
User.UI_CHX
User.UI_CHY
User.Pnt
User.Ang
We’ll fill in the formulas later.
Enter SETATREFEXPR()
The system we’re going to use involves user-defined cells, along with two functions: SETATREFEXPR and SETATREF. Let’s start with the former.
What the function SETATREFEXPR() does is store a value or formula, which usually comes from the user interface. This function is usually used in cells such as Width, Height, Angle, or Control Handles. When a user alters a shape via the UI, Visio stuffs an expression into the the parentheses of SETATREFEXPR( some_ui_expression ). Furthermore, Visio doesn’t destroy any other parts of the formula for that cell.
Normally, if you put a formula, say, in the Width cell of a shape, and you didn’t GUARD it, a resize of the shape would blast this formula away. SETATREFEXPR prevents this, plus you get to keep and examine the user-input value. It’s easier to understand if you try it:
Controls.PntPerimeter = SETATREFEXPR()
Controls.PntPerimeter.Y = SETATREFEXPR()
The control handle will jump down to the lower-left corner of the shape’s alignment box. No biggie. Just go pull on the handle and watch the ShapeSheet. As you do, Visio will stuff “width times this and height times that” expressions into the parentheses of the functions:
![]()
So that’s interesting! With this setup, we can add terms to each formula. We could round the values. We could multiply them by 0, then add the COS() of DAYOFYEAR() of NOW(). Or we could try doing something useful instead.
While intriguing, SETATREFEXPR isn’t enough in its own right. We need one more piece: SETATREF.
Pushing Expressions
SETATREF allows us to push a value or expression to other cells. Let’s just try it out, rather than wax theoretical. Update your control handle formulas as follows (and don’t worry about the values within the SETATREFEXPR functions!):
Controls.PntPerimeter = SETATREF( User.UI_CHX, SETATREFEXPR(Width*0.7071) )
Controls.PntPerimeter.Y = SETATREF( User.UI_CHY, SETATREFEXPR(Height*0.7071) )
And go tug on your control handle in the drawing window.
Since you’ll want to be working in both windows throughout this process, I’ll drop this window-management hint: you can quickly tile your drawing and ShapeSheet windows using these shortcuts:
Shift + F7: Tile windows side-by-side
Ctrl + Shift + F7: Tile windows above and below
Notice the two user cells as you move the control handle: they’re receiving the same bits that get stuffed into the SETATREFEXPR() functions!

So if you look at our empty user cells, you can see what’s in store. We’re going to use the pushed x and y values to calculate the angle at which the control handle is positioned, relative to the center of the circle, then we are going to calculate a point on the circle at that angle. The final task will be to feed that calculation back to the control handle.
It turns out that SETATREF takes a third, optional parameter, which we didn’t use above. This is a boolean value that lets us accept or reject the value of SETATREF. Let’s try it out now:
Controls.PntPerimeter = SETATREF( User.UI_CHX, SETATREFEXPR(Width*0.7071), TRUE )
Controls.PntPerimeter.Y = SETATREF( User.UI_CHY, SETATREFEXPR(Height*0.7071), TRUE )
This is the same as multiplying the whole thing by zero.
Now, when you move the control handle, the SETATRERFEXPR( ) values will update. The User-UI_CHX/Y formulas will update, but the radial line will remain pointing at the point (0, 0). So it seems we’ve broken the whole thing, but we’re actually quite close.
Massaging the UI Values
So let’s take the User.UI_CHX/Y values and calculate and angle and a point. User.Ang will use the ATAN2( dy, dx ) function to calculate the angle, relative to the center of the shape, which is located at ( Width*0.5, Height*0.5 ).
Once we have an angle, we can calculate a point on the perimeter. Note that Visio has a PNT( x-val, y-val ) function that actually returns a point structure with x and y values!
To pick off individual components, use the PNTX() and PNTY() functions. Some special ShapeSheet cells will do this for you automatically–namely X and Y cells in geometry, control handle, and scratch sections. But when a point is part of a larger formula, you will need to use PNTX or PNTY to get the part of the point that you need.
So let’s polish off the user cells we created earlier, with the formulas below. I’ve added some bold just for clarity. Note that both outer functions are taking two arguments, so take note of the commas in the middles of the expressions:
User.Pnt = PNT( Width*0.5*(1 + COS( User.Ang ) ) , Height*0.5*(1 + SIN( User.Ang ) ) )
User.Ang = ATAN2( User.UI_CHY – Height*0.5 , User.UI_CHX – Width*0.5 )
Note 2020.01.30:
Reader vojo pointed out a formula for User.Ang that will work better with ellipses. The above only works if the shape is a circle:
User.Ang = ATAN2( (User.UI_CHY – Height*0.5)/Height , (User.UI_CHX – Width*0.5)/Width )
Constraining the Control Handle (Finally!)
The only remainging TODO is to add User.Pnt back into the control handle formulas:
Controls.PntPerimeter = SETATREF( User.UI_CHX, SETATREFEXPR(Width*0.7071), TRUE ) + PNTX( User.Pnt )
Controls.PntPerimeter.Y = SETATREF( User.UI_CHY, SETATREFEXPR(Height*0.7071), TRUE ) + PNTY( User.pnt )
Once you do, then your shape should behave rather nicely, like this:

Thank you very much for all your articles.
I have managed to follow and finished this http://www.visguy.com/2018/11/07/constrain-control-handle-to-circle/
But you have few times the same typo. You missed a ‘d’ in Width property.
If you don’t mind please fix in
Controls.PntPerimeter = SETATREF( User.UI_CHX, SETATREFEXPR(Width*0.7071) )
next in
Controls.PntPerimeter = SETATREF( User.UI_CHX, SETATREFEXPR(Width*0.7071), TRUE )
and finally in
SETATREF( User.UI_CHX, SETATREFEXPR(Width*0.7071), TRUE ) + PNTX( User.Pnt )
Thanks Augustin, I’ve corrected the post, and hopefully found all of the Withs!
So this works well for circles, but for ellipses, the control handles jump. I tried a few things (in my experience, any sort formula with width*0.5 or height*0.5 do not provide the desired behavior. Tried removing and adjusting…but problems, I set the ellipse as height = width *0.571…hack for isometric head on, etc….i do have a isometric pie slice using numerical inputs, so not a complete idiot).
ok…so if you want do this with an ellipse, then
only equation that has to change is the angle
From: atan2(user.UI_chy-height*0.5,user.UI.chx-width*0.5)
To: atan2((user.UI_chy-height*0.5)/height, (user.UI_chs-width*0.5)/width)
refresh on trig of ellipse, lots of trial and error given visio pecurliarities
have fun
Good stuff Vojo!
Yeah, that original ATAN2 formula looks suspiciously “non-normalized” to me, now that I look at it!
I’ve added a note in the post above.
Very useful Chris!