 A customer/fan asked me the other day how to create custom bullets in Visio using a character he’d carefully selected from the Wingdings font. He had dug his way deep into the text editing dialog, and had actually found the right place for customizing bullets, but he couldn’t quite get it to work.
It turns out he was making it just a bit more complicated than it needed to be. When I looked into it, I found that the process was indeed a bit unclear. So let’s walk through creating custom bullets in Visio, and clear up any muddiness that you might encounter along the way.
Create Some Text to Format
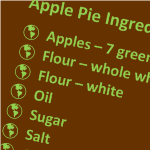
First, we’ll create some text to bullet-ify. You can use the Rectangle tool to create a rectangle, then type, say, a title and a list of ingredients.
Using the Home ribbon tab in Visio 2010, it’s easy enough to left-align and top-align the text. You’ll find those buttons in the Paragraph group, and they look just like Word’s and Excel’s.
Now everything looks a bit more tidy:
 We can format parts of the text by double-clicking the rectangle, selecting runs of text, then clicking more buttons in the Font or Paragraph groups.
You can see above that I’ve made the top line bold, and given it a larger font size, so it makes a nice title.
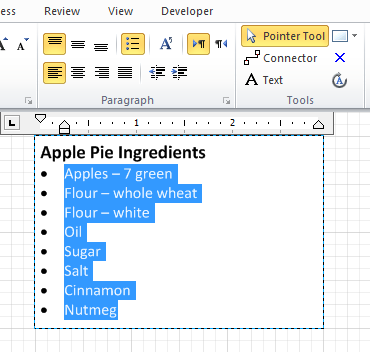
I’ve also selected the list of ingredients and give them standard bullets by clicking the Bullets button, also in the Paragraph group.
Changing Bullets
Visio has a limited set of built-in, custom bullets. In all versions of Visio, you can get to them via the Text dialog, which has a Bullets tab.
In Visio 2010 and 2013, you can get the text dialog by clicking the dialog box launcher (the funny little box with arrow icon) in the lower-right corners of the Home > Font or Home > Paragraph groups. In older versions of Visio, you’ll find it under Format > Text…
In any version of Visio, you can also just right-click a shape and choose Format > Text. If you are already in text-edit mode, then right-clicking will bring up a bunch of text-editing options. Paragraph… or Font… will get you to the Text dialog.
Once you’re there, just click the Bullets tab, and click one of the custom bullet types. You can click Apply to preview your changes without leaving the dialog:
click to view larger image
Custom Bullets
But wait, there’s more!
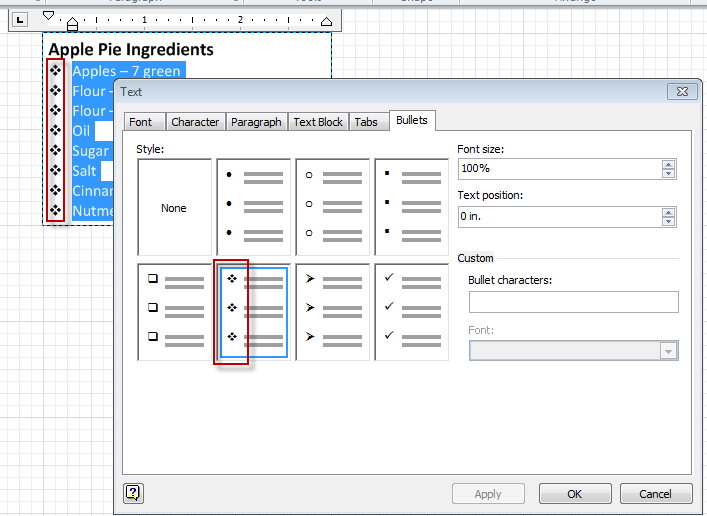
You can create custom bullets from any string of text characters, and even use other fonts, like Wingdings 1, 2 or 3, or Webdings. This opens up a whole new set of possibilities.
Note: In Visio 2003, 2007, 2010 and 2013, you can create custom bullets using custom fonts. In Visio 2000, you can create custom bullets using any run of characters you want, but you have to use the same font as the text that is being bulleted. So you’ll have to use “*” or “0” or “+” or “>>>”, or get creative with emoji and the like…
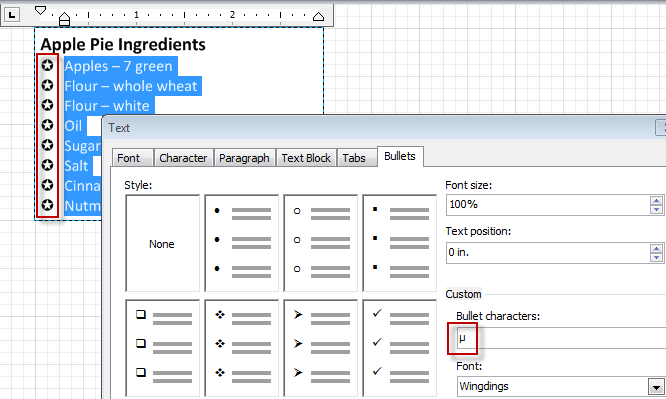
As a quick test, reselect your list of items, then go to the Bullets tab. Type “abcdefg” into the Bullet characters field. (Woohoo, a multi-character bullet!)
Creating a Custom Bullet String
Now, select Wingdings from the Font drop-down, and click Apply:
 click to view larger image
Herein lies some of the confusion that my customer experienced. Notice when change the font, the “abcdefg” doesn’t change. It still says “abcdefg”. But when you click Apply, the bullets on the shape update with the Windings characters, as we’ve seen with the run of funny astrology characters. The customer was confused by the font not changing, and overthought the problem. He found the character codes for the bullet characters he wanted, and tried typing them in. So he was entering codes like “0xA8” into the Bullet characters field, and it wasn’t working. This seems a very logical thing to do if you’re a developer or a techie.
Getting Bullets from Weird-o Fonts
So how do you know what “normal” character to type, in order to get an “abnormal” Wingdings character? Well one way is to use Character Map. Just go to your Windows Start menu and type “char”. Character Map should show up in the list of choices. Start that application.
Select a font from the list at the top, then browse until you find a symbol or character that you like. Double-click the item to add it to the Characters to copy list. You can add several characters if you want, because Visio supports “compound bullets” or “multi-character” bullets, as we saw before with the astrology symbols.
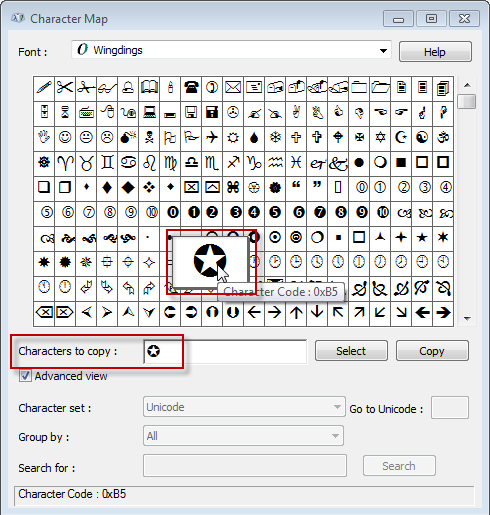
Once you’ve built a “bullet-string”, copy the characters, then go back to Visio and paste them into Bullet characters field. Be sure to change the Font in the drop-down list to match the font you were viewing over in Character Map:
click to view larger image
Remember that you won’t see the actual bullets on the Visio side. The field doesn’t change font to show you what the bullet will actually look like. Above, we can see that my white-on-black, star-in-circle symbol occupies the Greek “mu” character’s slot in a “normal” font.
But when we click Apply, we can see that everything looks great in the shape’s text.
Yes, it’s a bit convoluted and not very WYSIWYG, but it works, and it’s not so difficult once you know how to do it!
Alternatives to Character Map
If Character Map frightens you (and who isn’t frightened by Character Map?), there are other ways to pick out bullets.
Use Visio Shape Text!
One way is to work within Visio itself by changing the font of some shape text, then copying characters from the shape.
Try this:
- Type a bunch of characters on a scratch shape in Visio. Below I’ve just typed all the characters in upper and lower case on a U.S. English keyboard.
- Copy the shape, then change the font. Below, the lower, yellow shape is the same as the upper, but the font has been changed to Wingdings.
- Find a symbol you like, copy it, then paste it into the Font > Bullets > Custom > Bullet characters field.
Here, we’ve turned an old telephone icon into a custom bullet, using just Visio and font manipulation:

click to view larger image
And just to reiterate, when we paste the telephone into the Bullet characters field, we see a left-parentheses character, not a phone:
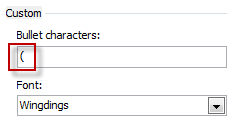
This method won’t get you the full spectrum of possibilities that a symbol font might have to offer. Recall that our star-in-circle came from the character mu. Well, I don’t know how to type mu on my keyboard, do you? So we would have missed out on that symbol using this “type and change font” method. But it’s pretty quick, at least!
Use Insert > Symbol
Visio also has a “built-in version of Character Map” called Insert Symbol. Again, on a scratch shape, double-click or use the Text tool to get into text-edit mode. Then click the drop-down control at Insert > Symbol. Visio will offer a few common hard-to-type symbols, but you can dig deeper by choosing More Symbols… at the bottom of the gallery:
 You will see a pop-up window that is remarkably similar to that of Character Map. You can change fonts, and see the entire set of characters or symbols for that font. The main difference is that when you double-click an item, it is inserted directly into your Visio shape, and the font is changed to match.
When you close the dialog, you can then select the character that you want to use as your custom bullet, and paste it into the Bullet dialog, as we’ve done before!
So that’s how to create all sorts of custom bullets in Visio. Hopefully this tip has helped you learn a thing or two. If something’s not clear, be sure to ask a question in the comments below, or visit our forum!

Hi
I am struggling with Windings etc font while parsing SVG file. Why don’t visio use standard Unicode char of bullets instead of wingdings, weddings etc. What is your thought?
another issue I am facing is that with Visio Professional 2016 when I open SVG file in notepad++, the char which has been used to make bullet is visible as just a square box which is quite strange as all these square boxes are making different bullets. Don’t know how can I get the actual char instead of a square box?
Thanks
Pradeep
Is it also possible to change the colour of the bullets? In Word (specifically) the bullets can be customised per line, does Visio do this too? I can’t make it go, if it does.
I want to use the bullets as a RAG status indicator (red, amber, green) but I’m guessing I’ll have to just use an inserted image?
thanks!