Title blocks on drawings are important for many, many reasons.
If your company has created more than a small number of drawings, it’s useful to know who created them, when they were created, who updated the drawings, and when they were updated.
Often times, copies of a drawing are e-mailed or sent in printed form to customers, installers, contractors, builders, inspectors. For these recipients, contact information and drawing scale data can be of utmost importance.
As it turns out, much of the information that is imperative to title blocks is already in the drawing. Through Visio’s SmartShape features, it can automatically be extracted, eliminating the need to re-key it.
Other information that is not available by default can be entered in a central location, or extracted from existing data sources, then displayed by cleverly-constructed title block shapes.
This article is a first in a series on how you can use Visio’s built-in features, ShapeSheet capabilities and even automation code to make smart Title Block shapes that save you work.
Save Time by Using Existing Title Block Shapes
Before we spend time creating shapes from scratch, I’d like to note that there are a bunch of pre-made master shapes that can help you to construct title blocks.
The stencil is called: Title Blocks.vss.
In Visio 2007 Professional, you can find it by navigating the main menu to:
File > Stencils > Visio Extras > Title Blocks
While this stencil has been around for several versions, I am not 100% sure if it ships with the Standard version of Visio. So there’s an outside chance that you might not have it on your PC.
The stencil contains several pre-made title block shapes, some drawing frames, some borders, and a whole slew of elemental boxes that you can use to assemble to make your own text blocks.
By elemental box, I mean a box that has a field label, and a field value. An example might look like this:
[ Creation Date: 10/20/2008 ]
Here’s a peek at the shapes in the Title Blocks stencil:
click image to see larger version
One key point to note about the elemental shapes: Many of them are already linked to information about the document, so you don’t have to re-enter any information!
Link to Existing Information by Inserting Fields
If you don’t have the existing Title Block shapes, or you don’t like them, or they are missing something you want, or you’re just a Visio Guy and like to build things yourself, then Visio offers a handy way of linking shapes to existing document information.
Under the Insert menu, you’ll find the Field… item. This allows you to link the text on a shape to a bit of information stored in the document.
Let’s create a simple example that shows the creator of a document. Just follow the steps below:
- Draw a rectangle on a Visio page
- Enter text-edit mode by either: double-clicking the shape, or selecting it and pressing F2
- Select Insert > Field from the menu
- Choose a Category and a Field name from the various options in the dialog
You should see something like this:
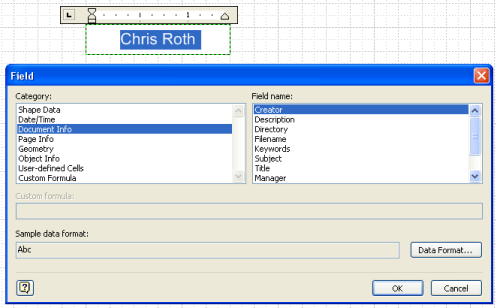
When you install Microsoft Office, it asks you for your name, and automatically inserts this into newly-created Office documents. Here we can see that Visio automatically found my name and listed it as the creator of the document.
If you’re interested in where this field is stored, have a look at the dialog under File > Properties. It looks similar to what you’ll see in other Microsoft applications:
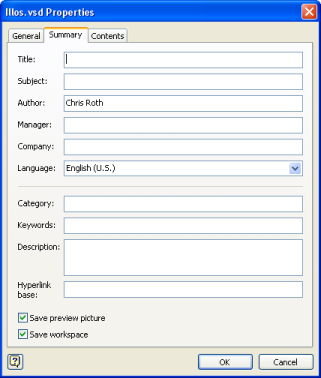
And you can see indeed that the creator matches what we’ve got on our shape.
Which Information can be inserted as a Field?
You might have noticed that there are quite a few fields that you can insert. Instead of forcing you to tediously explore the Insert Field dialog, I’ve conveniently listed all the fields for you right here:
| Shape Data List of Shape Data fields cells that a shape might contain |
|
| Date/Time | |
| Creation Date/Time | |
| Current Date/Time | |
| Last Edit Date/Time | |
| Print Date/Time | |
| Document Info | |
| Creator | |
| Description | |
| Directory | |
| Filename | |
| Keywords | |
| Subject | |
| Title | |
| Manager | |
| Company | |
| Category | |
| Hyperlink Base | |
| Page Info | |
| Background | |
| Name | |
| Number of Pages | |
| Page Number | |
| Geometry | |
| Width | |
| Height | |
| Angle | |
| Object Info | |
| Data 1 | |
| Data 2 | |
| Data 3 | |
| ID | |
| Master | |
| Name | |
| Type | |
| User-defined Cells | |
| List of User-defined cells that a shape might contain |
|
| Custom Formula | |
| Any valid ShapeSheet formula | |
Some of the fields, like page Name and Page Number are extra clever. They are smart enough to work from background pages, but reflect foreground-page information.
For example, imagine that you created a title block element that shows the page number and total number of pages–something like: “1 of 4”, “2 of 4” and so on.
You could then place just one single title block on a background page, and each foreground pages would nevertheless show the correct page number and count, even though there is only one title block shape!
Unfortunately, this foreground/background awareness doesn’t work for all inserted fields
Add Both the Field Name and Field Value to One Shape
We’ve seen how easy it was to add “Creator” to the text of a simple rectangle. But title block elements usually come in pairs: a field name, and a field value. Sure, we could just draw another box and type “Creator:” in it, but wouldn’t it be nice to combine the name and value into one text block?
It turns out that you can insert multiple fields in a shape’s text block, and mix them with text that you type as well.
So we can simply type “Creator” first, then insert the Creator-field at the end of the text. Simple enough, but the alignment of the text might not look right–especially if we have lots of fields stacked on top of each other.
Imagine several left-aligned fields on top of each other. They might look like this, all jammed up against the right side:

Not very title-block-ish now, is it? I think we can agree, that a title block should look more like this:

We can accomplish this using some of Visio’s built-in text-editing features. Below, I’ve first left-aligned the whole text block, using the button on the Formatting toolbar.
Then, I entered text-edit mode and added a right-aligned tab near the end of the text block. That’s the little “L” shape you see highlighted below:
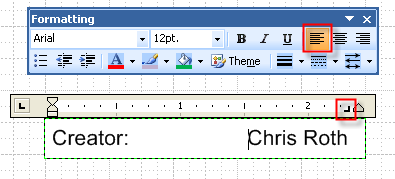
To get this to work properly, you have to first type “Creator:”, then hit the TAB key before inserting the Creator-field.
How Inserted Field Affect the ShapeSheet
If you have delved into the ShapeSheet and like to tweak your SmartShapes, you might be interested in what goes on behind the scenes. After you insert a field into a shape, you can see the changes reflected in the ShapeSheet behind the shape.
You’ll see that a new row is added to the Text Fields section, and it holds information about which field was inserted, how to format it, and a few other options.
Below, we see that the CREATOR() ShapeSheet function was inserted. This makes sense, since we chose to insert the Creator field.
![]()
If you’re guessing that there’s a ShapeSheet function that corresponds to every option in the Insert > Field dialog, then you’re right!
You might also correctly note that once a field has been inserted into a shape, you can quickly change the field via the ShapeSheet: You don’t have to go back and select the text.
For example, we could change the formula in the Value cell above from CREATOR() to “[” & CREATOR() & “]”. The shape would then display [Chris Roth], because we concatenated brackets before and after the field.
Inserted Fields and Corresponding ShapeSheet Functions
Below is a list of the Insert > Field options, with the corresponding ShapeSheet function listed next to it.
| Shape Data List of Shape Data fields cells that a shape might contain |
Examples:Prop.Cost Prop.Resources Prop.ComponentID |
| Date/Time | |
| Creation Date/Time | DOCCREATION() |
| Current Date/Time | NOW() |
| Last Edit Date/Time | DOCLASTEDIT() |
| Print Date/Time | DOCLASTPRINT() |
| Document Info | |
| Creator | CREATOR() |
| Description | DESCRIPTION() |
| Directory | DIRECTORY() |
| Filename | FILENAME() |
| Keywords | KEYWORDS() |
| Subject | SUBJECT() |
| Title | TITLE() |
| Manager | MANAGER() |
| Company | COMPANY() |
| Category | CATEGORY() |
| Hyperlink Base | HYPERLINKBASE() |
| Page Info | |
| Background | BKPAGENAME() |
| Name | PAGENAME() |
| Number of Pages | PAGECOUNT() |
| Page Number | PAGENUMBER() |
| Geometry | |
| Width | WidthThis is a ShapeSheet cell, not a function |
| Height | HeightThis is a ShapeSheet cell, not a function |
| Angle | AngleThis is a ShapeSheet cell, not a function |
| Object Info | |
| Data 1 | DATA1() |
| Data 2 | DATA2() |
| Data 3 | DATA3() |
| ID | ID() |
| Master | MASTERNAME() Returns <no master> if shape has no parent master |
| Name | NAME() |
| Type | TYPEDESC() |
| User-defined Cells | |
| List of User-defined cells that a shape might contain |
Examples:
User.index User.txt User.Class |
| Custom Formula | |
| Any valid ShapeSheet formula | Examples:Prop.Cost * Prop.Resources User.txt “Area = ” & Width * Height |
Shape Data and User-defined cells show a list of those cells that might be contained in the shape, so the list can vary widely from shape to shape.
With Custom Formula, the world is wide open to any valid ShapeSheet formula you can come up with. A great one to try here is the shape’s area: just enter: = Width * Height as the formula.
In the matrix above, I also concatenated the text “Area = ” on to the formula, but you could also enter this as static text in the shape, then insert the calculation after it.
Super-smart Title Block Element: A Multiple-field Box
As a closing teaser, I’ll leave you with some food for thought: With the information we’ve talked about, and a bit of ShapeSheet know-how we can build Text Block Element Shapes that “do it all”.
The shape I’ve built below incorporates all of the Date/Time functions we’ve talked about before into one single SmartShape:
Using the Shape Data window, we can enter the text for the field name, which shows up on the left-hand side of the shape. Then we can select which bit of date/time info to show using the drop-down list:
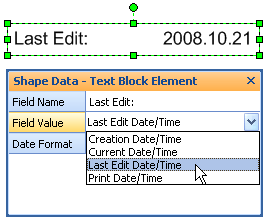
Using the third data field, we can set the date (or date-time) format. Several options are pre-entered, but you can add more, since it is an editable list:
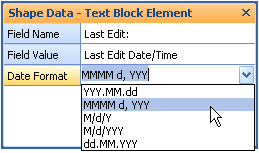
So with one single SmartShape, we can create a Text Block that has four different pieces of information, and we don’t need to mess around with the Insert > Field dialog at all!

You might also note, that although the text blocks are wider here than the first “Last Edit” box shown above, the text is still properly left- and right-aligned.
This was accomplished using what I call “Smart Tabs”–essentially ShapeSheet formulas in the Tabs section of the ShapeSheet. But that is a discussion for a future article.
You can download our Multi-text-block element here, and have a look under the hood to see what makes it tick:
Download: date-and-time-multi-title-block-element (59 KB)
Title Blocks: What’s Next?
In the coming weeks and months, we’ll talk more about how we can create SmartShapes that make “Title-blocking” easier and more efficient. Topics we might discuss include:
- How the SmartShape above was created
- Building one SmartShape that contains ALL of the Insert > Field options
- Using “Smart Tabs” to make text positioning better and more flexible
- Storing data centrally in the Document’s ShapeSheet
- Using Anti-scale ratios to get text and title blocks to behave in scaled drawings
- Getting and setting Title Block information using VBA Code and custom forms
- Creating smart drawing frames that automatically fit the size of a page
Let us know which of these topics sounds the most interesting, or suggest your own!
We can cover many, many aspects of Visio solution development within the context of title blocks and frames. And I think it is a good place to start the discussion, since practically every Visio-based solution I’ve ever worked on has required some amount of title-block-related development.
Title Block Series
Follow the series on Title Blocks as it develops, past present and future:


Nice development of Title Blocks, Chris. It’s a very useful, poorly “advertized” feature in Visio. This should raise it’s awareness. I believe there are borders that size and stretch to the sheet upon drag and drop, but what isn’t available is a title block that scales to the sheet size. That would be cool!
Hmm. Interesting. It’s not too hard to make a title block that stretches with the page.
I always thought that a title block should stay roughly the same size, the idea being that on a bigger drawing there is more space for more drawing details, and the title block takes up proportionally less of the paper.
Ie: the text on the title block is always 12pt, no matter the paper size, so to speak. Does that make sense? Is it flat out wrong?
The trick is making shapes that do both. Sometimes people want the text to stretch with the shape, other times they don’t. It’s hard to know which one folks will want on any given day.
– Chris
Hmmm. Probably true, except the title block seems unusually large for A-sized. Don’t know if D- and E-sized need to stretch.
Thanks for the tip, I’ve been using title blocks for a while now but I have one question that I’d like an answer to.. Lets say I’ve created a text field called ‘client’. Using either just the “text” entered in that text block OR (if it’s easier) defining and using the custom properties of the shape, can I then re-use/link the value/text in the text field in other parts of my diagram? i.e. on my title sheet I want to insert the text from this ‘client’ text block into other parts of the diag. I know you can use the Properties etc however I find most people forget to use the properties page so it’s easier to create my own text blocks on the front page.
cheers Tony
Stop press, have worked out how to do this myself. Not sure if this is the correct/easiest method but I inserted a Custom Formula field and stated the ‘client’ shapes CustomerProp field, i.e. formuala is =Sheet.20!Prop.ClientName
cheers Tony
Chris,
Great ideas. One question though: isn’t the formula inserted for Last Edit
DOCLASTEDIT()
and not
DOCLASTSAVE()
as you indicate above?
DOCLASTSAVE() is actually more useful in many cases [DOCLASTEDIT()changes every time you do anything in the drawing; DOCLASTSAVE()only updates when you save]. However, Last Save Date isn’t on the Insert/Field menu — you have to know to enter the formula manually in the shape sheet, or choose Last Edit Date and then edit the formula.
Scott
Thanks Scott,
I usually write these late at night! 😉
I’ve changed the article to list DOCLASTEDIT() as the ShapeSheet function that gets inserted for “Last Edit Date/Time”.
And thanks for pointing out the difference between the DOCLASTEDIT() and DOCLASTSAVE() functions. Hopefully folks will have a better understanding of how to go into the ShapeSheet and make a “last save” SmartShape!
This posting will help me greatly. I now can pretty much automate the process of getting my drafting guys to make sure that the necessary information is on each drawing. In addition I now have a way of doing better document control for ISO certification. This site is really the best VISIO site that I have run across in the many years that I have been using the application. Started before MS took over the product.
Keep up the great work
Another extension of “How Inserted Field Affect the ShapeSheet” might be the case when it’s desired to show both the file name and drawing page name at the same time, perhaps as the title. In this case, the value cell entry becomes a “run-on”, i.e., no spaces:
=TITLE()&CHAR(10)&PAGENAME()
Of course this assumes that the file was saved with title information entered. Note, it only needs to be entered once, and placed on the background page.
This is a great article, and site in general.
I started using this to modify my title blocks, but have run into one problem. How can I get the scale of the page (i.e. 3″ = 1′)? I don’t see a scale option in the fields list.
Hi Michael,
It’s not straightforward to calculate the page scale ratios. You have to refer to two ShapeSheet cells in the page’s ShapeSheet:
– ThePage!PageScale
– ThePage!DrawingScale
So, for example to get something that looks like 1:4, you could do this in the Custom Formula field of the Insert Field dialog:
= 1 & “:” & ThePage!DrawingScale/ThePage!PageScale
To get it in “inches=feet” format, then something like this:
= ( 0in + ThePage!PageScale )/1in & “”” = ” & ThePage!DrawingScale/12in & “‘”
Custom scale display (in the previous comment by Visio Guy) is EXACTLY what I was looking for. This makes me happier than medically appropriate. Thank you very much for the tutorial and especially for this example.
Thank you, Visio Guy. This was really helpful for me. I’d only used title blocks a few times before and didn’t really see their power and flexibility.
One thing I am stuck on though (and title blocks may not be a solution) is how to roll information forward into a table of contents for a set of tabs/sheets. In particular, I have
1. the page name (from the tab name) which in my data is a numeric value
2. a the page number from the Visio field for page number.
3. text descriptive title from each page (actually on-page text)
1 & 2 pull nicely into a TOC macro (by Stephen Turbeck & greenonions.com). What I can’t figure out how to do is get #3 a into the TOC. Any help would be appreciated.
I have in the past combined numeric value and text name in the tab, but that makes the tabs very wide and more unwieldy to navigate in document with many sheets.
Thanks, Lynn
Hi Lynn,
You can get a shape object, then get the text via shp.Text.
To get a special shape on a page, you could name each shape. See: What’s My Shape’s ID? for more info on shape ids and names.
So if you have a “title shape” on each page, you could give each one the name “MyTitle”.
Then you can get each title shape using pg.Shapes.Item( “MyTitle” ).
In your response dated “January 22, 2009 at 11:15 pm”, I tried this.
First, the quoted text will not work.
Secondly (most importantly), the scale does not update from page to page. It works on the Background page, but all the pages of different scales will not update – it shows the scale established on the Background page. It this the way it is supposed to work?
This is the last feature that I desperately need to get working for our company standard templates.
Hi RBB,
If you copy formulas from this site that have quotes, they might be the fancy 66 99 quotes. Visio’s ShapeSheet only accepts the straight quotes (”), so you might have to retype them. I’ve turned off the fancy quotes in the blog software several times, but they just keep coming back.
Shapes that show page scale use ShapeSheet formulas that don’t update on foreground pages when placed on backgrounds, so you’ll have to put scale-reporting shapes on each page, unfortunately.
Using the formula provided to show page scale worked! I am curious though it displays as a decimal… is there a way that it could show the fraction? 1/4″ = 1′ not 0.25″ = 1′
I am working on a title block for my team and your information has been very beneficial so far. I do have a question though. Is there an easy way to setup text boxes where users can format the text and that entered text be stored in a variable that is accessible across multiple pages? I guess something similar to creating pivot tables in Excel. I’m just trying to avoid having the users go into the file properties to make changes. I would much rather have a page dedicated to the user entered data that is then referenced throughout the rest of the document. For example, right now I am using the Manager and Subject fields to contain template and drawing version numbers. I would much rather have a page where I can almost build something like a form that will have labels for those values.
I apologize if this is a pretty trivial task that I haven’t found the answer to yet.
Hi
I have produced a Visio flowchart several pages long with Hyperlinks to navigate. All good from Visio (2010) and when published it allows navigation. This issues arises when produced as a PDF. The links work on every page but the first one which has the most links. All pages have a home icon and can navigate to the first.
The omnly difference is that the first has a scale of 1:5 not 1:1. This allows a downloaded shape to fit on.
I have copied a shape from the first and to another page and it works. I have copied the whole page and it does not work.
Anybody got any ideas?
Tony
I am trying to setup a title block for are flow charts. I need the title, part number, and drawing approvals to auto populate from a “data card” in are PDM vault. We already do this in Autocad and Solidworks. I have the block names and attribute names all of wich I should be pushed to visio from PDM. I am just not sure how to “find” them or set up the boxes so they know wher to look for the data. Any help would be great. Thank you!
Paul
Visio Guy says:
January 22, 2009 at 11:15 pm
—————————–
Visio guy said To get it in “inches=feet” format, then something like this:
= ( 0in + ThePage!PageScale )/1in & “”” = ” & ThePage!DrawingScale/12in & “‘”
My question is, where, exactly, would I enter this on the shapesheet? I see lots of fields but don’t know which should hold this formula.
Thank you
Never mind – I figured it out. I Did not use a title block but, rather used a text box and inserted a field within the text box.
I also found that copying and pasting the formula from the page above did not work because of the font (I think). I replaced the ” marks and it worked fine.
Now, I wonder if there is any way I can take my text box and create a shape out of it to put on my personal template for repeated use.
For your information.
You say ‘While this stencil has been around for several versions, I am not 100% sure if it ships with the Standard version of Visio. So there’s an outside chance that you might not have it on your PC.’
A titles template is present in the standard edition of Visio 2010.
Interesting site, lots of good information, Thanks.
Hi,
I have several layers of visio drawings, each layer is one page in Visio. I would like to insert the information about the previous layer on a layer.
Example:
On Layer 2: Layer 1 page name + Layer 2 page name
On Layer 3: Layer 1 page name + Layer 2 page name + Layer 3 page name.
I have searched a lot for how to insert previous layer page name, but I cant find it.
Anyone?
Thanks in advance!
Eva Pf
Hi Eva,
There is no “previous page” function, however you can get it to work, kind of.
1. On a shape on Page-1, in a document that has Page-1 and Page-2 (at least)
2. Enter text edit mode for the shape.
3. Go to Insert > Field
4. Select Custom Formula
5. Enter the expression: =Pages[Page-2]!ThePage!PAGENAME()
6. Click OK
The shape will now display the next page’s name, even if Page-2’s name changes. But there is no notion of “My page plus one” going on here.
There are probably other ways to solve this, probably best with a macro. For example, a short macro could insert a User-defined cell into the page’s ShapeSheet for every page. It could be User.NextPageName or something. Then shapes could simply refer to ThePage!User.NextPageName to display the next “layer”‘s page name. The macro would be used to set this up and refresh the values if you changed page order, etc.
Hopefully this isn’t all too confusing!
YES IT WORKED – THANKS A LOT!!! /Eva
Awesome! Glad to help!
How can I add in an image i.e. logo into a title block?
I’m trying to view where there are inserted fields in my document. Any suggestions on how to view these? Kind of like turning on and off editing/formatting markers in word?
Hi Frank,
No easy way to do this, other than with custom code of some sort.
Thanks, I figured that was the case. I hoped you knew of something I hadn’t found yet, though.
Their knowledge and experience is good enough tto provide alll
that a website needs for reaching the ace ranking. It also sewms critical to usse best ranking foreign language keywords
as the link anchor text to non-English language website.
Search engines first try uunderstanding a page from these tags
that incorporate relevant information.
Hey visguy
i have entered the version number field in as a requirement for my degree level diagrams and i was wondering if there is a way to automate this somehow rather than me having to manually change what version number it is and occasionally forgetting and getting marked down for it.
Hello Visguy,
I’m trying to represent custom properties, which I’ve added to each page-Sheet, in some shape in the background page. The background shall be represented on each page of the document so that it would show the custom properties of current page. The problem is, I can’t find out how the variable page linking works.
I was trying to get it like this:
=Pages[PAGENAME(750)]!ThePage!Prop.PropName
but it does not work. I was trying to submit PageName to the listing Pages[] also with other methods, but without success.
Do you have any idea what the problem might be?
P.S. if I’m representing only PAGENAME() in the shape on background, than I can see on each page with this background appropriate PageName, but it wont to work as identifier for Pages[], it accepts the argument only if I’m typing it like fixed value (e.g. Page-1), but not if I’m trying to get the PageName by means of calculation….
I would appreciate any suggestions.
Best regards
Vladyslav