 Sometimes you really need shapes that can’t be connected to. While Visio has settings in the UI for doing this, they don’t fully work. This article will show you the workaround!
While every shape in a diagram should be noticed, cherished and nurtured, some elements of a diagram should be completely ignored by Visio’s dynamic connectors.
This article discusses how to make shapes “unglue-able”. Visio’s user-interface has settings to “mostly” do this, but there is one nagging issue that is arguably a bug. When a connector is duplicated via Ctrl + Dragging, it will still glue to a shape, despite setting the various “don’t glue to” settings (steps 1 and 2 below). To workaround this bug, step 3 below must be done in the ShapeSheet.
So for the impatient-and-experienced amongst you, here is the quick recipe to make a shape “truly no-glue-to”:
- Set Developer > Behavior > Layout tab > Placement Behavior to “Do not lay out or route around”
(ShapeSheet: Miscellaneous.ObjType=4) - Turn off “Snap to member shapes” )if the shape is a group)
(ShapeSheet: Group Properties.IsSnapTarget=FALSE) - Set GlueInfo.GlueType = 8
This works-around the issue where Ctrl + Drag duplicates of connectors from glue to shapes despite the proper settings.
For the rest of you, the full story follows below!
Connected Diagrams with Title Blocks & Frames
The classic example that I run into a lot when doing work for customers is the title block and frame situation.
Customers need special, company-specific frames and title blocks, which I create for them. Many have fancy behaviors, such as snapping to the bounds of the page, showing the drawing scale automatically, in a standard format, elements that stay the correct size no matter what page the scale is at–the list goes on. At any rate, they’ve got frames around the page, and title blocks with lots of elements on one or two sides of the drawing.
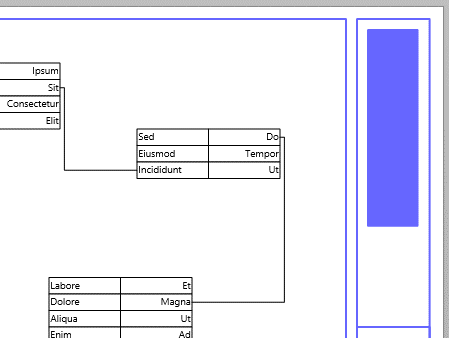
Below is a mock-up of a typical case. I’ve shown the drawing frame and title block with blue lines and fills. The meat of the drawing is the schematic I/O blocks. You can see that some of the individual ports have been “wired” together. This is done by gluing dynamic-connector-ends to the connection points on the outside of each port (you can’t see the connection points until you hover near them with the Connector tool.)
If the customer is creating any kind of connected diagram, such as the one above, and these shapes are going to be inside a frame or near the title block, then I have to take special care to set up these shapes so that connectors can’t glue to them.
The Default Problem
If you just draw a frame and title block, and perhaps group them together into a single shape, things will go wrong quickly. A default shape–drawn with the drawing tools on the Home tab–will accept an incoming connector. So now you’ve got this frame shape that encompasses nearly the entire drawing page. No matter where the connector goes, it will try to snap and glue to the frame.
Note: the frame in this example has No Fill, but nonetheless, Visio sees it as a target for gluing connectors.
Now, if you’re accurate enough with the mouse to find connection points on the I/O ports, then you will be OK. But if you need a free-standing connector–say it is a work-in-progress and doesn’t have a target port yet–then you’re out of luck.
Also, the frame will flash green (or red in older versions of Visio) as you move the Connector tool around the page. This will likely drive you insane.
This animation illustrates what happens:
One simple solution is to place a title blocks and frames on background pages. In many cases this solves the problem. However, situations where it doesn’t work include:
- Document has pages with different sizes and orientations, so separate background pages are needed for each size-orientation pair.
- Title block information is page-specific, so blocks need to be on the target pages.
- Different page types might use different standard title blocks and borders.
- Foreground page information doesn’t always show through from background pages. You can insert smart text fields on background pages, for example page number. The number will update independently for each foreground page that uses the background page. But for more complicated fields that involve ShapeSheet calculations–such as drawing scale–the foreground page updating fails.
Visio’s Built-in “Almost” Solution
Fortunately, Visio has a setting in the user-interface that remedies the situation…almost. To get connectors to ignore your frame and title block, try this:
- Select your frame or title block or both.
- Make sure the Developer tab is showing.
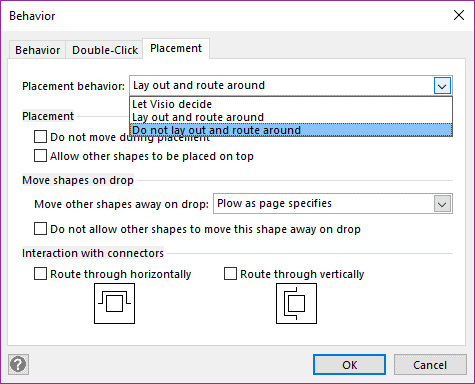
- Go to: Developer > Behavior > Placement tab
- In the Placement behavior drop-down, select Do not lay out and route around
- Hit OK
Your shapes will now, for the most part, be ignored by connectors.
The first problem involves gluing to subshapes.
If your to-be-ignored shape or shapes have subshapes, then the Connector tool will find them and try to glue to them. You’ll notice the green highlighting as you move the mouse about.
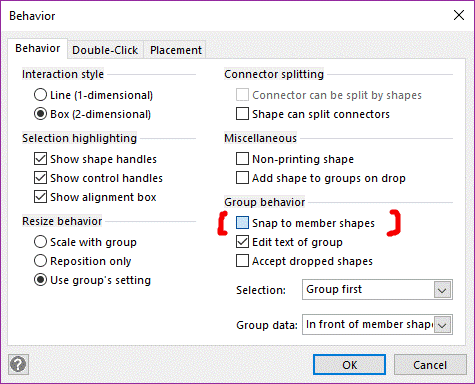
You can fix this, using the same dialog as before. Go to the first tab, Behavior, then uncheck Group behavior > Snap to member shapes in the lower-left corner:
Voila! Your shapes will no longer be targeted by the Connector tool. And connecting your other shapes will be much easier, and a lot less distracting.
We’re Not Out of the Woods Yet!
Ok, walk back on the stage, and pick the microphone back up!
You can draw an unattached connector. You can leave one and free, and glue the other to a port’s connection point. You don’t have all that annoying highlighting/flashing as you move the Connector tool cursor over title block elements and over the frame. Life is good. What could go wrong?
Try this:
- Draw a free-standing connector
- Duplicated by holding down the Ctrl key as you left-click-drag that shape.
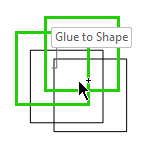
POOF! The resulting duplicate connector glues to the frame! Ooops! Same old, weird highlighting and gluing behavior:

This only occurs when you specifically Ctrl + Drag a copy of a connector. While that doesn’t sound so bad, it can be really, really strange if you are zoomed in. The connector that you allegedly just drag-duplicated will disappear before your eyes! You’ll have to zoom out to find it, and even then, it might just be a single point, if both ends happen to glue to the center of the frame!
The Last Mile
I have found that one more setting will fix this last problem. You have to go into the ShapeSheet to do it, but it’s not hard.
Since you’ve already activated the Developer tab, you can now right-click your shape, and choose Show ShapeSheet.
As you scroll down through the ShapeSheet, notice that in the Miscellaneous section, the cell ObjType has been set to 4. This was done when you set the “Do not lay out or route around” setting earlier.

Just below the Miscellaneous section, you’ll find Group Properties (if your shape is, in fact, a group!) Notice that IsSnapTarget is set to FALSE. You did this via the UI when you unchecked “Snap to member shapes” on the Behavior tab of the Behavior dialog:

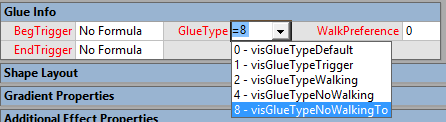
The last, missing setting is only available via the ShapeSheet, and has yet to be set. Approximately 9 sections below Group Properties, you’ll find Glue Info. In this section, we need to set GlueType to 8, or visGlueTypeNoWalkingTo.
Once you’ve done this, your title block and frame group will be fully, 100% connector-proof!
Note: if you don’t find the ShapeSheet sections illustrated above, try this:
- Right-click inside the ShapeSheet window
- Choose View Sections…
- Ensure that Miscellaneous, Group Properties and Glue Info are all checked.
Make a Tool
The main reason I wrote this post is because I keep forgetting what that final setting is (I think I’ve written it down in OneNote, but I still have a hard time finding it via search…) So I figured I would create an article, then I’d know where to look!
I’ve also rolled it into one of the utility add-ins that I use for my own development. If you’re a coder, here’s a snippet that will make a selection of shapes “truly-no-glue to”. It’s a bit disheartening to look at after all the explanation in this article. It boils down to three settings, which you can set via the ShapeSheet, which can be automated in precious little code!
This sample is in c#, hopefully the VBers out there can mold it to do their bidding as well:
 // Get the Visio.Selection object - the set of shapes
 // selected in the active window:
 Vis.Selection sel = visApp.ActiveWindow.Selection();

 // Loop through each shape:
 foreach(Vis.Shape shp in sel)
 {
   // The secret missing setting that prevents
   // Ctrl + Drag gluing of connectors:
   shp.CellsU["GlueType"].ResultIUForce = 8; //...visGlueTypeNoWalkingTo

   // "Do not lay out or route around":
   shp.CellsU["ObjType"].ResultIUForce = 4; //...visLOFlagsDont

   // Uncheck: "Snap to member shapes"
   // Only needed for groups:
   if (shp.Type == (short)Vis.VisShapeTypes.visTypeGroup)
   {
     shp.CellsU["IsSnapTarget"].ResultIUForce = 0; //...false
   }
 }
Now to remember where I put the tool…

Good god, thank you for this. The snapping to the group thing was killing me.
Is it possible to create a new line (shape) that does not glue or snap and add it to the insert ribbon so it can be used when needed and not have to deal with all these settings just to draw a straight line?
Hi John,
You could just use the line tool. There’s a tool drop-down at Home > Tools.
Right-click the line too and choose “Add to Quick Access Toolbar” to put it at the top of the window.
The line tool draws straight lines. They will glue to connection points on shapes and glue to guides, but they won’t go crazy and try to route around stuff like the Dynamic connector does.
You can hold down Shift while drawing/editing a line to constrain it to horizontal, vertical or 45-degree diagonal.
Hi John
I have tried to use this approach on the Wall Shape (Walls, Doors & Windows Stencil). When I snap walls together as a “T” joint the walls are glued together, when the walls are joined as a corner they only snap together (they do not glue together). Is there a way to turn of the dynamic glue connection point for wall shapes (T joints) but still allow them to snap together.
The approach described here did not work, neither did turning off glue (tools/snap & glue)
Cheers
Dan
This is AMAZING! I have been going crazy since the update to Visio 2019. It solved the problem!
Thanks for the boost, Steve, appreciate it!
It’s really a niggling problem that I would ALWAYS forget on various projects, and would have to fix at the last moment. I’ve built it into my helper-utilities now, so it’s a button-push-fix away now. I should release a one-button add-in for the Visio community and save you all the trouble!
Thank you so much Visio Guy!