
If you use Visio for CAD-like purposes, you might need to make revisions or “AS-BUILT” modifications to your drawings from time to time. Often this is shown by drawing a squiggly cloud, or bubble, around the portion of the drawing that has been modified.
I’ve created three shapes for doing this for you to download.
The Way It Was
Visio has a Revision Cloud shape on the Annotations stencil that is…well…less than adequate. (You can find it under File > Shapes > Visio Extras > Annotations.) The problem is that you don’t get more bubbles as you stretch the shape; it just looks wrong.
Better Mousetrap
The shapes that accompany this post utilize custom patterns. Custom patterns are elemental graphics that can repeat themselves as line or fill patterns. I won’t go into how to create custom patterns in this article, but there are several links at the end of the post that will take you to this knowledge.
The new bubble shapes define a pattern that has three bumps. When you apply them to a shape, they simply repeat around the perimeter, giving you a nifty Revision Bubble!

You can see where the custom bubble patterns are stored in the Visio document by clicking this menu item: View > Drawing Explorer Window, then expanding Line Patterns tree node.
For this post’s download, you will see three patterns: RevBubble (L), RevBubble (M), and RevBubble (S):

To apply a pattern to a shape, simply select the shape and choose Format > Line from the menu. Click the Pattern drop-down and scroll all the way to the bottom to see the custom patterns available:

It’s also a good idea to apply some corner rounding if your revision shapes have a lot of sharp corners. The custom bubble pattern looks better when it goes around soft, rounded corners than when it has to be stretched around a sharp corner.
Make the Bubbles Bigger or Smaller
There are two ways that you can increase the size of the bubbles on your shapes.
1. Apply a different bubble pattern, ie: “RevBubble (S)” for small, “RevBubble (M)” for medium, and RevBubble (L) for large.
2. Increase the line-weight of the shape. The bubbles will get bigger when you increase the line-weight of the shape, but the thickness of the bubble-lines will also increase.
Of course you can mix the two, and this two-axis diagram attempts to illustrate what is going on! It’s kind of luck a Bang for the Buck chart, in that the bubble size increases as you go right or up — as you increase the pattern size or the line-weight.

Hope you find these shapes useful!
Download “Visio Bubble Revision Shape”
s!Aj0wJuswNyXlhx2GzEBgoFsQiRGE – Downloaded 20183 times – 103.00 BNeed More? Have Spare Change but No Patience?
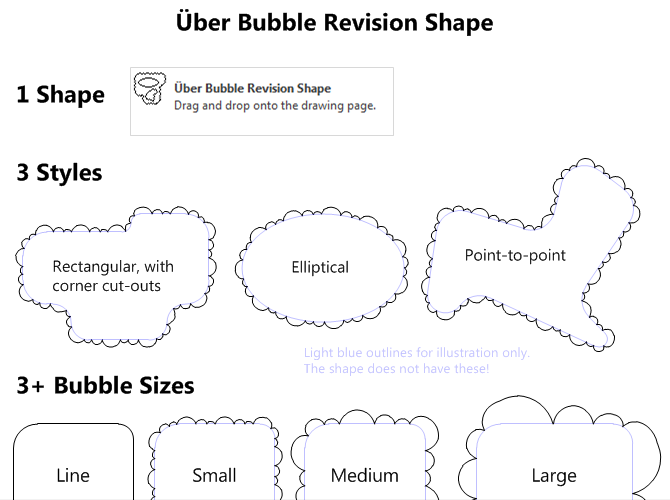
Try out the Über Bubble Revision Shape that I have developed, available via Gumroad. It has the same three bubble sizes as the free version above, plus a line mode that makes it easy to see what you’re doing, during adjustment. It also has three built-in forms: rectangle with corner cut-outs, ellipse, and point-to-point with eight independent vertices. This is all built into one single shape, so the shape is not only more capable than the free version, it is more streamlined! Have a look:
More on Visio and CAD
More Information on Creating Custom Visio Pattern
- Stupid Visio Tricks #821: Thought Balloons
Essentially the article I didn’t have to write! Unfortunately, I didn’t find this link till it was too late! This is from Dan Brown, the man who brought you the Visio Keyboard Shortcut Mousepad! - Creating Custom Line, Fill and Line-end Patterns in Visio
A farily-detailed article from Chapter 10 of the on-line version of Developing Visio Solutions on MSDN. - About custom fill, line, and line-end patterns
A rough overview of Visio’s custom line and fill patterns from Office Online. - How to create a custom fill pattern by using a bitmap image in Visio
An interesting step-by-step from Microsoft Support that shows that you can use images in your Visio custom patterns as well! - Custom line ends
A quick step-by-step process for creating custom line ends from Visio The Blog - Custom Visio Solution: Candy Equipment Manufacturing Example (VBA and Active X)
I wrote this demo for Visio Corp. back in 1999. There’s heavy use of custom patterns in the Visio document that you might find interesting! - Visio & AutoCAD

I am fairly new to Visio and have been assigned the task of editing floor plans. There does not seem to be alot of info dealing with CAD or Architecual drawings.
1. Can all a layer be moved to another layer without doing it shape by shape in the drawing explorer window?
2. Can I convert an AutoCAD shape into a Visio shape at the Master Shape so all instances of the CAD shape are changed at once?
I would like to use these bubbles in Visio 2002 Prof.
However, you probably made this vsd-file in a newer version of Visio. Any chance you could save it in a format compatible with Visio 2002?
I have a flash site
i’m looking for the script who makes google ads with flash.
do you know this script?
Loved your tool, I had a situation where I need to update a Visio drawing to reflect the new changes,
Visio in itself does not have this master shape in their selection, your stencil served my purpose. You should sell this stencil to Visio for lots of $$$$$ for such applications,
Thanks,
Biju
Thanks so much for taking the time to share!
Good stuff!
Is there any way I can make an inverted bubble (on in wich the arcs bend inwards)?
Thanks for shapes!
Hi Viera,
If you just draw a polygon in the clockwise direction, then apply the bubble line-pattern, the bends will peak towards the inside of the shape.
This is so close to what I need. How would one modify this so all the bubble peaks are the same size? (I need to conform with some drafting rules)
Thank you. (It is sad that this is not a standard line type in Visio)
I cant download the revision bubble tool. Can you email it to me?
Thanks
Aj,
What is the problem with the download? It would help if you describe why you can’t download, or what errors your seeing?
Thanks,
Chris
Is there any way to do this in Word? I know it’s a bit beyond the scope, but it would really help…..
Hi Adam,
You could probably use the Visio shape. Make sure it has no fill, then paste it into Word. If you Paste > Special, As Metafile, then you can set the Wrap Text behavior to In Front of Text, and freely move the bubble around.
As a metafile, you won’t be able to re-edit the revision bubble as you can in Visio, though. So you’d have to guess at the shape you need before pasting.
Also, Word has a Cloud Callout from it’s Insert Shapes feature. This is similar, except it has the thought-bubble-callout bit that is somewhat distracting. Again, you’ll have to give it No Fill, then set it to wrap In Front of Text so that you can see your text behind it.
To get rid of the callout portion, you can choose Edit > Shape, Edit Points, then right-click the points you don’t want and select Delete Point.
Chris,
The download link is not working for the three shapes. It throws a “Error 404 – Not Found” error (missing page).
Bob
Works for me in IE8 and Firefox. Anybody else having download problems?
Excellent stencils now if I could just find a way to hatch fill the cloud automatically it would fit my needs perfectly
Pete
Pete,
If you open the ShapeSheet for a bubble revision shape, you can set Geometry1.NoFill to False. Then you will be able to fill the shape.
BUT the bubble bits around the perimeter won’t take a fill, so it might look kind of sloppy.
It might be possible to devise a custom line pattern that works with a fill pattern, but I never really thought about it. In the as-built drawings I’ve done, we just drew bubbles around parts of the drawing and didn’t do any shading.
Hi Visio Guy
Thanks for getting back to me and yes your proposal is a partial solution. I’ll play with your other suggestions though not being a prolific user of Visio my skill set is somewhat limited.
The effect I’m trying to get is red hatch lines on a transparent overlay so that I can highlight areas of a drawing that have to be deleted. Not an easy one eh?
Still I’ll try
Once again Thanks
Visio Guy,
This stuff is great. I noticed that your S, M, & L lines are of the same width and height in the custom line editor. How were you able to scale up the M & L lines without literally changing the size of the arc in the custom line editor? I suspect you had to set some setting in the line editor for the M & L lines.
And I’m not talking about how to resize lines which is mentioned in your article (that’s simple).
Hi Irv,
I do this by drawing the custom line pattern such that it is bigger than the alignment box. Say you draw a rectangle shape. It is exactly Width x Height big.
The Height of a custom line pattern maps to the thickness of the line. This means, in practice that you have to apply really thick lines in order to see the patterns.
I make my patterns taller than the height box so that you don’t have to enter custom line weights. So the Large pattern probably sticks out of it’s alignment box by a whole bunch (ie: -Height*2 to Height * 3) and the medium pattern a little bit less (ie: -Height to Height*2)
Hope this makes some sense…
Chris
Chris,
Wow…learn something nifty everyday. I would have never guessed something like that would change the size of the pattern. Thanks for your article and advice.
Irv
I also get a 404 error when trying to download the shapes.
There was an old link at the beginning of the article that I’ve removed. The download link at the end should work.
Thank You! This site was helpful, I use Visio rarely, things not found in help was also available
How to change the fill color?
Hi Eric,
Since these shapes use custom line patterns around their edges, they don’t fill very well, so I disabled the feature.
You can try it by doing this:
1. Show the ShapeSheet for one of the bubble revision shapes. (Window > Show ShapeSheet, or right-click if you’ve enabled Developer Mode)
2. Change the value of the cell Geometry1.NoFill from TRUE to FALSE.
You can now fill the revision shape, but portions within the bubbly part won’t fill. It might still be OK if you are doing a white fill or a partially transparent fill, though.
Exactly what I needed! Thanks for taking the time!
You’re welcome, Katy!
Awesome! Been wanting this shape for a long time. Thanks for posting.
Glad you like them, Mike!
I remember drawing these as a summer intern, by hand, on As-Built drawings for the Port of Tacoma in 1988.
I can’t get them to work.
I downloaded our file, and when I open it, it works fine. I can change the size and it seems to be exactly what I need.
My problem is that when I try to use them in other visio-documents the clouds are just squares or oval with no cloudy line.
Can you help me with this one? I think the problem is that I can’t make custom lines. I have MS Visio Standard 2010.
Hi Jon,
That is a puzzler! I opened the file (in Visio 2010) and dragged a bubble shape into another document and it worked fine.
When you drag the shape to another document, the custom pattern definition should come along for the ride as well.
Visio Standard 2010 should work just fine. Custom line patterns are not specific to particular Visio editions.
I figured it out.
But I have another question. Do you know how to fill the bubble with a pattern with no fill color, so that the layer underneath can be seen through the pattern? This should be solved with an option to have “no fill color”, instead of white, but I can’t find this option (probaly because it doesn’t exist).
Hi Jon,
Would you mind sharing what the problem was and how you fixed it?
Hi Jon,
I don’t understand your question. The revision bubble shapes do not have a fill at all!
Vote #1 for fillable version of these 😉 Maybe Jon stumbled on the answer how by accident?
Correct Dean, I stumbled on the answer by accident 🙂
Let me try to clarify my other question;
As you might already have guessed, I’m working with as-builts. From time to time, I need to fill the revision cloud with something that indicates that the equipment inside the cloud shall be removed. But if I use standard filling options in Visio, I can’t see whats inside the cloud, or in other words, I can’t see which equipment that’s supposed to be removed.
Ah ok. There’s a bit of a Visio limitation. The basic shape can be configured to have a fill, but that fill won’t extend to the areas under the arcs in the bubbles. Those bits are specified by the custom pattern that makes the bubble shapes.
So you could (after I do an edit) make say, a rectangle filled with a hash or a partially transparent color, but the bits under the arcs would remain without a fill. I could fill them with a hash or a color, but that would be fixed. Ie: you would have to make a pattern with a specific fill under the arcs, then the shape would have to have the matching fill to complete the illusion.
You saved me the day.
THANKS!
Happy to help!
Hi I have posted this on the discussions Shapes & Templates » Using Revision Bubble Shapes form but haven’t got any replies and thought that you might notice it if it were here. I have been using the “Revision Bubble Shapes” and they seem to work well. The only problem I have is that when using Visio Viewer the bubbles don’t show up. It reverts to a line instead of the bubbles. Is there a way to get the visio viewer to see the bubbles? The visio viewer is loaded on a different computer. I currently am using Visio 2007 and the Visio Viewer is 2007. Is there a way around this?
Thanks
VG,
Thanks so much for sharing your skills and energy with us. I need the Revision cloud and also need the reversed Revision cloud, which is used as a HOLD cloud, the points being on the outside.
The purpose of a HOLD cloud, as distinct from a Revision cloud, is to indicate an incomplete design. A drawing may be progressed through a design stage if their is some incomplete detail that can be resolved at the completion of the project, as in the type of lock that may be fitted to a door. It won’t stop the house from being built, but it could be detailed as a HOLD, so that the builder knows he will be supplied the information further into the job. Maybe a door lock is not the best illustration.
Normally in a design package all HOLDS are detailed in a HOLD register. The HOLDS are lined through in the register, when the HOLD/s are lifted. It’s no use having HOLDS on a drawing if everybody concerned is not aware of their existence, hence the need for a register.
Thanks again, VG, and kind regards,
George
I cannot seem to get the bubble feature to apply to my shapes. When I do the download, I do not see a Line Patterns folder.
Hello VG,
There two control handles in the ‘Rev Area’ bubble that can be used to reposition the corner. How can I add more such control handles to the other two corners?
Thanks,
HJ
Hi HJ,
I’ve made a “Pro” version of the shape, which you can purchase here: Über Bubble Revision Shape.
Hey, just wanted to thank you for this tip.
This is going to save me a lot of time !
Keep up the good work.
Thanks so much for putting this up. This is very helpful to me. Glad there’s smart people out there.
I required symbol of Limit switch High Low (ZSHL) in bubbles.
Please advise
Hi Mahantesh,
I don’t know what to tell you.
Chris
i want a revision bubble with the same arc radius, how to do that?
While these Rev Clouds work well in Visio, they do NOT convert properly in AutoCAD, they end up being smooth line work only. Is there a trick to have them show up “cloudy” in AutoCAD??