If you’ve read our last article, Visio Multi-shapes, then you know what a great feature multi-shape-ness can be.
However, until you graduate from Visio Geek University (go VGU!), and become proficient with ShapeSheets, those pesky multi-shapes can be quite difficult to build.
So what if user’s could somehow define their own multi-shapes?
That question has burned today’s article into my mind, and today it comes to you via the information super-highway. Ladies and Gentlemen, may I introduce to you the Configurable Stickman, which who can be set to one of five positions.
And YOU can define the positions yourself!
Actions Not Words
It’s easiest to see what the Stickman can do by having a look. I’ve created a few Stickman configurations, which are available in the download that accompanies this article:
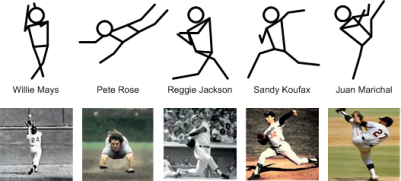
Since baseball season has just ended, the Phillies are champions, and millions of Americans are going through withdrawal, the first incarnation is called Baseball Heroes:

That’s one single shape that can be set to five different positions!
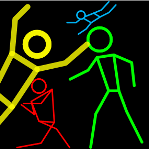
Another version pokes fun at folks who aren’t fortunate enough to live on America’s most-wonderful West Coast. I call it Ape to Man:

So with just two shapes, we’ve got ten different options. Even more interesting is that both of these shapes were created from the same shape! That’s the “configurable” part of “Configurable Stickman!”
Using the Stickman
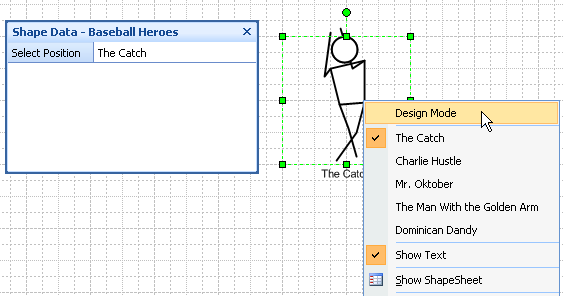
Using a pre-configured Stickman is easy enough. All you have to do is right-click on him, and choose one of five poses:

There’s also a Shape Data field, available in the Shape Data Window. You can see it on the right in the illustration above. Select Position offers a drop-down list with the same five options you see in the context menu.
The nice thing about the Shape Data field is that you can select several shapes at once and change them. With right-clicking, you can only operate on one shape at a time. I call this; “dual mode“.
Designing New Stickmen
In the last illustration, you might have noticed the “Design Mode” option in the context menu. Well, the Configurable Stickman has two modes: Design Mode and Run Mode. Or just Design Mode and NOT Design Mode, if you will.
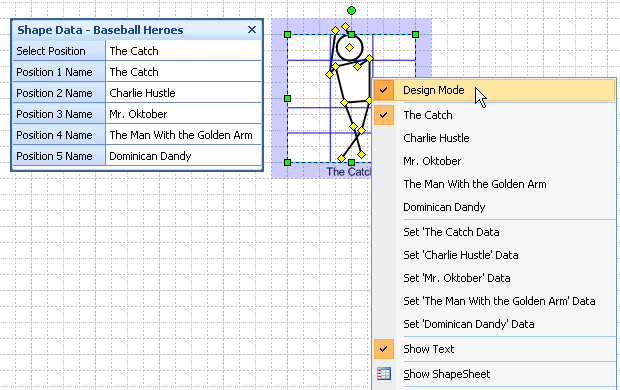
When you check Design Mode, the Stickman will change appearance. You will see a blue outline and grid, plus a bunch of yellow control handles, and five new Shape Data fields will magically appear in the Shape Data Wndow:

You can pull on the control handles to repostion the head, hands, elbows, shoulders, hips, knees and ankles of the Stickman. And you can give the position a name, using one of the five “Position N Name” Shape Data fields.
Once you’ve got your man set the way you like, you can then “burn” the current position into the shape’s memory by selecting one of the “Set ‘position name’ Data” options in the right-click context menu.
Yup, that’s right, the Configurable Stickman works like a Field Programmable Gate Array, he’s an open book, just waiting to be re-programmed!
So let’s re-iterate the steps to re-configure the Stickman. Just follow these steps:
- Right-click the shape and make sure “Design Mode” is checked.
- Define a position by moving the yellow control handles to form a new body pose
- In the Shape Data window there will now be five Position fields that allow you to specify names for each pose.
- Select one of the Shape Data fields and give it a new name, for example: “Standing Up”
- Right-click the Stickman and choose: “Set ‘Standing Up’ Data. This has the effect of “burning” the current pose into the shape’s memory.
- Repeat for all five poses.
- Right-click and uncheck “Design Mode”.
Once you’ve got your man set the way you like, you can disable the ability to go into design mode by setting a value in the ShapeSheet.
Note: if you don’t have five poses, just clear out the name of one of the positions when you’re in Design Mode. Once you’re back in Run Mode, the option won’t show in the context menu. (Although it will show as a blank in the Shape Data drop-down list – a bug I didn’t have time to fix…)
Locking the Stickman
Once you’ve defined a set of poses, you might want to ensure that your users don’t mess the shape up. I’ve added a back door feature that lets you hide the Design Mode option from the context menu. This requires using the ShapeSheet, so buckle up and hold on tight!
To turn off the Design Mode menu, just go to Window > Show ShapeSheet and look for the User-defined Cells section.
There you’ll find the cell: User.showDesignMode. Just change its value to 0 or FALSE. It’ll look something like this when you’re done:
User.showDesignMode = FALSE
The Design Mode option won’t show in the shape’s context menu any more, and your end-users won’t accidentally mess up your poses. Your Stickman will be safe from curious hands.
In the download at the end of this article, both Baseball Heroes and Ape to Man have show design mode turned off, so you won’t accidentally change them.
Sneak Peek Behind the Scenes
A lot of readers are interested in building there own shapes, so I like to say at least a few words about how the shape works. If you’re not one of those types, I strongly recommend skipping to the next section…NOW!
For the rest of you brave soles, I won’t go into extremely deep detail right now because…well…you’ll fall asleep, but I’ll give a general overview of how the shape works, and show off some frightening ShapeSheet formulas just to titillate and amaze.
The shape makes heavy sick use of the SETF ShapeSheet function. It uses this to blast data for the current positions of the yellow control handles into position-defining cells, and to blast stored data back to the control handle cells.
Watching the Current Configuration
So first off, we have a cell called User.dataCurrent that holds all of the x- and y-values for all of the control handles, normalized as percentages of the shape’s Width and Height.
Here’s the formula:
User.dataCurrent = Controls.head/Width&";"&Controls.head.Y/Height&";"&
                   Controls.shoulderL/Width&";"&Controls.shoulderL.Y/Height&";"&
                   Controls.shoulderR/Width&";"&Controls.shoulderR.Y/Height&";"&
                   Controls.elbowL/Width&";"&Controls.elbowL.Y/Height&";"&
                   Controls.elbowR/Width&";"&Controls.elbowR.Y/Height&";"&
                   Controls.handL/Width&";"&Controls.handL.Y/Height&";"&
                   Controls.handR/Width&";"&Controls.handR.Y/Height&";"&
                   Controls.hipL/Width&";"&Controls.hipL.Y/Height&";"&
                   Controls.hipR/Width&";"&Controls.hipR.Y/Height&";"&
                   Controls.kneeL/Width&";"&Controls.kneeL.Y/Height&";"&
                   Controls.kneeR/Width&";"&Controls.kneeR.Y/Height&";"&
                   Controls.footL/Width&";"&Controls.footL.Y/Height&";"&
                   Controls.footR/Width&";"&Controls.footR.Y/Height
Yeehaw!!!
It looks scary, but considering there are 12 control handles for positioning the shape, and each handle has an x and y position, that quickly makes for 24 items to watch. So we basically have 24 items of roughly the same formula, plus a list separator in between each item. Not so bad. (Note: I’ve added line-breaks for clarity. In the actual ShapeSheet formula, it IS much scarier looking!)
Flashing the Data to a Named Position
When you click one of the “Set Position” context menu items, you blast the values in User.dataCurrent into onf of five data-holding User-cells: User.dataPos1, User.dataPos2, User.dataPos3, User.dataPos4 or User.dataPos5.
So when you click on “Set Position 1 Data”, the information in User.dataCurrent get’s “flashed” to User.dataPos1. It looks something like this when it’s all done–just a bunch of numbers!
User.dataPos1 = "0.484375; 0.8984375;
                 0.375; 0.75;
                 0.640625; 0.8125;
                 0.328125; 0.6875;
                 0.546875; 0.75;
                 0.375; 1.03125;
                 0.453125; 1.0625;
                 0.4453125; 0.46875;
                 0.640625; 0.484375;
                 0.515625; 0.28125;
                 0.578125; 0.25;
                 0.578125; 0.0625;
                 0.421875; 0.03125"
Striking a Pose
The values in the User.dataPosN cells are just waiting for your end-users to select a new position. And once a user does that, another bunch of SETFs blast this numerical data into the control handle cells.
Here’s an example of one of the “data-flashing” cell formulas:
User.triggerPos1 = IF(User.position=1,
                   SETF(GetRef(Controls.head),""&"Width*"&""&INDEX(0,User.dataPos1))+
                   SETF(GetRef(Controls.head.Y),""&"Height*"&""&INDEX(1,User.dataPos1))+
                   SETF(GetRef(Controls.shoulderL),""&"Width*"&""&INDEX(2,User.dataPos1))+
                   SETF(GetRef(Controls.shoulderL.Y),""&"Height*"&""&INDEX(3,User.dataPos1))+
                   SETF(GetRef(Controls.shoulderR),""&"Width*"&""&INDEX(4,User.dataPos1))+
                   SETF(GetRef(Controls.shoulderR.Y),""&"Height*"&""&INDEX(5,User.dataPos1))+
                   SETF(GetRef(Controls.elbowL),""&"Width*"&""&INDEX(6,User.dataPos1))+
                   SETF(GetRef(Controls.elbowL.Y),""&"Height*"&""&INDEX(7,User.dataPos1))+
                   SETF(GetRef(Controls.elbowR),""&"Width*"&""&INDEX(8,User.dataPos1))+
                   SETF(GetRef(Controls.elbowR.Y),""&"Height*"&""&INDEX(9,User.dataPos1))+
                   SETF(GetRef(Controls.handL),""&"Width*"&""&INDEX(10,User.dataPos1))+
                   SETF(GetRef(Controls.handL.Y),""&"Height*"&""&INDEX(11,User.dataPos1))+
                   SETF(GetRef(Controls.handR),""&"Width*"&""&INDEX(12,User.dataPos1))+
                   SETF(GetRef(Controls.handR.Y),""&"Height*"&""&INDEX(13,User.dataPos1))+
                   SETF(GetRef(Controls.hipL),""&"Width*"&""&INDEX(14,User.dataPos1))+
                   SETF(GetRef(Controls.hipL.Y),""&"Height*"&""&INDEX(15,User.dataPos1))+
                   SETF(GetRef(Controls.hipR),""&"Width*"&""&INDEX(16,User.dataPos1))+
                   SETF(GetRef(Controls.hipR.Y),""&"Height*"&""&INDEX(17,User.dataPos1))+
                   SETF(GetRef(Controls.kneeL),""&"Width*"&""&INDEX(18,User.dataPos1))+
                   SETF(GetRef(Controls.kneeL.Y),""&"Height*"&""&INDEX(19,User.dataPos1))+
                   SETF(GetRef(Controls.kneeR),""&"Width*"&""&INDEX(20,User.dataPos1))+
                   SETF(GetRef(Controls.kneeR.Y),""&"Height*"&""&INDEX(21,User.dataPos1))+
                   SETF(GetRef(Controls.footL),""&"Width*"&""&INDEX(22,User.dataPos1))+
                   SETF(GetRef(Controls.footL.Y),""&"Height*"&""&INDEX(23,User.dataPos1))+
                   SETF(GetRef(Controls.footR),""&"Width*"&""&INDEX(24,User.dataPos1))+
                   SETF(GetRef(Controls.footR.Y),""&"Height*"&""&INDEX(25,User.dataPos1)),0)
Are you still here?
So the ShapeSheet formulas look complicated, but the logic is fairly simple.
Normally, I wouldn’t recommend using SETF so much in a shape, because, well the ShapeSheet is a spreadsheet engine, and cells are supposed to depend on each other, not blast each other’s values.
But considering that the SETFs are called relatively infrequently, I think it’s OK here. The SETFs only get called when a user specifically selects a new pose, or when a designer flashes a set of data.
If these things were being triggered, say every time the Width was changed, then I would get worried.
It’s also interesting to note that there is no reason that this shape needs to be a Stickman. The control handles could control the position of anything.
There’s nothing to stop you from deleting the Geometry from the Stickman’s group, then adding new Geoemtry, or sub-shapes inside of the group, that react to the control handle positions.
You could create a set of pre-configured offices, where the furniture gets moved to any of five positions. You could create an array of shapes that can be aligned horizontally, vertically, in a circle, or along two diagonals. The possibilities are endless!
Share Your Personalized Stickmen!
Since you can now create your own multi-shapes, let us know what you’ve come up with!
It would be fun to add a gallery of reader-defined stickmen to this post or another post, and even offer the ‘men for download.
So if you want to share your creations, just send them to us at:

Get Your Configurable Stickmen Here!
And last but not least, here’s the download for you to play with, experiment with, and enjoy!
Download “Configurable Stickman Visio SmartShape”
s!Aj0wJuswNyXlhS72ARODsTJcmUyz – Downloaded 3066 times – 103.00 B

Fascinating! Very imaginative.
Hurray!! The first Advent Calendar shape I do not know. Greetings from NRW..
WOW!! Really cool article on multi-shapes. I wish i came across this article a couple years prior, certainly could have learned have some things much easier using this shape as an example.
Thanks Chris!
Amazing, I love this.
Thank you