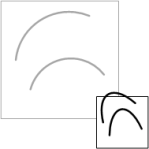
 If you’ve ever drawn arcs in Visio, then grouped them together with other shapes, you may have noticed that they behave rather oddly on resizing. As you make the group bigger or smaller, the arcs may bow or squish in ways that you didn’t expect.
This problem arises because of the interaction style of the arc shapes, which is 1D. Visio has two interaction styles: 1D and 2D. They have to do with the green handles you see on the shape, and how you go about manipulating the shape with the mouse.
In this article, we’ll describe the difference between the two interaction styles, and explain how to correct resizing problems you might be encountering.
Odd Resizing Behavior in Groups
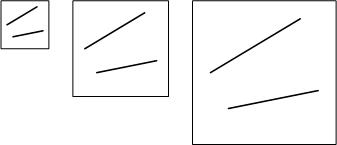
Before we go any further, let’s illustrate the problem. If you draw some lines with the Line Tool or the Pencil Tool, then group them together, the lines will resize quite nicely with the group:
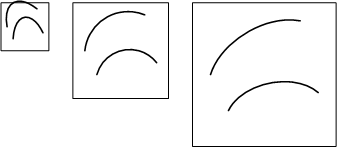
But if you similarly draw arcs using the Pencil Tool or Arc Tool, then group them together, they behave rather oddly when the group is resized. Below, we can see that the arcs on the left have bowed significantly, so much that they are protruding from the group! The arcs on the right have flattened out, even though the group has maintained its aspect ratio:
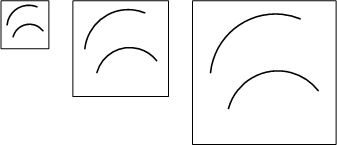
One would expect the arcs to resize proportionally like this:
Two Sets of Green Handles, Two Interaction Styles
The first clue to the problem comes from the green handles that you see when you select a Visio shape. Visio has two styles of handles.
2D Shape Handles
If you draw an ellipse or a rectangle using the Ellipse Tool or Rectangle Tool located on the Drawing toolbar, you’ll end up with green selection handles that look like this:
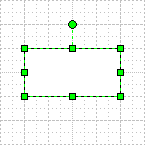
This is called a 2D shape, because you independently set Width and Height by resizing in the x and y directions. The angle is also set independently using the lollipop handle up top.
1D Shape Handles
When you draw single arcs or lines, however, you’ll see handles like this:
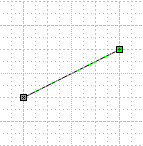
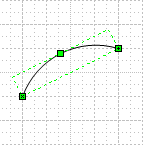
These are called 1D shapes, because they are dependent on their endpoints for their Width and Angle. When you reposition an endpoint of a 1D shape, the Width and Angle are calculated based on the difference between the points. The Height of the shape is completely independent — you can see the height handle on the arc shape above.
2D ShapeSheet
If we look at the Shape Transform section in the ShapeSheet for 1D and 2D shapes, we can see the dependencies more clearly.
Below we have the Shape Transform section for a 2D shape. Notice that size, angle and position are all independent, set directly by the user’s interaction with the shape and with the green handles.

1D ShapeSheet
The 1D shape, however has an extra ShapeSheet section: 1-D Endpoints. The values in this section are independent, and are set when the user tugs on the green endpoint handles. The Width and Angle cells are clearly dependent on the values in the 1-D Endpoints section, but height is independent.

What Happens in the Group?
When shapes are put into groups, certain cells are modified so that they refer to positions within the group. This is what causes the shapes to resize with the group. This is also where we run into difficulty with 1D shapes.
With 2D sub-shapes, we see that the size and position are linked to the group, but the angle stays independent. In the ShapeSheet below, “Sheet.45” is the group, and “Sheet.45!…” references a cell in the group’s ShapeSheet.

So any change to the group’s width and height result in width and height changes in the sub-shape. There is a direct correspondence.
Now look what happens when a 1D shape is grouped. The Begin and End cells now refer to the group, but the Shape Transform cells stay the same. Since the value for height is constant, it doesn’t change. If the group is made smaller, the Begin and End points become closer together, the 1D shape gets shorter, but the height stays the same!

Getting Rid of 1D Shapes
Now that we understand what the problem is, how can we fix it? No, you don’t have to delete them all and start from scratch. There are a couple of methods to remedy the situation, and they’re rather easy to perform.
Convert the Interaction Style
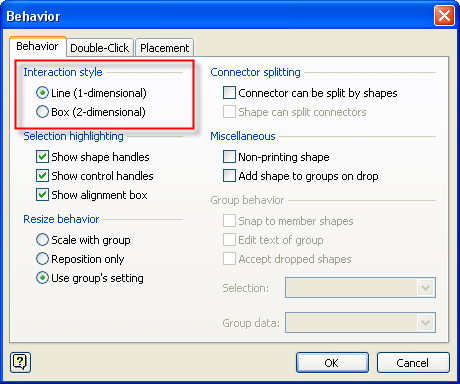
You can quickly change a shape’s interaction style via the Format > Behavior dialog. Simply select 1D or 2D in the top-left corner of the Behavior dialog.
Blast the Shape Into Submission
Another way to quickly fix raw vectors is to combine them with themselves. Yes, this sounds weird, but what you are essentially doing is converting a rotated 1D shape into a right-side up 2D shape.
- Draw a 1D arc with the Pencil Tool or Arc Tool
- Select only the shape you just drew
- From the menu, choose: Shape > Operations > Combine
- Your shape will be converted to a 2D shape with an Angle of 0deg.
If you’re quick with the keyboard, Alt + S, 0, C gets it done fast, and soon becomes a habit. I like this method because it creates a right-side-up shape, with zero degrees of rotation. Keep in mind, however, that Combine is destructive. If you’ve added any smart formulas or Shape Data fields to your arc, they will be blown away. This is strictly a technique for raw graphics.
Code Macro to Get it Done Fast
Here’s some VBA code to help you convert all shapes and sub-shapes on a page to 2D. This comes in handy if you’re doing a lot of drawing and don’t want to worry about shape interaction style ’til you’re finished creating the graphics.
There’s and undo scope that encapsulates the operations, so you can revert back to “the way it was” with a simple Ctrl+Z.
Sub ConvertOneDSubShapes()

    '// Converts all shapes on active pag
    '// to 2D,including sub shapes in groups.

    Dim shp As Visio.Shape

    Dim UndoScope As Long
    UndoScope = Visio.Application.BeginUndoScope("Convert Shapes to 2D")

    For Each shp In ActivePage.Shapes
        Call m_convertShapeTo2D(shp)
    Next shp

    Call Visio.Application.EndUndoScope(UndoScope, True)

End Sub

Private Sub m_convertShapeTo2D(ByRef shp As Visio.Shape)

    If shp.OneD Then
        shp.OneD = False
    End If

    '// Recurse through sub-shapes, if any:
    If shp.Shapes.Count = 0 Then Exit Sub

    Dim shpSub As Visio.Shape
    For Each shpSub In shp.Shapes
        Call m_convertShapeTo2D(shpSub)
    Next

End Sub

Thanks! This was very helpful, as the default behavior was driving me crazy. A google search had your answer right up at the top of the list. Now I find myself all over your blogs checking for more great tips!
Nice info like always. I do have two questions for you. One related to Visio and one related to wordpress.
Visio question: I have changed my text to a metafile picture and thus my alignment box gets bigger than my shape. I have only found one way to fix that and that is by using “LockCalcWH=1” then resizing/stretching everything to fit the locked alignment box. The unfortunate part is if I need to add something to the group inside the group with the LockCalcWH set, then I can’t. Any way around that? Also some of the items in my group have arcs they get distorted. I can’t figure out how to do a 2-D shape with 4 alignment points that snap/glue to rack/cabinets (Network->Rack-mounted Equipment). Is there a way to do that?
WordPress question: what plugin are you using to post code? The plugins I have tried don’t seem to solve the issues with copy paste and getting control/html conversion character in there.
Hi Lance,
Re: WordPress and code, I don’t have a plug-in. The theme I use has a “preformatted” style that seems to help.
What I’ve done before is to copy code from Visual Studio 2006 into Word. Word seems to preserve the font, and the green, blue, black that aids readability.
Then I paste it into WordPress (can’t remember if I use the Word-stripper, or just paste direct). At any rate, the html is full of span and style tags, which is probably sloppy and bad. It doesn’t always seem to work so well, but when it does work it’s pretty nice.
Any comment on the visio question?
Lance,
You can zoom way in on your metafile shape, then crop the edges using the Crop tool on the Picture toolbar.
You can also tweak the cells in the ShapeSheet section: Foreign Image Info, but this takes a bit of experimenting before it is clear what needs to be done.
As for connection point stuff, check out this article and see if it makes any sense, first:
Connection Point Directions and Types
– Chris
Very Cool.
Thank you for letting me know that shape.OneD property is also able to change the states shapes, though it is explained as read-only in MSDN.
How do you change from 1D to 2D shapes in Visio 2016? The Format->Behavior Dialog seems to have disappeared.
It’s in the ribbon, but you need to turn on the Developer Tab.
Then, go to Developer > Shape Design > Behavior – that’s the same dialog.
See: How to Show the Developer Ribbon Tab (and Why)