 Relatives ask me now and again if That Visio software can help me make quilting patterns?. I start to answer Well, maybe… and then we get side-tracked by family gossip and questions about When ya moving home?, etc, so nothing ever comes of it.
Between my relative’s inquiries and the decent traffic for the article: Visio for Fashion Design?, this seems to be a niche with more than passing interest.
On a recent trip to the Great Northwest and the Land of Microsoft, the sewing question arose yet again, but this time I had a large swath of fabric at my disposal.
The wheels in my head started turning…
Designing A Pencil Bag
What I wanted to do was to create a pencil bag out of fabric, because my Zip-lock bags aren’t quite big enough, and my 2H pencils are always puncturing them.
Now, I don’t know much about sewing or tailoring, but I remember from my childhood mom’s paper patterns that were laying around in the basement. It seems to me that with just a few tips, Visio users might be able to create basic sewing patterns (After they’ve finished up those flowcharts, business process diagrams and network layouts, of course!)
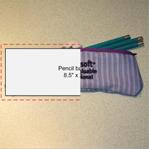
So I laid out a very basic pattern in Visio for my bag. One side of the bag’s pattern looks like this:

This seems pretty simple: two rectangles and some text. Yawn, Mr. Visio Guy! But oh ho ho, there’s a bit more to this simple Visio illustration than meets the eye.
Dimensional Text With Inserted Fields
The text on the inner rectangle displays the actual size of the pattern. When I change the size of the rectangle, these numbers update to reflect the new size. That’s pretty neat, and it is done by inserting fields on the shape.
To insert a smart field like this, do the following:
- Select the rectangle
- Choose Insert > Field from the menu
- In the dialog, choose Custom Formula from the Category list
- In the Custom Formula text field at the bottom of the dialog, enter the formula:
=Width & ” x ” & Height
To append or prepend the text at a later time, just double-click the shape, or select the shape and press F2; this will get you into text-edit mode, so you can move the cursor before or after the smart field, so as not to overwrite it.
Seam Overlap Using Offset Feature
My simple caveman brain doesn’t know much about sewing, but this limited knowledge includes the bit about needing to cut the material a bit larger than the final product. This is to accommodate the overlap required so that you’re not sewing your fabric pieces on the very edges, begging for an unraveling before you’ve even finished! I’m sure there’s a technical term for this, but suffice to say, every seam needs an overhang or a margin.
So my precisely-drawn rectangle needs to be bigger than the one I drew, and it’s nice to show both the finished size and the cutting size on our pattern.
The easiest way to get the overhang is to use Visio’s Offset feature, like this:
- Select the rectangle
- From the main menu, choose: Shape > Operations > Offset
- In the pop-up dialog, enter an offset. I used 0.25 in in this case
- Click OK
The offset feature creates two shapes: one to the inside of our rectangle, and one to the outside. I simply deleted the inner one, and formatted the outer one with a red dashed line, to show that this represented our sewing margin.
Other Tips
The tips above are fairly simple, but hopefully useful. If you’re intrigued, then you might want to investigate a few other areas related to drawing in Visio.
- Size & Position Window – Found under the View menu, this allows you to precisely control the size and location of your shapes.
- Rulers and Grid – Also under the View menu, they can help you to size and position your shapes
- Guides – purple lines that you drag out from the rulers. Shapes snap and glue to guides, and this can help you with your layout
- Drawing Toolbar – contains the Line, Pencil, Rectangle, Ellipse and Freeform tools that allow you to create lines, curves and shapes, as well as to edit the vertices of those shapes
- Snap & Glue – Located under the Tools menu, and also its own toolbar, Visio has many snapping and gluing options, as well as Drawing Aids that allow you to more precisely control what you are drawing.
- Keyboard Shortcuts – to help you pan and zoom faster, and get frequent tasks done all that more quickly. See: Work Faster With Our Top Visio Keyboard Shortcuts
- Parameterized Shapes – if you’ve got a knack for tinkering and programming, then you might be interested in Visio’s ShapeSheet, which allows you to add smart behaviors and parametric geometry to your shapes. This is an underdeveloped area where Visio could really benefit the world of sewing. If you’re interested in exploring this, John Goldsmith has written an excellent article, called Just for Starters that will introduce you to the world of Visio customization.
Sewing for Dummies: Building the Pencil Bag
Ok, now for the part of the article that qualifies it for the “Humor” category. As I mentioned earlier, I came into possession of a piece of material that I wanted to turn into a pencil bag. I obtained the material at a recent Microsoft event:

After rough-cutting my pattern, I carefully applied it to the fabric:

After pinning the patterns in place, the material could be cut along the dotted lines, to ensure the extra overlap material at the seams:

After fighting with the sewing machine and inexperience, I neatly attached the zipper, WITH THE ZIPPER HEAD ON THE INSIDE. Now where’s that seam ripper, time to start over…

After successfully attaching the zipper to both sides (er…and facing outwards), I was able to stitch up the rest of the bag. Here we see a bag that is vastly smaller than planned, and vastly non-rectangular.

Anyhow, despite my clear lack of sewing prowess, perhaps you can still see the potential in this non-standard and interesting application of Visio technology!

Shoe pattern design was one of the reasons I tried drawing during the Drawperfect area. I still hope that one day it will be possible to replace the heuristic ways by a surface accurate projection.
With “possible”, I mean for 200 euro.
The seam overhang is called “Seam Allowance”. When making a quilt this allowance is typically 0.25 inch however when sewing things that will be subjected to more abuse (such as you pencil case) 0.5 inch is preferable. With this width you can fold the seam allowance over and sew it down with a second row of stitches making it even less likely to unravel at the seams.
Nice article, it has inspired me to add this to my work drawings.
Thank you
Great tutorial! I’m interested in attempting this but am wondering which version of Visio you used. Will the standard version allow one to Insert > Field into the shape?
Yes, the Standard version supports Insert > Field!
Thanks! Needed to know that before deciding whether to purchase the Standard or Professional version.