Many Visio users create detailed elevation drawings of network and audio/visual equipment. The quality of these drawings can impress customers and enable equipment to be more quickly recognized in a diagram.
While vendors such as Altima and D-Tools provide detailed Visio shapes, you may find yourself needing to create your own shapes from time to time.
One method for creating detailed equipment shapes involves tracing an image of the actual gizmo. We’d like to offer a few tips to help you get the job done in Visio!
There Shall Be No Tracing Before Its Time!
Before you start madly tracing that photo of that shiny new router from Cisco, you should first try to find a vector-based file. Sometimes manufacturers provide these resources in the form of SVG, AI, WMF, EPS, DWG, DXF, PDF files. If you find one, hopefully you’ll be able to successfully and cleanly import the vectors into Visio.
If not, then your next recourse is an image. A brochure-scan, a digital photo, or an image-search result will suffice. If our pressed for time, you can import the image directly into Visio and use it as a shape. See: Effects of Imported Images on Visio File Size for more on what happens to Visio file sizes when images are imported.
Of course, images don’t resize very nicely, and they often have blocky background fills that don’t blend in nicely with your drawing’s background. Such can make your drawing look less professional. So if you’ve got the time, try and get the shape in vector format.
The next step is to look for vector-tracing software. I would imagine that Adobe and Corel have something that does this, and I know there was an online tool called Vector Magic, from Stanford, that did this, but I’m not sure about the quality of the results, nor the costs involved.
Visio Image Tracing in a Nutshell
Here’s a quick list of the techniques we use to trace images. If you’re already quite handy with Visio, this might be enough to get you off and running!
- Setup toolbars and snap settings
- Select Drawing Aids
- Import an image
- Make the image semi-transparent
- Put the image on a locked layer
- Set the default line to a bright color and a very thin weight
- Set the default fill pattern to none
- Turn off the grid and ruler
- Add guide lines where symmetric axes occur
- Add guidelines to shape boundaries and important details
- Trace the relevant details of your equipment, drawing only one side where symmetry allows
- Duplicate and flip features that can be mirrored
- Union, Join or Combine both sides of mirrored features
Toolbars Are Our Friends
Of course you can set all drawing options via menus, but when you’re tracing an image, there are a few settings you’ll want to activate and deactivate often. The menus will drive you nuts, so turn on the toolbars! I recommend these toolbars for the tracing that we’ll be doing:
- Action Toolbar
- Drawing Toolbar
- Picture Toolbar
- Snap & Glue
- View Toolbar
The Snap & Glue toolbar has a lot of options that deal with snapping and gluing. I find that gluing isn’t as important as snapping-in fact gluing might actually get in the way of your workflow. But you’ll certainly want to snap to guides and the lines and vertices that you create while tracing your image!
Here’s the Snap & Glue toolbar up close and personal:
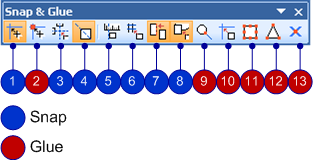
And here are the buttons on the toolbar. The options that I like to use are shown in bold face, and match the depressed buttons in the image above:
- Toggle Snap
- Toggle Glue
- Snap to Dynamic Grid
- Snap to Drawing Aids
- Snap to Ruler Subdivisions
- Snap to Grid
- Snap to Alignment Box
- Snap to Shape Intersections
- Glue to Shape Geometry
- Glue to Guides
- Glue to Shape Handles
- Glue to Shape Vertices
- Glue to Connection Points
Snap to Drawing Aids (button #4) can be further configured in the Tools > Snap & Glue dialog, on the Advanced tab. There are lots of fine-tuning options, such as snap to midpoints, snap to line extensions, etc. I urge you to check them out!
Making a Traceable Background
We want to import our image, and fade it so that we can better see our tracing. And so that we don’t keep accidentally selecting and moving the image, we want to lock it down.
Importing
First the obvious: import the image. This is accomplished via Insert > Picture > From File…, or you can click the Insert Picture button on the Picture toolbar. This is pretty standard Microsoft Office stuff. Stretch the image to be as big as the page and badda bing, badda boom, you’re done!
Transparency
One thing that can be hard to keep track of when tracing is: What features have I already traced? If you draw black lines over black features, this will definitely be hard to determine.
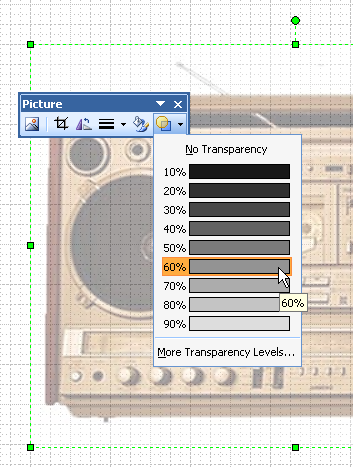
For that reason, I like to fade the image to the point that I can still recognize the details, but also see my traced lines against the background. The easiest way to do this is to make the image semi-transparent. You can set the transparency with the Transparency button on the Picture toolbar:
Locked Layer
Our image is still a free-standing shape on the page. But I promise you, every time we go to select a vertex, or a line that we’ve drawn, we’ll miss and select the image instead! And since we’ll be flying along, we won’t notice that we’ve picked the image, and we’ll move it, or delete it, or God-knows-what.
So it would be nice if the image were not selectable and frozen in place.
Fortunately, this is easily accomplished by putting the image on a layer, then locking the layer. To put a shape on a layer, select it and choose: Format > Layer. You’ll be able to create a new layer and name it. For tracing, I usually create the: “Image” layer.
Once our image is on a layer, we can lock the layer down. We do this via Layer Properties dialog, available under the View > Layer Properties menu, or from the View toolbar. Just mark the checkbox in the Lock column:
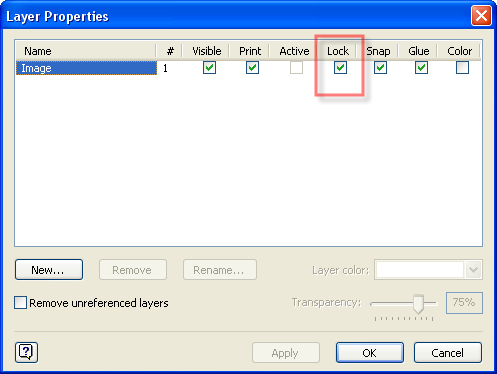
Now our image is nicely faded, and safely locked-down. We can now clearly see what we draw on top of it, and don’t have to worry about selecting, moving, altering or deleting it!
Default Line and Fill Settings
We can control the default formatting of any lines or shapes that we draw on the page. It’s best to set this up before we start drawing, instead of re-formatting after we’ve drawn something.
Our image is faded, so we can see black lines fairly well. But the important features in the image are still primarily dark lines. For that reason, I like to set the default line color to something like red or blue or green. It’s just much easier to see what is done, and what remains to be done.
A very thin line weight is desirable, because it allows you to very accurately center it on sometimes blurry lines that you’ll encounter on an image. I set the default line weight to zero. Zero-weight lines have the added bonus of not getting any thicker no matter how far in you zoom! They are infinitely thin, and won’t obscure the details on your image. Using zero-weight lines in Visio is akin to working in keyline view in, say, Adobe Illustrator.
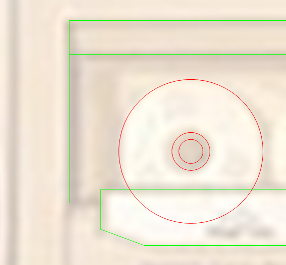
For fill, I like the default pattern to be nothing. This helps me to see what I’ve already traced, and what still needs to be traced. No-fill shapes don’t obscure the image below, and the thin, bright lines easily show my progress.
Below, we can see that my tracing has no fill, so the image is clearly visible behind the tracings. The thinness of the lines helps me to be sure that my details have been placed as accurately as possible. The transparency of the image helps the contrast, so I can what I’ve done fairly clearly.
Default Formatting
Okay. Thin, colored, no fill. Cool! But how do we set the default formatting in the first place?
You can set the default formatting for your drawing by simply clicking buttons on the Formatting toolbar when you have no shapes selected.
You can choose No Fill from under the bucket drop-down. Choose a line color like red or green or blue from the Line Color button. And from the Line Weight drop-down, go all the way to the bottom and select More Line Weights. A pop-up will appear where you can enter “0” for the line weight.
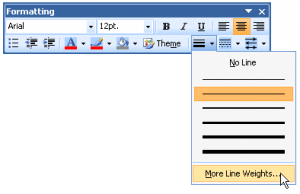
These settings will persist as long as you have your drawing open, but will disappear once you close and re-open, or restart Visio. So be sure and finish all of your tracing in one sitting! Just kidding!
Styles Live On
You can, however set default line, fill and text styles, for a drawing. Styles are remembered from session to session. With no shapes selected, you choose default styles from the menu: Format > Style.
Note that in Visio 2007, you might not see this menu item. If this is the case, go to Tools > Options > Advanced tab and check Run in developer mode.
In the sample drawing that you can download with this article, I created a style called Tracing. My Tracing style has a 0-weight red line and no fill pattern.
You create a style via: Format > Define Styles. In the pop-up window, you just type a new name over the <New style> placeholder, then click the checkboxes for Includes Line and Includes Fill.
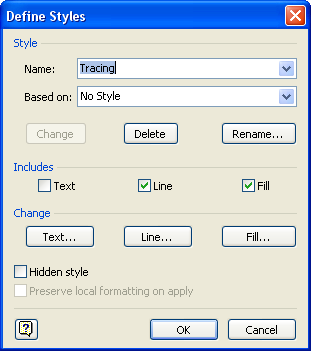
Then you click the Line and Fill buttons to drill down into sub-dialogs for setting all the formatting characteristics that you want for the style. When you’re all done, just click the Add button and you’ve got a new style! (In the image above, it says Change instead of Add, since I’ve already created the style…)
Grid, Guides & Rulers
You might like drawing shapes that fit nicely to the grid or rulers. Yes, I know it’s very satisfying to get that crisp snapping feeling, and to know that all your shapes have nice, rounded numbers.
But when you’re tracing an image, you’re most likely working in a very non-grid situation. That imported image isn’t going to have features that only fall on the grid intersections.
So we’ll want to turn off snapping to grid and rulers. The easiest way to do that is to turn off their visibility. But before we hide the rulers, let’s drag out a few horizontal and vertical guides. We might need them later, and once the ruler’s hidden, they’ll be harder to come by. If we drag them out now, we can Ctrl + Drag copies of them later, as needed.
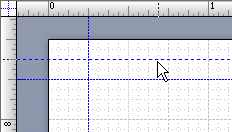
You can turn off the rulers and grid via: View > Rulers and View > Grid, or go to Tools > Snap & Glue, uncheck Ruler subdivisions and Grid.
Even better is to use the View toolbar. The first three buttons control the visibility of the ruler, grid, and guides, respectively. And the last button brings up the Layer Properties dialog that we discussed earlier!
![]()
Guide Lines as Reflective Axes
Wherever there is horizontal or vertical symmetry, you should place vertical or horizontal guides to mark the center point. By doing this, you only have to draw half of many of the details on your shape. You can then mirror a duplicate of them later, and quickly be done. It also ensures consistency, because you are using the same sizes and spacing on both sides of your reflecting axis.
So let’s have a look at an example of how this might work:
After placing a central mirror-axis guide, and placing other outline guides at edges and key points on the boom box, we can start tracing the left half. Before I turned the grid off, I created a C-shape that was exactly three sides of a rectangle. It was easy to snap duplicates of the C-shape to the guides. I’ve also drawn a few horizontal lines to show detail around the cassette-deck.
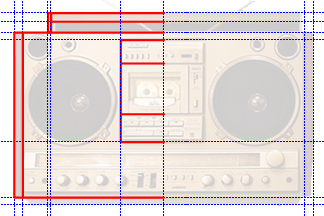
Once the left half details are finished, we can select the whole mess and Ctrl + Drag a duplicate to the right side. We can easily snap this duplicate to the central axis, and then quickly flip it horizontally by pressing Ctrl + H. Presto! We’ve got two sides that are exactly the same!
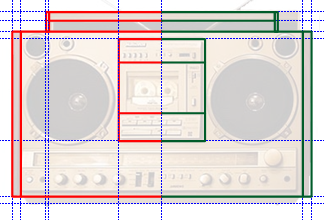
Now, using Visio’s Boolean Operations, we can join the two halves together using Shape > Operations > Join. Visio sees that the open ends of the left- and right C-shapes touch, and makes fill-able rectangles out of them. Note: you need to select each pair of left-right C-shapes and Join them individually. Please don’t select every feature and try to join them all at once!
That’s starting to look like a shape we can use!
Shape Operations
I just mentioned that you can piece shapes and line segments together using the Join operation under the Shape > Operations menu. That menu is full of useful functions that you might find yourself using in your tracing endeavors.
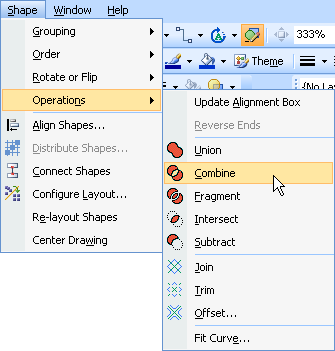
The menu looks like this:
Boolean Operations
Of particular interest are the Boolean Operations: Union, Combine, Fragment, Intersect and Subtract. These allow you to slice and piece-together shapes.
Union melds closed-paths together into a single outline. Sometimes you can make a complicated shape by union-ing a bunch of simple shapes together. For instance, you could make a four-leaf clover by union-ing four overlapping circles together. That’s a lot easier than drawing the outline of the clover!
Combine is useful in making your shapes more efficient. You can combine paths together to make a single Visio shape with multiple geometries. This is similar to creating a group, except that there isn’t really an Un-combine function: it is less reversible, so to speak. But combined shapes are more efficient than groups-there’s less overhead and your shapes will be smaller in size. Shapes that have the same line style and fill color can be combined. As an example, the knobs and buttons at the bottom of our boom box shape are prime candidates for combination. Several circles and rectangles could be combined into a single shape.
Fragment is another favorite. You can fragment overlapping shapes and line segments. Think cookie cutter. Visio will try to construct filled shapes out of all the intersecting bits, and will throw away any left-over line segments.
Path Operations
Below the Boolean operations are two functions that are used for open-paths: Join and Trim. Join allows you to meld end-to-end line segments into a single path: Trim allows you to cut lines into pieces where they intersect.
Trim is great for slicing up line segments. It is “fragment for lines.” When tracing, it is often easier to quickly draw lots of overlapping lines over the image, and then use trim to get rid of the overhanging bits.
Join is kind of the opposite of Trim. It seeks to put line segments together into single paths.
I urge you to experiment with these functions on your own. Once you master them, you can create complex Visio geometries very quickly!
Putting the Pieces Together
Once you’ve traced, combined, trimmed, joined and mirrored all the details that you wish to have, you can re-style the shapes to look more like the actual piece of equipment. Change the line colors to something more tasteful. Varying shades of gray, and gradient fills can make the plastic and metal surfaces look more realistic.
When you’re all done, group the shapes together, then resize it. If you’re going to use the shape in a scaled environment, then copy the shape to a scaled drawing page-a page that has a scale that is close to that in which the shape is intended to be used. Then resize the shape so that it matches its real-world physical dimensions. Check out the article: How Big Is My Shape to see all the ways that you can get and set the size of Visio shapes.
Your new Visio shape is now finished. Just drag onto a stencil and you can re-use over and over and over again!
Last But Not Least
Before we say good-bye to this article, we’d like to toss in a few more tidbits that are related to the business of drawing in Visio, tracing, and creating manufacturer equipment shapes.
Concentric Shapes
If the image you are tracing has lots of concentric circles or “concentric” rectangles and ellipses, then check out this article: Center-sizing Smart Shapes. It has shapes that you can download that make creating lots of centered shapes easier.
Also, the Offset function on the Shape > Operations menu that we just discussed can help in creating “concentric” shapes. Offset creates two shapes: one that is offset bigger than the shape you selected, and one that is offset smaller.
Keyboard Constraints
We’ve talked about keyboard shortcuts in a previous Visio Guy post (see: Work Faster With Our Top Visio Keyboard Shortcuts) but for Professional Tracers (trumpet fanfare!) like ourselves there’s a few more that will definitely come in handy, and a few the bear repeating.
- Duplicate shapes quickly: Ctrl + Left mouse drag or Ctrl + D
- Constrain shapes to move horizontally or vertically: Shift + Drag
- Bring to Front: Ctrl + Shift + F
- Send to Back: Ctrl + Shift + B
- Switch Tools:
- Pointer tool: Ctrl + 1
- Pencil tool: Ctrl + 4
- Line tool: Ctrl + 6
- Arc tool: Ctrl + 7
- Rectangle tool: Ctrl + 8
- Ellipse tool: Ctrl + 9
- Constrain to circle: Shift + Drag while using ellipse tool
- Constrain to square: Shift + Drag while using rectangle tool
- Align shapes dialog: Alt + S, A
- Group shapes together: Ctrl + Shift + G
- Ungroup shapes: Ctrl + Shift + U
- Nudge shape coarse: Arrow Key
- Nudge shape fine: Shift + Arrow Key
Text Issues
This article was mainly concerned with tips on how you can more quickly trace an image. But once you’ve got the vectors down, you’ll probably have some text to deal with.
If your equipment has text that doesn’t change, i.e. for button and know labels, manufacturer logos, etc. consider converting the text into metafiles. You can read more about this here: Resize Text With Metafiles! This will save you some trouble when it comes to controlling font sizes in scaled drawings.
If you have text on the shape that you want to edit, there are some issues with controlling font-sizes in scaled drawings that you will want to know more about. You can read all about it in: Text Resizing with ShapeSheet Formulas.


I have come to the conclusion that Glue settings serve also als Snap settings. I haven’t found this clearly explained in the Help.
This toolbar is allready sufficiently awkward, so extra confusion because of a wrong tooltip is not wellcome.
Another criticism on Visio (2003). If “drawing aids” on the toolbar button and “shape extensions” in Tools, Snap and Glue, Advanced are the same, why are two descriptions used. ?
All very confusing to me.
Hi Philippe,
This is indeed confusing.
It seems that the Snap to Drawing Aids toolbar button maps to the Drawing Aids checkbox on the Tools > Snap & Glue > General tab.
But this same tab also has Snap to Shape Extensions checkbox!
And then, as you said, there are the detailed settings on the Tools > Snap & Glue > Advanced tab!
After a little bit of investigating, I realized that there are two things to worry about: the thing you are drawing, and the thing it might be snapping to.
So if you are drawing or editing a line, the drawing aids will suggest vertical, horizontal, 45-degree lines, etc. If Snap To Shape Extensions is also active, then you will get drawing aids for other shapes as well.
The separate check boxes allow you to decide if you want extensions for the shape you are editing and/or extensions for other shapes that you are drawing to.
This is not super-clear, thanks for pointing this out!
– Chris
Hi, I have a question regarding styles. I am using Visio 2003 Professional and would like the ability to redefine a style, preview it and then have the option to change it again if it’s not quite right. I know there is a Change button on the Define Styles window, but only the first change made is actually applied in my drawing. Help seems to imply that you should be able to redefine your style as many times as you like, as does the fact that the Change button is still enabled. I’ve spent several hours trying to find an answer, but it seems no one else has ever wanted this feature… Thanks for your help!
Hi Melinda,
Wow! I think you’ve found a bug! I’ve never seen this before, but even in Visio 2007, after the first time you press “Change” in the Define Styles dialog, the drawing doesn’t update. When you click Close, the drawing does however update with your style changes.
So the functionality is working properly, but the preview-on-change is broken.
I would like simple instructions on the following:
1)Import a DWG to use a background for tracing.
2)Proper settings so as to trace the EXACT image.
3)Delete background when complete
4)Results – completed Visio image
HELP!
I discovered a lot of this by trail and error
As a rule of thumb
(I tend to work in mm using a visible grid of 2mm with snap and glue only to the ruler and gridlines)
1. Put the trace picture as background
2. On a foreground page, draw over it with a thin bright colour,
Only use circles and squares,(embellish with lines where required)
3. Remove the background page.
4. Align all the shapes on the grid.
5. Select corners, change lines and infill to suit.
This will generally produce a recognizable facsimile which is good enough for figures used in documents and keeps the file size down.
When shrinking this to fit inside a document keep text out of the circles and squares as the text is not infinitely scalable.
Quick and dirty maybe, but produces acceptable results
Thanks for sharing, Tim!
Hmm it appears like your website ate my first comment (it was extremely long) so I guess
I’ll just sum it up what I had written and say, I’m thoroughly
enjoying your blog. I as well am an aspiring blog blogger but I’m still new to everything.
Do you have any helpful hints for first-time blog writers?
I’d certainly appreciate it.
I am fairly new to Visio but these tips have helped me immensely. I have been learning mostly by trial and error but your Bloggs have been very helpful and clearly explained.
Thanks