 So you’ve created beautiful graphics in Visio, and you know how to add phantasmal ShapeSheet smarts to your shapes, now its time for you to make it all disappear! I often get asked how to toggle the visibility of various elements of Visio drawings, and I usually offer up one of many solutions. But I don’t think that those many solutions have ever been cataloged in a single place. Until, of course, now…
The Traditional Way
Let’s start with the traditional method of hiding things — the method I personally use most often. This method uses cells that specifically control the visibility of various parts of the shape.
The ShapeSheet has a number of cells that turn components on and off, all of which are TRUE/FALSE cells:
- NoFill
- NoLine
- NoShow
- Miscellaneous.HideText
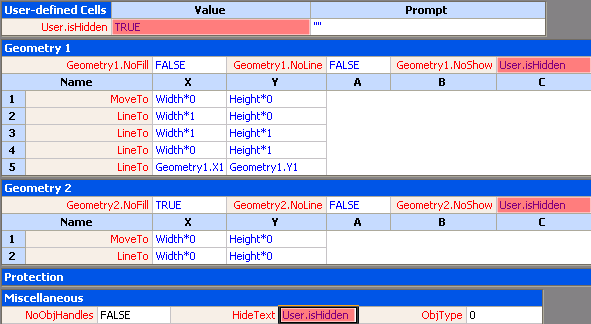
While NoFill and NoLine allow you to fine-tune the look of a geometry section, NoShow makes the whole component invisible. Of course, sometimes you may want to hide an entire shape, like when it is a sub-shape inside of a group. In this case, you have to set every single NoShow cell in each geometry section, because there is no cell that hides the entire shape.
If you need to hide the text of the shape, that is easily accomplished via the Miscellaneous section’s HideText cell. If you have lots of elements to show and hide, it’s good to centralize the control in a user-cell. Below, we can see a shape configured to hide all geometry and text, according to the value of User.isHidden.
Formatting
Of course, if you need to hide an entire shape, it seems like it makes sense to just use formatting. Your natural inclination might be to use the color cells to hide our shape:
- Fill.Format.FillForegnd
- Fill Format.FillBkgnd
- Fill Format.ShdwForegndTrans
- Fill Format.ShdwBackgndTrans
- Line Format.LineColor
- Character.Char.Color
However, there isn’t really a clear color, so we might choose white (color 1) to match the paper. This might work for most scenarios, but feels like a bit of a hack. You’d get into trouble if you had a shape hidden in this way laying on top of a visible shape, because the white would cover up the other shape.
In thinking about a clear color, we realize that it’s not the color that’s clear, but the pattern that’s none! So let’s consider the pattern cells:
- Fill Format.FillPattern = IF( User.isHidden, 0, 1 )
- FillFormat.ShdwPattern
- Fill Format.LinePattern
While 0 represents the no-pattern for line and fill, there’s no equivalent for text. So we’ll still need to use Miscellaneous.HideText to make our characters invisible.A shape that is 100% transparent certainly has a clear color, so this might be another strategy: make the shape completely see-through! These cells control transparency in a shape:
- Fill Format.FillForegndTrans = IF( User.isHidden, 100%, 0 )
- Fill Format.FillBkgrndTrans
- Fill Format.ShdwForegndTrans
- Fill Format.ShdwBackgndTrans
- Line Format.LineColorTrans
- Character.Char.ColorTrans
This is nice, in that it doesn’t change the color of the shape in any way. But it can affect just as many cells as The Traditional Way, unless you have a very large number of geometry sections. Plus, it requires that messy IF statement that is considerably more typing than = User.isHidden
Another danger with using formatting cells has to do with styles. Even if you protect your formulas with the GUARD() function, the application of styles will blow the formula away. If a user chooses individual formatting options, like color, or pattern from a toolbar or dialog, then GUARD() survives. But if the user applies a style, then GUARD() gets blasted.
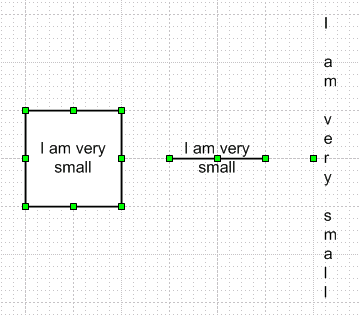
Size
See-through was a nice idea, but how about: too small to see? We can hide entire shapes by simply making them 0 x 0! Yes, you can make them infinitesimally small!
The only caveat here is that the font-size won’t automatically shrink with the shape. If you don’t use the HideText cell, then you’ll end up with an ugly, very tall, single-character wide column of text floating above an invisible shape!
Note that this strategy will require formulas in the shape’s Width and Height cells. If you GUARD these cells to protect your formulas, then the user won’t be able to change the size of the shape. However, if you’re using Visio 2003, though, then this won’t be a problem. A new function, SETATREFEXPR, will let you have the best of both worlds
This is how you would set the width and height formulas:
- Shape Transform.Width = SETATREFEXPR( 3in ) * NOT( User.isHidden )
- Shape Transform.Height = SETATREFEXPR( 3in )*NOT(User.isHidden)
If User.isHidden is TRUE, or 1, then the expressions evaluate to zero, and the shape disappears. If FALSE, or 0, then the formula evaluates to the last size to which the shape was sized. This last-size-value is stored in the parentheses and is shown as 3in in this example. I know it looks a bit weird, but it works!
Crop
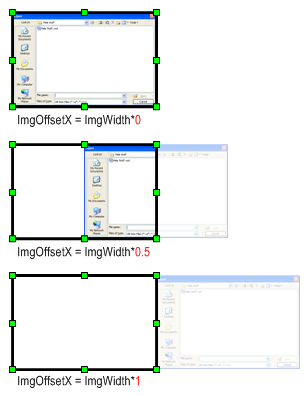
If you have a foreign object in a shape, such as a bitmap or a metafile, you can do an interesting technique that’s related to cropping. You can simply shift the image out of the viewing panel!
When you have a foreign object in Visio, the ShapeSheet will contain the section: Foreign Image Info. This controls the zoom of the image relative to its shape-container, and the degree to which it is panned. By default, an image exactly matches its containing shape, and we have four very boring formulas, as shown:

You can simply change either the X or Y offset cells to be “times one”, and that will completely shift the image out of view, giving you nothing to look at!
- Foreign Image Info.ImageOffsetX = ImgWidth * User.isHidden
- Foreign Image Info.ImgOffsetY = ImgHeight*0
Notice the black line on the shape. That’s actually geometry! By default a foreign image shape has one geometry section that forms a rectangle around the shape. You’ll want to delete that section or hide it as well.
Layers
You can turn off a whole class of shapes by simply assigning them to a layer, then turning off the visibility of that layer. You add a shape to a layer via the Format > Layer dialog, and you change layer properties via the View > Layer Properties dialog.
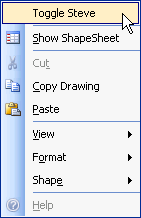
And you can even manipulate layer visibility via the ShapeSheet. Suppose we have three layers on a page: Bob, Steve and Connector. In the page’s ShapeSheet, the Layers section would look something like this:

We could add a right-mouse action to a shape, or to the page that would allow users to quickly
toggle the visibility of this layer. In our case, layer Steve is in the second row, so it’s (his?) visibility cell is called Layers.Visible[2]
Actions.ToggleSteve.Action =
SETF( GetRef( ThePage!Layers.Visible[2] ), NOT( ThePage!Layers.Visible[2] ) )
An action in the page’s ShapeSheet doesn’t need the ThePage! Prefix, so the formula would be simpler:
Actions.ToggleSteve.Action
= SETF( GetRef( Layers.Visible[2] ), NOT( Layers.Visible[2]) )
It’s worth pointing out that it might not be such a good idea to put this action on a shape that belongs to the “Steve” layer itself, because you won’t have anything to right-click on the first time you hide the layer!
But right-mouse actions on the page are cool. You can quickly right-click the page, and toggle the “Steve” layer, and our life’s goals instantly become fulfilled!
Handles
You can also show and hide elements of the user interface, i.e.: handles and highlight-boxes. The miscellaneous section has five cells that deal with UI:

- Miscellaneous.NoObjHandles
- Miscellaneous.NoCtlHandles
- Miscellaneous.NoAlignBox
- Miscellaneous.DynFeedback
- Miscellaneous.NoLiveDynamics
Normally, when you resize a shape, you see what it looks like, as you are dragging. If your shape is especially complex, this can bog down, and be jerky and distracting. It’s a good idea to set NoLiveDynamics to TRUE for complex shapes. Then the user will just see a “rubber-band” outline of the shape’s width and height as a sizing handle is dragged.
DynFeedback seems to only apply the Dynamic Connector shape, and controls the complexity of the ghosting displayed by the connector as you drag an endpoint. This cell didn’t seem to really affect anything.
I believe it might be a leftover from older versions of the Dynamic Connector, and isn’t particularly interesting anymore.
You can have shapes that are visible, but don’t print by setting the cell:
- Miscellaneous.NonPrinting
Individual Control Handles
NoCtlHandles will turn off all of your control handles, but if you want to hide individual control handles, there is another technique: just add 5 to either the .XCon or .YCon cells. These cells are seen in the ShapeSheet under the column names: “X Behavior” and “Y Behavior”, but for some reason, the cells have these funny “Con” names. They specify how the control responds when the shape is resized (e.g.: “stay relative to the left/bottom” or “reposition proportionally”)
A common application of this technique is used for control handles that control the location of the text block. If the shape has no text, then we don’t want to have a control handle dangling in space. So we check for no-text, and turn off the control handle if this is true.
The system of formulas looks something like this:
- Text Transform.TxtPinX = Controls.Row_1
- Text Transform.TxtPinY = Controls.Row_1.Y
- Controls.Row_1 = 0 + 5 * StrSame( ShapeText (TheText ), “” )
So if StrSame() is TRUE, that means we have no text, and we also have 5 x 1, which will hide the control handle. You only have to do this in either the X or Y cell, not both. I put 0 + at the beginning to illustrate that the 5-part can be separate from whatever control handle behavior you choose.
Automation methods:
Of course, there are many objects that you can hide via automation as well. These are fully documented in the Developer Reference help that ships with Visio, or you can get even more information from the Visio SDK. I’ll at least point you in the right direction here by giving you a rundown of the properties that you can set, and the objects they affect.
Visible property:
- Application object
- InvisibleApp object
- Menu object
- MenuItem object
- MenuSet object
- Toolbar object
- ToolbarItem object
- Window object
Hidden property
- Master object
- Style object
You can also create an invisible instance of the Visio application with code such as this:
Visio.InvisibleApp visAppInvis = new Visio.InvisibleApp);
Well, that’s about it for now. Time for me to disappear!

is there any function to convert “anything” -> anything .. without char(34)
plezz help
Hi,
I am creating an org chart using the visio wizard which works fine, now I need to colour the shapes according to different Business Units there are 11 different colours as well as hashed boxes. How will be the best way to produce this. Can we set this up in the main template or add a forumual to the excel sheet I am using?
Thanks
Sam
Hi Sam,
If you’re using Visio 2010 Pro or Premium, you can define a Color by Value Data Graphic that will color the shapes based on values stored in their Shape Data fields.
If you’ve got a different version or edition of Visio, look for this older add-on:
Add-ons > Maps and Floorplans > Color by Values…
Please try with below code to change of shape object in visio.
ThisShape.CellsU(“Width”).ResultIU = MaxWidth
ThisShape.CellsU(“Height”).ResultIU = MaxHeight
How would I switch off data graphics associated with a single shape?
When I change the noFill property on the shapesheet the datagraphic remains.
Hi Scott,
If you’re doing it programmatically, then you can set the shape’s data graphic property to null.
Here’s an example in Visual Basic:
Visio.ActiveWindow.Selection(1).DataGraphic = Nothing
There’s no easy way to do it via the ShapeSheet. You would have to go through every sub-shape in the data graphic and set the GeometryN.NoShow and HideText cells.
Data graphics are designed to be applied and removed from shapes with zero or minimal impact on the shape itself. That’s the beauty of them. Add them when they’re needed, then remove them when they’re not!
Hi,
I want to create a button to change the visibility of my layers so i used your code “= SETF( GetRef( Layers.Visible[2] ), NOT( Layers.Visible[2]) )” in the case events : eventDlCliks of my shape but I obtain an error in the formula.
I also try to add an action by Insert/Section/Action
and add the code :
Actions.ToggleSteve.Action = SETF( GetRef( Layers.Visible[2] ), NOT( Layers.Visible[2]) )
but it didn’t work
I use Visio Standart 2007
Do you have any solution ?
Thank you for the tips
Tyrael
I found the problem.
It was an error with my value in the GETREF, i needed ThePage! and I enter a wrong value for my layer name, I wanted to find it with its name so I put “office”, when I changed with the number it worked.
Thanks for the tutorial
Tyrael
Hi
I want to toggle visibility of shapes based on a date property in them
But I want to do this for all diagrams that I use these shapes on..
is this possible?
thanks
Dazza
I’m looking for the formula to “highlight a shape” when receiving a specific value from an external data source. More specifically, I’ve imported excel data, and I want to take a shape and assign it to a specific data name – when that data is = “1” (which means 100%), I want a yellow highlight (or something) around that shape. What is happening here is I’ve got a Visio flow that matches a Project flow – since I don’t see a direct link from Project to Visio, I’ve off loaded the Project data to Excel, then imported into Visio From excel. So now I have external data in Visio – and i want to link specific fields to specific shapes and then highlight the shape (or some other kind of change to the shape) based on the external data. These are all 2010 versions (Visio, Excel, etc.) Im thinking I use the “New Data Graphic” option, but just don’t quite know what formual I’d use. Any help would be great.
Visio Guy,
I need to have all layers of a visible within the master layer but have any of the layers that are larger than the master layer to be hidden outside of the master layer. Does this make sense? Can I do this?
Hi Sean,
Not exactly sure what you mean by “a larger layer”.
I wonder if the Super Mask Visio Clipping Shape would help?
Hi,
I have a process map that includes reference to two databases. I want to colour the process steps according to the system being used in that step, I also want to have the flexibility to toggle seeing this colour – in the same way that making a layer visible/invisible would. Therefore just applying a fill to each shape would not allow this – is there a way to have the shape on one layer and the fill for that shape effectively on another so that i can achieve this?
Any help would be really appreciated…thanks.
Hello,
I am a beginner and start my first steps with Visio Master Shapes.
For this I want to make a control for the positioning of the text from the shape. This I find out and it works very good. But the alignment of the text is “centre”. I like to have the alignment left. When I use the align button left in top of menu it is left, but the control use centre. How can I say, that the control align left?
thanx for your answers
Beginner
Hi Beginner,
Not sure what you mean, when you say “Control”. Are you using the ShapeSheet to define control handles?
Hi,
it is possible to change the arrow heads in the connectors based on the value of a data field? same as we can do with the color.
Thanks
Juan
Hi Visio Guy,
I´m having the following problem and I would like to know if you can help me?
I´m using Visio 2003 in Windons XP SP3 in my company.
I create a template for drawing PFD and P&ID for the company´s projects. Associated to this template a created several custom properties sets for each type of shapes that I´ve also create to use in our projects.
I assign thoses custons properties sets to the master shapes in the stencils created.
So, now starts the problem. When I´m drawing something, draging the shapes to the sheet, I also insert the values in the custom properties fields.
But after saving and closing the drawing and re-open it, those values are lost, just disappear.
Can you help me?
Thanks you
I’ll try to explain this but don’t know if I’ll succeed.
Have been using Visio 2003 for many years (love it). When I create a complex continuous line, i.e. straight, turn 90 straight, turn 90 etc. When I come to the end of the line and find out it’s too long or one of the segments is too long or in the wrong place, I simply click on the line (whole line is selected) keep the pointer over the line and within seconds there appear little diamonds at the various junctions. I can then grab these junctions in the middle or the end and move them anywhere I desire to straighten, extend, shorten, or move the line. The same thing happens when I create a freeform line and wish to modify it’s path. Viso 2010 will not do this. I’ve tried Ctrl and Alt with it but nothing works. This is a huge loss to my tools and causes me to do many redraws because I can’t edit the line. Many thanks, Dr. Dave.
Hi Visio Guy,
Is there a way I can show/hide shapes based on click of another shape.
For example I have 2 shapes, shapeA and shapeB. I want to show shapeB if I click on ShapeA, else shapeB is hidden.
Thanks,
Sony
Hi Sony,
What you want to do is possible, but it would have to be triggered by a double-click, or a right-click of a custom context menu item, or the change of a Shape Data field’s value.
ShapeSheet references can be created across shapes to do things like what you want.
For example, say we have two shapes with ids 1 and 2.
Shape 1 could hide its geometry with a formula like this:
Geometry1.NoShow = Sheet.2!User.DontShowOtherShapes
Shape 2 would have a user-defined cell that you would create called User.DontShowOtherShapes, and it could toggle the value in that shape using the EventDblClick cell:
EventDblClick = SETF(GetRef(User.DontShowOtherShapes), NOT(User.DontShowOtherShapes))
Hope this helps!
Hi there
Regarding your very good responses, specifically the one on August 29, 2011: I’m using 2010 and have customised a Timeline stencil. Is there a way to edit the stencil’s subparts’ stencil 🙂 so that I don’t need to revisit the attribute afterwards (probably using VBA)? What I mean is: can I change, for example, the line style of the subpart, in this case the downline on the primary time ticks, so that when new ones are created, they’ll use the same line style?
Thanks!
Hi Wilhelm,
It’s a bit complicated. You can’t edit the stencils that come from Microsoft, but you can make a copy of a stencil, then edit the masters in the copied file.
Then you can make your own template that uses that stencil, and always start new timelines using that template (+ stencil).
However, the timeline has supporting code (an add-in) to handle some of the fancy features. Sometimes the MS-supplied add-ins will fight with your customization, and go get the original shapes. I haven’t tested the timeline, but I know the org-chart solution is really nasty about ignoring custom shapes and fetching the originals, despite hard customization work on the part of the user.
Thanks, Visio Guy – it looks like you’re right. There are some stubborn forces at play here 😐
(Let me know if I’m going off topic!) I’m thinking I’ll have to try and revisit the parts with a little strip of VBA, but now I’m struggling to identify the subparts – is there a trick I’m missing? (I’m only a novice at this – sorry if the questions are bland.)
Thanks in advance!
Sometimes there are subshapes inside of groups, but with the swimlanes, there are also Lists and Containers, which were introduced in Visio 2010. It’s not easy to reverse engineer shapes and systems of shapes, and I just can’t do it justice in a post comment. It would take me a day to explain it all.
No probs – thank you very much for all the help.
Hi,
How can I make a shape invisible based on condition.
That is if I have no data in excel and I have connected the excel to shape, the shape should be invisible if the row is blank.
How to achieve that?
thaks information
I have a basic org chart built in Visio that is being used for multiple purposes. One team of people needs to see the org chart with different color coding overlay on the original chart. I was hoping to do this by using separate layers. When I change the shape fill and attach the shape to a new layer, the color shows up on both layers (the original and the new). Is there a way to attach shape fill to a separate layer?
Thanks for your help!
I want to create a shape that would allow me to use drop down menu to prompt me to fill out another data line while I am in the shape details form (this form occurs when I drop a shape on a sheet).
For example,
Data row is:
“Do you need another resource?”
Fixed drop down menu would be: (True/False)
Then if I select “False”. I dont want it to do anything.
If I select ” True” I want it to populate or show another line called resource 2 ( Resource 2 is a data row I already created)and then I can fill out that row.
In otherwords, As a fixed data variable is used then it would allow me to access another data line based on the answer on the first variable.
Basically I want to create a dynamic form that is dependent on previous answers.
Thank you soooo much
Hey Visio Guy,
Long time lurker — your stuff is great and I have learned a ton.
I have built a bunch of code to hide/ghost shapes in layers dynamically when toggle objects are double clicked. It all works great. But then I tried it with a complex shape with multiple geometries and only the first geometry was being affected. I went back to inspect my code and I see that I had put a reminder to fix my hard-coding!
    'NOTE: fixme need to go back and use CellsSRC and cycle through the geometry sections since there could be more than one in complex shapes..

    pShape.Cells("Geometry1.NoShow").Formula = "User.isHidden"

    pShape.Cells("HideText").Formula = "User.isHidden"
So now I want to iterate over each Geometry (like you mention), but I am trying to figure the best way to do this. Microsoft gives an example with using GeometryCount but within each geometry section I am not sure how to get the ‘isHidden’ cell. I know I could iterate over ever cell in the section (the way the Microsoft example does), but that seems inefficient. Am I missing an easier way?
Thanks again for all your code and teachings
Hmm.. ok, as soon as I posted it, I found (I think) an example:
   Set shp = ActivePage.Shapes(1)

    If shp.SectionExists(visSectionFirstComponent, False) Then

        For i = 0 To shp.GeometryCount - 1

            ' equate each geometry section's NoShow cell to docsheet user cell

            shp.CellsSRC(visSectionFirstComponent + i, visRowComponent, visCompNoShow).FormulaU = _

                "TheDoc!User.HideGeometry"

        Next i

    End If
visRowComponent and visCompNoShow were the magic I was missing I think.
Hi Visio Guy,
Thanks for all the great posts. I’m working on an org chart and need certain fields to show in each box and one line of standard text to show outside the box if a condition exists. So within the box I have Name and Title, but I need to create VBA code that places standardized text outside of a box that says “Also reports to” if the employee reports into another person. I am loading data from Excel and there is an indicator column called “AddtlRpt” which basically flags if the employee reports into more than one person. Can you help me figure out how to display that standardized text to the right of the employee’s org chart box if the employee is flagged for multiple reports.
Thank you!
Hi
I would like to know if there is a way i can add information on shapes and its hidden but when i click it, it shows?
I want to add contact details on a shape that i have made on excel but i dont know the way to add it on the shape that when i click, it appears. please help
I would like to use shape data to control both the line color and the fill color of a shape. I find it very simple to control the fill color using ‘edit data graphic’ but I cannot find a simple way to control the line color.
So for example I would like my data to color the fill according to one column and the line according to another. Is this possible?