 In this first of a series of posts, we’ll use built-in Visio functionality to arrange small circles around the perimeter of a larger circle, at equal intervals.
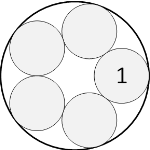
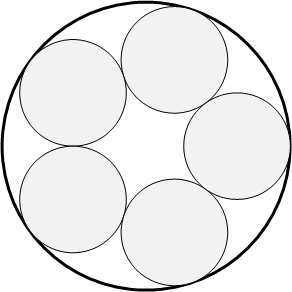
A customer named Jeff sent me a message a few days ago, asking me which command in Visio could arrange small circles up against the perimeter of a larger circle, at equal angular intervals, like this:
The answer wasn’t immediately obvious, and there isn’t a built-in function to specifically do this. But after a few minutes of thinking, I devised a technique.
But rather than write a long-winded, time-consuming answer on how to do this, I decided a video would probably work better. So I gave Jeff a few hints, hoping that would tide him over.
Well my hints weren’t quite detailed enough, so I’ve happily finished the video, which I’ll share with you today. So in addition to the link to the video, I’ll recap the recipe for doing this below. Experienced Visio users might be able to run with the notes below, but if you still find the Visio ribbon baffling, have a gander at the video!
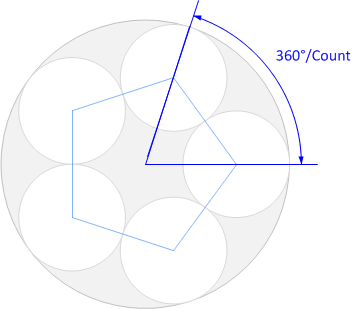
First, a bit of math. The angle that you’ll need to rotate each circle is equal to 360°/Number-of-circles. In our example, we’ll be placing five circles, so we’ll need to rotate each one by 72°.
Next, make copies of your circle. You can do this by Ctrl + Left-mouse-button-dragging the original, or just select your small circle and type Ctrl + D to duplicate it four times.
Now you can align the small circle to the 3 O’ clock position of the big circle. Just select the big circle, then Shift + Click on the small circle.
On the Home tab, in the Arrange group, there is an Align drop-down. Use this to Align Middle in the vertical, and Align Right in the horizontal.
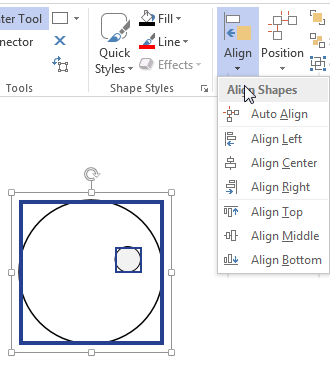
The small circle should now be up against the right edge of the larger circle.
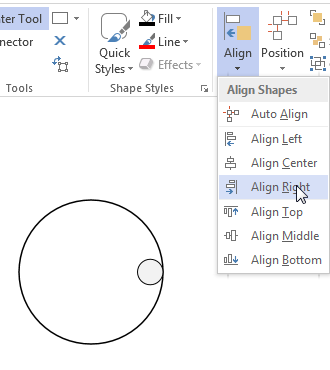
Notice when you select the shapes that the big circle has a thicker highlighting outline than the small circle. This indicates that the big circle is the primary selection. When performing alignment operations, shapes will align to the primary selection.
If you do a drag select of several shapes, it isn’t obvious which one will be the primary selection. For this reason, I use the Shift + Click method, so that I can explicitly select the first shape and make it the primary. You can combine methods, however. Click your primary shape, the Shift + Drag-select any number of other shapes you might want to align to the primary selection.
Now, with your big and little circles selected, group them together, using Ctrl + Shift + G, or just Ctrl + G.
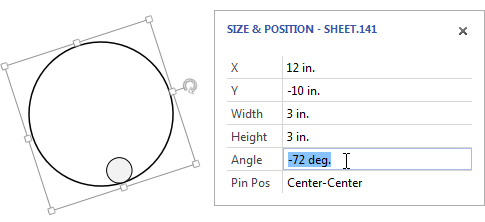
We can now use the rotation handle of the group to rotate the shapes by -72°, or you can use the Size & Position dialog to enter the number.
To get the Size & Position dialog, just click on the Width, Height or Angle fields in the lower-left corner of the Visio application window–when a shape is selected. When the dialog appears, you can type in “-72 deg” into the Angle field, then hit the Enter key. Your group should rotate like this:
You can now repeat the process:
- Ungroup your group using Ctrl + Shift + U
- Shift + click the big circle, then another small circle to align
- Use the Align Middle and Align Right commands to get the new circle into the 3 O’clock position
- Group the big circle with the little circles using Ctrl + G
- Rotate the group by -72°
- Ungroup, then repeat from step 1 above
I’ve added a lot of extra explanation here in the article, but once you’ve done the steps two or three times, you’ll see that it’s really quite easy. And the video might make it easier to digest. Either way, when you’re through, you’ll have added some powerful tools to your Visio skillset!

Why would you just do the following
1) take group of big circle + little circle and copy n (5) times
2) rotate the group copy by specified angle
360/Number of small circles
group 1 = 72 degrees
group 2 = 144 degrees
group 3 = 216 degress
group 4 = 288 degrees
group 5 = 360 degrees
3) align groups vertical and horizontal as center and center
4) ungroup all all all
5) delete large circles until 1 left
6) group 1 big and 5 little circles into a group.
but hey just how I would do this
Or, even simpler:
1. Align small circle at 3 O’clock
2. Move pin of small circle to center of big circle
3. Duplicate small circle four times
4. Align duplicates to first
5. Rotate duplicates into place: -72, +72, -144, +144
That’s how I’d really do it, but it doesn’t show off some features that I wanted to demonstrate.
Very well explained……thank you……where would I find part 2?
Hi CJJ,
I never had time to create a follow-up. I think the preparation materials on my hard drive, but I just haven’t had a moment to record!
Thanks for the response……..greatly appreciate you help/support……