 Many Visio users would like to create graphics with text running around a circle. I’ve come up with a third iteration to solving this problem.
This time, you get a single shape, with no need for VBA macro code!
While Visio has no built-in way to put text on a circle, visguy.com has offered two work-arounds in the past. Maybe you’ve seen them: Circular Text Generator (version 1), Circular Text Generator (version 2).
Those solutions required the use of VBA macro code, which confused a lot of users, produced a disjoint set of shapes that needed to be used–and kept–together (further confusing users), and produced a static result. If you wanted new text-on-a-circle, you had to regenerate a new set of characters.
This latest version is now a single shape. You can edit the text on the shape to your heart’s consent. The only drawbacks to this version are that the number of characters are limited, resizing of the higher-character versions of the shape can be slow, and I’m only offering a four-character trial version for free (I have mouths to feed!)
Update 2018.02.14: Added new video!
Editing
Using the shape is quite simple. You just mix and match these actions:
- Select and type, or double-click and edit existing text
- Fine-tune settings by editing Shape Data fields or by right-clicking
- Position text and background circles using control handles
- Right-click and choose Update if anything goes wonky (this happens for larger amounts of text, jump to the Refresh section near the end of the article if you want more information)
The editing uses a trick I’ve used several times with other visguy.com offerings. The text you edit is actually invisible. You only see it while typing. Thereafter, subshapes within the group pick out individual characters, and rotate them properly:
This adds the advantage that you don’t have to twist your neck oddly in order to read the text as you type.
Here’s an animated GIF I whipped up to give a feel of how it flows. Features will be explained in detail in the sections after.
Features
The easiest way to see all of the shape’s features is to look at the Shape Data panel. Here we can see six fields, with the possible values shown at right:
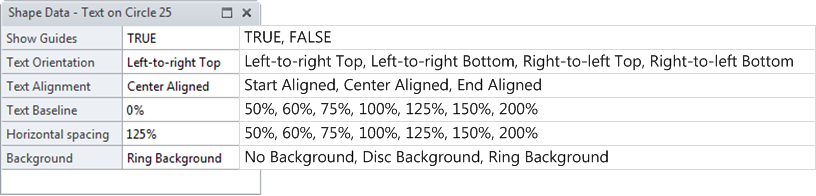 Let’s go through each setting one by one, to get a better picture of how each field affects the look of your text on a circle shape.
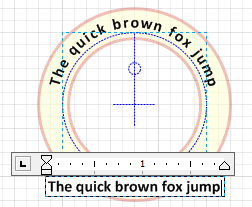
Show Guides
The shape has guide-styled geometry that appears as blue dashed lines. These serve as visual references to help you configure the shape.
There are three guide elements:
- Circle that the text rests upon
- Crosshairs at the center of the circle
- Clock-hand that shows the left/center/right side of the text, depending on the Text Alignment setting
The guides don’t show up when you print, or when you export the shapes to an image format or PDF. Nevertheless, you can turn them on or off with the Show Guides setting:
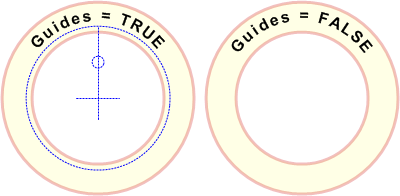
One scenario where this is particularly useful is if you make presentations directly from within Visio. In that case, the guides might be a distraction. So you can simply select all the text-on-a-circle shapes, then use Shape Data to set Show Guides to False.
Text Size/Font Size
The best way to resize the font of characters is to:
- Select the shape
- Use the Increase Font Size, Decrease Font Size buttons, or the Font Size drop-down
Make sure you don’t try to do this while you are editing the text. Remember that the text you edit is “ghost text”, so to speak. You don’t actually see this text when you’re done editing. Instead, that text gets sent character-by-character to characters arranged around the circle.
So again, be sure to exit text-edit mode, make sure the shape is still selected, then simply bump the text size up or down.
If you need to increase the sizes of individual characters, see the section further on in this post, entitled “Open Group Window…”.
Text Orientation
Depending on where you place the text, and which direction your language goes, there are four logical orientations.
The setting makes more sense once you see an example of what can go “wrong”. Here we have the typical, default “Left-to-right Top” text. As we rotate the text around to the bottom of the shape, it becomes upside down and harder to read:

If you have lots of text that goes all the way around the circle, you can’t avoid this situation entirely, unless you stack two different shapes on top of each other, with two different settings. In that case, you would set the top text to “Left-to-right Top”, and the text at the bottom to “Left-to right Bottom” as shown in the left column below:
 The shapes in the right column say “Happy New Year” in Arabic (according to Google). Arabic uses a right-to-left writing system, so this is simply the mirror case of the shapes on the left.
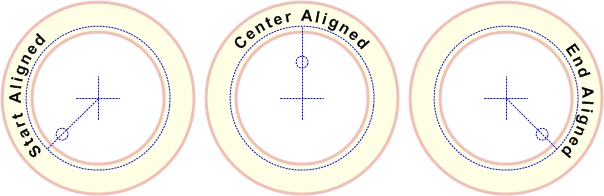
Text Alignment
You position the text by adjusting a control handle that is always in the middle of the little blue guide-circle that lies along the radial clock-hand line. Using the Text Alignment setting, you can choose to have the text aligned by the left/start, center or right/end. As usual, the image makes a lot more sense than the text:
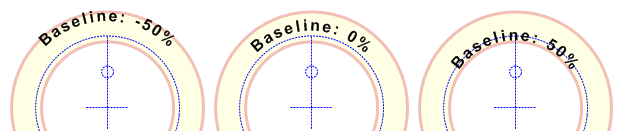
Text Baseline
The “baseline” of a font or line of text is the conceptual bottom, along which the characters are positioned. For typography types, it’s probably a super-important characteristic, worthy of a much more accurate definition. As applied to this shape, it’s another parameter that you can set, which moves the text up or down, in relation to the baseline.
Here we can see that negative values push the text up above the baseline, while positive numbers push it down. 0% is the default setting. Since you can change the radii of the inner and outer circles, the baseline setting isn’t super-important:
Horizontal Spacing
Sometimes you want your text to fill up a larger amount of space than the number of characters naturally wants to do. The Horizontal Spacing setting allows you to stretch out the space between characters, without resorting to cheap tricks like adding spaces between characters:
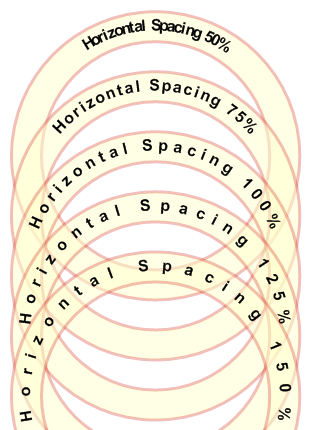
Adding spaces between characters is a bad idea for a couple of reasons. First, it uses up valuable characters in a shape that only handles a limited amount of text. Second, the width of a space probably changes between characters due to kerning, although I don’t really know how much kerning Visio actually does with its text.
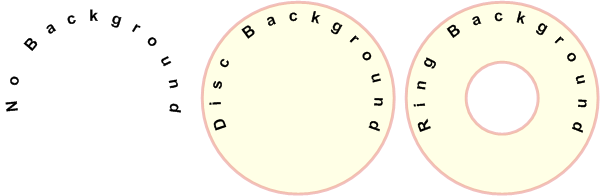
Background
You can choose to have no circles, a single circle, or a ring as a background for your circular text. Just set the Background setting in the Shape Data panel:
Context Menu
Almost all of the settings in the Shape Data panel are available by right-clicking the shape, plus a few extra items. Baseline is missing, Text Orientation only has two values to choose from, and Horizontal Alignment only has four.
Keep in mind that when you right-click a shape, only the primary selection (first selected shape) will be affected when you choose the custom actions at the top of the menu. If you need to change multiple shapes at once, use the Shape Data panel.
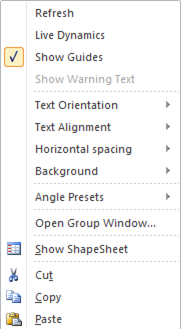
You’ll notice a few items in the menu that aren’t in the Shape Data panel. Let’s go over those:
Refresh
The purchasable shapes come in 25-, 50- and 100-character versions. For some reason, on the higher-character version, changing certain settings can cause the text to get out-of-whack. I’ve worked and worked on this problem, but I was not able to keep it from happening. I think the chains of cell references inside the ShapeSheet for this beast-of-a-shape are quite long, and at some point, Visio gets overloaded.
I was, however, able to come up with a workaround. Just right-click and choose “Refresh”. This forces the shape to do a lot of recalculation, and your characters should magically jump into their proper positions.
In this example, a change to the Text Orientation causes the characters to get jumbled near the end of the phrase:
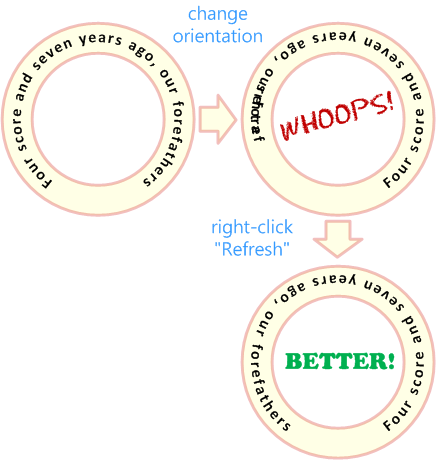
Right-clicking Refresh clears it right up in a jiffy!
I know it seems a bit 1990’s, but I just couldn’t find any other solution. Remember, we are pushing Visio into areas where it wasn’t originally conceived to go!
Live Dynamics
Visio shapes support “live dynamics”, which lets you see how the shape will react as you resize it, and as you move control handles. Since this shape has a large amount of ShapeSheet references, it can get pretty slow, especially in the versions that have more than 25 characters.
For this reason, Live Dynamics is off by default. And if you are doing lots of resizing, you should leave it off. But once you’ve got the shape to the size you want it, live dynamics performs just fine when you are rotating the text around the circle with the control handle. Even for large numbers of characters. So try turning it on, it’s pretty fluid, and cool to watch!
Show Warning Text
For performance and economic reasons, there are different versions of the shape, that support different numbers of characters. If you exceed this number, a red warning appears. Here we have a “25-banger” shape that has run out of space and only shows the “ch” in “characters”:
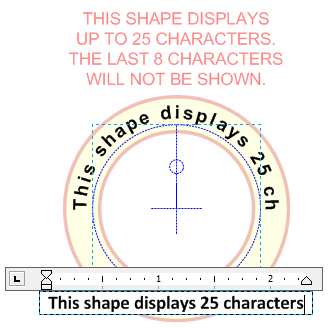
If you plan on shortening the text later, you might want to suppress the warning. Just right-click the shape and uncheck “Show Warning Text”. If, in the future, you reduce the text to below the maximum characters, and then exceed it again, the warning will reappear, so you don’t have to worry about it being permanently asleep.
Angle Presets
Sometimes it is hard to position a control handle exactly as you want it. For this reason, there are four presets available for quickly snapping your text clock-hand to the 12, 3, 6 and 9 O’Clock positions.
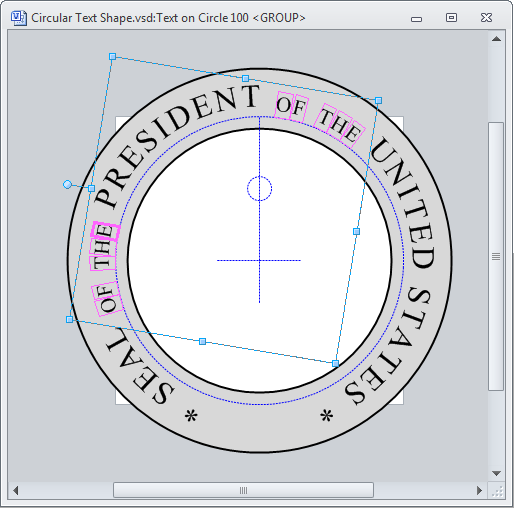
Open Group Window…
When editing the shape normally, you can’t give individual characters or runs of characters different styling. This is because the text you normally edit is actually mirrored by subshapes within the group.
Once you’ve set your text, you can can go into the group and style individual characters. Just right-click, select Open Group Window, then manipuplate individual character subshapes.
In fact, I did just that when making the presidential seal graphic that serves as the thumbnail for this article. The “OF THE” bits needed to have a smaller font size, so I went inside the group, selected the shapes, then reduced their font size:
 If you edit the outer text later, keep in mind that you might end up with the wrong formatting for the wrong characters within your new text.
The almost-finished presidential seal:
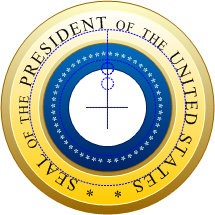
The shape contains two text-on-a-circle shapes. The main text, and the white-on-blue that has a bunch of asterisks. Getting the spacing on the asterisks just right involved tweaking the font size, then tweaking the Horizontal Spacing setting. Since these are the 100-character versions, changing the settings took a few seconds to complete. It’s a busy shape! You can also see a small gap at the bottom of the stars. The shape has no automatic way to distribute characters evenly around the entire shape. Maybe in the next version!
More Examples
Customers raise questions from time to time in the comments below. When I think an animation or further explanation might help, I’ll post some additional content in this section.
2017.03.07 – User bundgaj1 wasn’t sure about a few things, so I whipped up this animation.
It covers:
- Making the ring bigger to accommodate large-font-size text
- Changing the orientation of text at the bottom of the circle
- Aligning or stacking multiple text-on-a-circle shapes
- Hiding the guides
- Aligning two shapes together, and resizing them together
- Shows that the shape works on German Windows 7 in German Visio 2007, just because.
click to view full-sized image with animation!
Notice that the right-click menus do not have cascading in Visio 2007. So you’ll see a very long list when right-clicking in versions of Visio prior to 2010. But the features are all still there!
2017.03.08 – Here’s another animation, similar to the previous one, but it shows the Text on a Circle shape running on Windows XP in Visio 2003, both U.S. English versions. FOR THE LOVE OF GOD PEOPLE, UPGRADE! I know, I know, I’m just kidding. Visio can be expensive. Anyway, dig that default Windows XP background. Ahh, spring is in the air!
click to view full-sized image with animation!
Get the Text on a Circle Visio Shape
There are two versions of the text on a circle visio shape: a free trial version, and a for-pay version.
Free Version
The free version has all of the features described above, but only supports four characters of text. You can download it with this link:
Download “Text on a Circle FREE”
s!Aj0wJuswNyXlhjHPGnEUnd6TJLam – Downloaded 10694 times – 103.00 BFull Version
Once the free version has convinced you that you need more, head on over to my online store and purchase the full version here:
Buy the full product on Gumroad: Text on a Circle Visio SmartShape on Gumroad

Thanks for creating this shape, I’m trying to use and it says it’s limited to 4 characters, is there anything I can do to change that?
Hi SJ,
As is states in the article, the free version supports only 4 characters, so you can get a feel for how it works, and decide if you want to purchase the expanded version.
The free version also allows folks with Visio developer skills and lots of time to tear it apart and see how it works.
The not-free version comes in 25, 50 or 100-character-max versions. You can get it here: Text on Circle SmartShape.
3Q,It really works. Give me a lot of fun.
Having trouble modifying font properties. Is Text on a Circle Visio Shape compatible with Visio 2013?
Hi AK,
If the characters get jumbled, right-click and choose Refresh.
Yes, I tested it with Visio 2013. It worked fine.
What are you trying to modify?
(Note: I’m on vacation Aug. 14-25, with limited to no internet)
Hi
Im looking for a family tree chart Stencil,also im looking for a visio stencil writers. Can you please advise me
Hi Iain,
Thanks for your concern, and watching out for us!
What I can offer is this:
1. That video is over one year old.
2. I don’t use the pop-up purchase frame.
3. Every avenue for purchasing my stuff that goes through Gumroad is displaying the security padlock icon in the web browser’s address.
So as far as I can tell, there might have been concerns, but has been remedied in the past year by Gumroad.
Is there a way to resize the text?
Hi nsx9red,
Yes, you can resize the font using the standard Visio font-size controls.
I can’t download the free one..
Text on a Circle (ver 3) is working great for me. Only problem I have run across is using the Wingding font. I am trying to add stars to my text (Wingding 171) but it always translates to >>. Can you tell me if I am doing something wrong? Thanks.
Hi Roy,
Great question!
The text that you edit is a bit different than the actual text that is arranged around the circle. The text on the circle doesn’t really know what font you’ve typed the characters in. That’s why you’re getting the
«« characters.
Here’s the trick:
1. Right-click the Text on Circle shape and choose Open Group Window…
2. Select the shapes that *should* be stars.
3. Change the font of just those subshapes to Wingdings.
4. Close the group-editing window to return to the main drawing page window.
Alternatively, you can select the whole Text on Circle shape and change the font to Wingdings, after you have inserted stars and typed your text. Now all of the letters will be gobbledygook.
Then, go into the group as described above, select all of the shapes that aren’t stars, and change their font settings back to something that shows normal text characters.
Hopefully this makes sense and helps!
Thank you! Worked perfectly and would not have figured that out on my own. 🙂
I can not write text more than 4 characters long, help!
Hi Rasha,
The free download only offers four characters by design. The for-purchase version can be obtained here: Text on a Circle Visio SmartShape.
This non-free version offers circles that can support up to 25, 50 or 100 characters.
Cheers,
Chris
How much is it? Seems like a donation?
23 for a Circletext Fullversion?
B*tch please!
Hi JJ,
There is a free trial on this page. The download links always come with the donation signature.
The full version is available here: https://gumroad.com/l/arWx
Gee thanks, Miagi! Currently, the full version is actually USD 20.
Please note the two links in the third paragraph that point to free versions that use VBA code. They are clunkier to use, and many people seemed to have difficulties executing VBA macros, but they are free.
Or, you could arrange the items by hand using the rotation tool, and Visio’s feature to reposition the Pin (rotation point). And every time you need to make a change, you’ll spend many minutes re-positioning each letter.
I’m not sure what your hourly rate is, but for many folks who need this in Visio, this price is likely a bargain, which will save them hundreds of dollars in time and effort.
You’ll also find that this website is full of free tips and downloads. I occasionally decide to charge for some of my offerings in order to earn a living.
Just purchased the product but unable to increase the text size. It should as increased in the text box, but remains the same in the circle.
Hi Blur2,
Thanks for the purchase!
To increase text size, select the whole shape and bump the font size up or down. Don’t do it while you are editing the text at the bottom. There is no link for styling from that text box to the characters on the circle.
If you need to change individual character sizes, that is discussed in the article above. Look for the subheading “Open Group Window…”.
Cheers,
Chris
Got it. Thank you.
What if I want the circle to be thicker and to fill in the center with a color different from the ring?
Hi Morms1,
You can have a circle or a disc as part of the shape. If you need more circles, just draw them, give them the line and fill attributes you want, then center-align them with the Text-on-a-circle shape.
Hi,
I tried to register for the free version first, but got no confirmation and register-mail
Rgds
Udo
Sometimes the confirmation e-mails go to the Junk or Trash folder in your email client.
Hello-
I own the full version of this and I’m having trouble increasing the font size of the text. Can you help?
Thanks!
Nevermind! Went through your other comments and figured it out!
Hi Amanda,
Make sure you are not increasing the font size while you are editing the text. When you are typing, you are editing “ghost text”, so to speak that then gets sent character-by-character to the circle.
Leave the text edit mode, select the shape, then simply bump the text size up or down.
If you need to increase the sizes of individual characters, see the section in this post titled “Open Group Window…”
Hope this helps,
Chris
Whoops, now I see you solved it! 🙂
Anyway, I added a new section to the main article that discusses this.
I have 2 questions: 1) Can I run the full version on 2 of my laptops? 2) Can I run the full version on one laptop which has a HD display, running Win 10 and Visio 2013 Standard, the other laptop has a 4K display, running Win 10 and Visio 2016 Pro….your guidance support is greatly appreciated…
Hi Cjohnsnjn,
1. Yes, you can run the full version on two of your laptops. I’m sure I’ve got some legal-sounding info in the license doc, but I’m pretty sure as long as you’re “not using two PCs at the same time”, I don’t really care.
It is, after all, a Visio SmartShape, not a complete system of code and add-ins that are checking license codes over the net! 🙂
2. Visio is a vector diagramming program, so the resolution of monitors is not a factor in whether or not it will work. The shape works in Visio 2013 and Visio 2016.
The only limitation of the shape is that it doesn’t work well with multi-byte characters/fonts such as Hindi, where you type several keystrokes to get one character. I’m not sure if I will ever be able to solve this problem.
Cheers,
Chris
I purchased the Text on a Circle Visio Shape tool and it has worked great so far. This tool uses Concentric Layer #–is there a version that uses the Partial Layer # tool? This is to put text on “quarter arcs” vs the full ring… Thanks!
I just bought this and it is great. One feature I’m looking for is how do I get the text upside down? So instead of reading the text clockwise from the center I need to read the text counterclockwise from the outside. Visio can rotate the text but it doesn’t seem to be able to do it within this app.
Please provide instruction on how to rotate the text.
Thanks.
Hi Visio2016,
If you right click the shape, there two options:
Text Orientation
– Left-to-right Top
– Left-to-right Bottom
These should work for Western character sets. If you are trying to write in a right-to-left script, then look at the Shape Data panel (If you don’t see the panel, then right-click the shape, then Data > Shape Data…)
There you have four options in a drop-down list:
Text Orientation
– Left-to-right Top
– Left-to-right Bottom
– Right-to-left Top
– Right-to-left Bottom
Note that the words “Top” and “Bottom” don’t mean the text has to be at the top or bottom of the circle. Those words are used to describe where the text will be most readable. So most of the text in this article’s examples is “Left-to-right Top”.
Hope this helps!
Chris
Hi marobles99,
I don’t fully understand what you want. Do you just want arcs instead of full circles?
The shape doesn’t have that feature, if I’ve guessed correctly.
You could always set Background = “No Background”, then superimpose your text over arcs that you draw yourself.
Cheers,
Chris
Chris,
Most excellent! Thanks for the rapid response. That was exactly what I wanted. Keep up the great work!
Best Regards,
visio2016
Correct–I was looking for arcs, not full circles. I was thinking of the superimposing, but wanted to check first for arcs since I have concentric circles and I will have a bunch of 1/4 arcs (some filled in, some no background)–could be tricky during editing (who’s on top, can I even select the bottom one, etc)
Visio Guy,
Just purchased this software using PayPal, and ran into couple of questions –
1. How to configure to have more than 100 characters?
2. I would like to divide my circle into 4 quadrants and have the text centered in each of the quadrant. Is that doable?
Thanks much,
Vijay
Hi Vijay,
I sent you a special version that supports up to 200 characters. Normally, this can work fairly slowly – best to type the text on another shape, then copy and paste it to the circle so that it isn’t calculating every time you press a key.
For the quadrants, I think the best thing is to make four different shapes and stack them on top of each other. You can make them all centered at the top, then rotate the shapes to 45deg, -45deg, 225deg and -225deg.
Cheers,
Chris
Hi there,
I just bought the license and have run into a spot of trouble. While I can easily resize the 25- and 50-character circles, the 100-character circle won’t resize. I drag the corner, and the computer stalls out while thinking, and ultimately nothing happens.
Any ideas on how to fix this? Any advice would be greatly appreciated!
Thanks,
Eve
Hi Eve,
Yeah, it can get pretty slow. It works slow but fine on my laptop, but that’s a brand new i7 ThinkPad.
There is one technique that you might try: use the Size & Position pane.
1. Click on a text-on-a-circle shape
2. Notice the Width, Height and Angle in the left portion of the status bar at the bottom of the window.
3. Click on any of these fields to pop-up the Size & Position pane.
4. Enter a numeric value for either Width or Height (both will change).
5. Wait and hope.
This lets Visio go immediately to the “last calculation” instead of thinking while you drag.
If it works, but the text seems not perfectly spaced, right-click and choose “Refresh” at the top of the menu.
Other ideas:
– Find someone with a faster computer and try it on that.
– Type just a few characters, size and position the circle and text just the way you want it, then copy and paste the text into the shape afterwards. This way, you’ll avoid having to do resizing with lots of characters (although all the invisible ones still have to resize, haha, but it should be less math for Visio)
– Use two circles, each with less text on them and overlay them.
Hope one of these ideas works for you, let us know!
I purchased Text on a Circle about one hour ago and have not received it yet. Please assist.
Hi CR,
When you purchase, you receive an email with a link:
Title: You got Über Rack Unit Dimension Line Visio SmartShape!
From: support – at – visguy.com.
Please check your junk/spam folders.
I replied to your e-mail as well, and it bounced back, do you have some sort of filter that is not letting this email through?
Any idea when Gumroad will be back up?
They’ve got “Be back soon” up right now, which is better than a few minutes ago…
Just bought the Text on Circle. 1) When I set the font to Calibri, 24 pt, the outer perimeter ‘cuts’ through the middle of the text. I don’t see where I can ‘pad’ the top in order to ‘center’ the text on the outer disc. 2) I want to also have the (same) text at multiple angles and don’t understand how to ‘stack’ shapes. 3) How do I set the width of the outer disc and 4) I too have need of > 100 chars
Hi bundgaj1,
Thanks for the purchase!
1. If you look at the horizontal axis that runs through the center of the shape, you should see little, yellow handles that coincide with the circles. Use these to modify the radii of the circles.
2. With the shape selected, you should see another yellow control handle that allows you to change the angle of the text. Just pull on it to move it around. If you stack several shapes, you can adjust each shape’s text angle.
3. More control handles.