 While I was writing about the Visio Spectrum Shape the other day, I started thinking about the various ways that you could use this eyesore fabulous explosion of color in your own Visio SmartShapes.
While the spectrum offers a rainbow of tints, it only comes in one form: RECTANGLE. So what if you want to spice up some arrows, or circles, or…flowchart shapes?
Since Visio isn’t a full-blown, artistically-bent illustration application, we have to make-do with tricking it to do our bidding.
And what office worker could resist the temptation to add stuff like this to his business visualizations?

Ok, enough horsing around.
Yes, we’re using the frivolous spectrum shape as the basis for an “advanced fill” effect in Visio, but you could easily come up with useful fills that would seriously improve your drawings. And learning new techniques will just make Visio a more powerful tool in your arsenal.
So let us know what you come up with by leaving comments at the end of the article!
There are two ways that I came up with to get the spectrum shape (or any other fancy fill) to fill irregular outlines:
- Create a mask
- Create a custom fill pattern
The Mask
The mask technique is a bit destructive, so if you are using SmartShapes, be sure to get just the size you want first, and work with a copy.
Many Visio shapes have smart geometry that keeps parts of the shapes from stretching or shrinking as you resize them. You can learn more about SmartShape geometry in Why Visio Shape Smarts Makes Your Life Easier and A SmartShape is Worth 1000 Symbols.
But it is important to emphasize that we will be destroying smart behaviors in the shape you want to fill with the mask method.
Imagine we want to fill an arrow with the spectrum pattern. The first thing we need is an arrow, which we can find under: File > Shapes > General > Basic Shapes. On the Basic Shapes stencil, you’ll find a whole bunch of smart arrow shapes. I’ve used the 45 degree single here.
Once we’ve got the arrow sized to our liking, we draw a rectangle around the arrow. We then size the spectrum shape to match the size of the rectangle, or perhaps a tad smaller.
Using the Z-order commands under Shape > Order, we can arrange the arrow to be on top, the rectangle to be in the middle, and the spectrum to be behind. Keyboard shortcuts of Ctrl+Shift+B (send to back) and Ctrl+Shift+F (bring to front) will help you to do this more quickly.
We should have something like this, except that the spectrum will be lined up with the other two shapes:
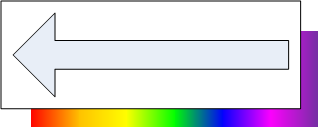
Now we want to use the arrow to punch a hole in the rectangle. We can do this with Visio’s Boolean operations, which allow us to add and subtract shapes from each other in various ways.
So select both the arrow and the rectangle, then combine them using Shape > Operations > Combine. You should see something like this:
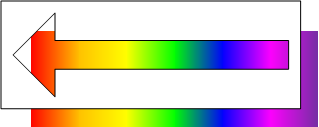
You’ve created a mask! And you’ve also destroyed the smarts for the arrow. You can see here that the arrow maintains it’s head-proportions–like a good SmartShape, but the mask squishes like a DumbShape:
Now that you’ve built your nifty mask, get rid of the black outline by giving it No Line formatting:
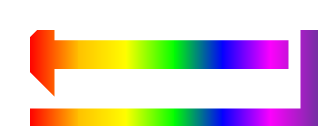
Then make sure it is lined-up with the underlying spectrum shape:
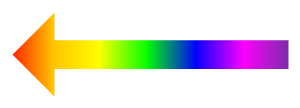
For convenience, you can select both shapes (mask and spectrum) and group them together (Shape > Grouping > Group or Ctrl+Shift+G)
If you want an outline around the arrow, then just get a copy of the original arrow, give it No Fill, and place it over the mask and fill combination. Now you’ve got three shapes to manage. If you want an outline around the arrow that is a little more elegant, then try the following…
Advanced topic: To keep the outline around the arrow, but not around the outside of the white rectangle more efficiently, you can use a little ShapeSheet magic.
- Select your mask shape
- Choose: Window > Show ShapeSheet
- Look for the sections in the ShapeSheet that start with Geometry
- The outer rectangle will have five rows in it. Find the NoLine cell at the top of this section
- Set the NoLine cell-value to TRUE
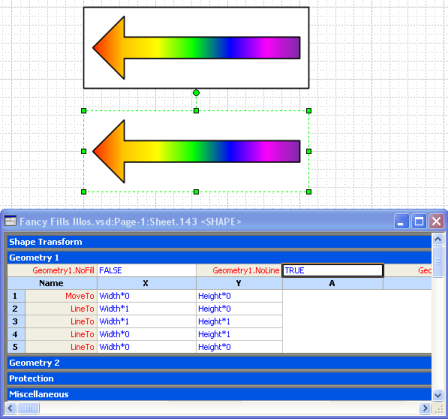
You should now be able to give your mask shape a line, but the outer edge will remain without a line, as shown in the second shape below:
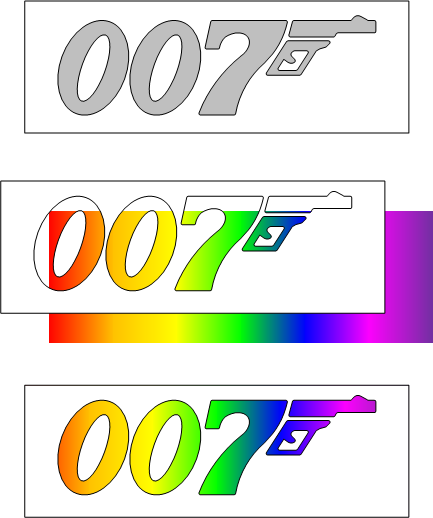
In case the arrow is too boring for you, here’s another example. Starting with a gray “007” shape that I’ve been working on and a white background-rectangle, I was able to combine the two to make a mask:
If you want to get more sophisticated and tricky, you might come to the idea of rotating the pattern. When you do this, though the spectrum must be really big to fill in your shap, as shown in the next illustration.
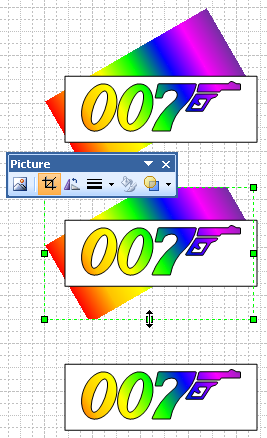
At first glance, it appears that our mask will have to be huge in order to obscure the pattern. But there’s another trick: we can crop the pattern so that it fits into a neat, right-side up rectangle.
To crop a rotated spectrum, it needs to be a metafile or bitmap. Normal Visio shapes don’t support cropping. So copy or cut the spectrum shape to the clipboard, then paste it using Edit > Paste Special. In the pop-up dialog, you can select to paste as a metafile (Picture) or a bitma.
Now we can use the Crop Tool to get rid of the excess, and keep our mask shape small and compact as before.
Here’s a visual summary of the steps:
For more on masks in Visio, have a look at: Super Mask Visio Clipping Shape!
Custom Patterns
The second method involves creating a custom fill pattern, which is less complicated but more obscure, in my opinion. One benefit of using this method is that you don’t have to destroy your original smart shape!
This technique is very similar to what was discussed in a previous article: Masking Images in Visio, but lets go over the steps using the spectrum shape, our arrow and our “007” shape.
The first thing we need to do is create a container for our custom fill pattern. So make sure the Document Explorer window is showing. You’ll find it under the View menu, if you don’t see it already.
Find the Fill Patterns node, then right-click on it and choose: New Pattern…
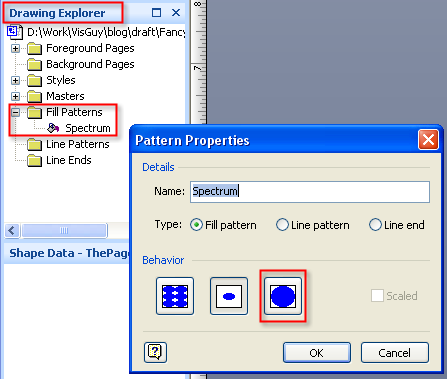
In the pop-up dialog, enter a pattern name, and choose the right-most icon for the fill-behavior.
Before we edit the pattern, make sure you copy the spectrum shape first. Now we can go into the pattern container and add the details.
You can right-click on the pattern-node and choose: Edit Pattern Shape, or just double-click it. Once you’re inside, you can paste the spectrum shape. But don’t just do a regular paste!
Visio won’t recognize a pattern-shape that has lots of gradient fills, but it will accept bitmaps as custom patterns.
So we can do a Paste Special of our spectrum shape. Go to the Edit menu and choose Paste Special. There you’ll see a list of options, from which you should select Device Independent Bitmap.
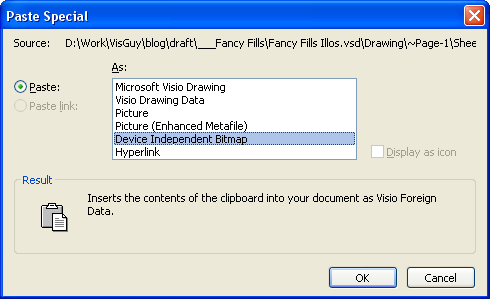
Once you’ve pasted the spectrum as a bitmap, close the pattern window and accept changes.
You can now apply your new custom pattern to any shape by simply visiting the Format > Fill dialog:
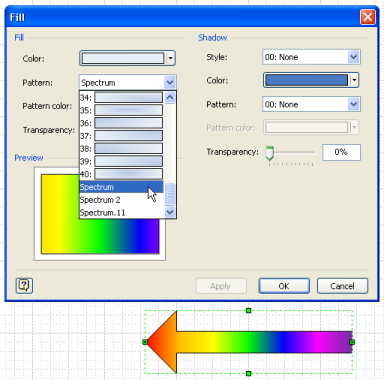 As you can see, custom patterns are listed at the bottom of the Pattern drop-down by name, not by preview (unfortunately).
And we don’t have to destroy the smarts on our original smart arrow to get the effect:

Now those with sharp eyes might notice that the spectrum is being cut off on the shorter arrows.
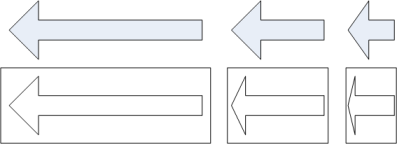
This is related to the “expand” fill behavior we chose in the Pattern Properties dialog. Below, I’ve placed a faded version of the pattern-shape, then drawn various-sized rectangles over the top of it.
You can get an idea of the effects of shape size relative to pattern size.
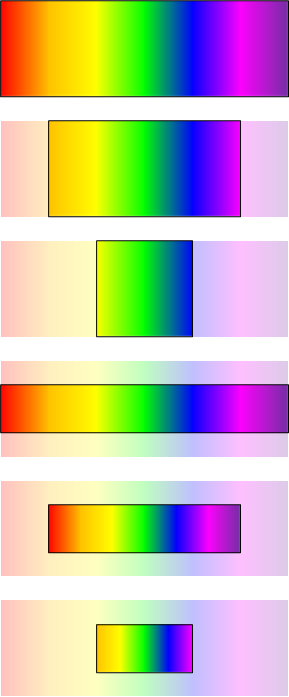
I don’t have any sage words of advice for this problem other than make the proportions of your pattern close to those of your target shape(s), if possible.
Here’s the “007” shape with the Spectrum custom pattern applied:

You may have noticed the rotated effects that I used for this article’s thumbnail:

To get this to work, I combined number of techniques described in this article. Inside of a custom pattern container, I did this:
- Pasted the spectrum shape
- Rotated it
- Cut it to the clipboard
- Pasted it via Paste Special as a bitmap or metafile
- Cropped it to a square
- Cut the cropped version
- Pasted it again using Paste Special, as a bitmap
You don’t want a cropped shape inside of a custom pattern, because it will cause funny, offset results when you apply it as a fill pattern. That is the reason for the multiple paste special steps: to make sure the final pattern shape is a rectangle with no cropping.
Well, I hope you have fun creating all sorts of crazy effects using these methods. Leave a comment below and let us know what you come up with and whether or not you find articles like this helpful and interesting!

great skill, thanks! I think the second way is more effective
Hi LM,
The only drawback to the second method is that you don’t have vector-graphics, just bitmaps. But perhaps it is worth it for cool fill patterns!
Is there any way of creating a custom fill pattern that rotates with the shape that it is filling? For example, fill a rectangle with equally spaced horizontal lines. Rotate the rectangle by, say, 45 degrees. I want the fill to also rotate by 45 degrees so that they are no longer horizontal. I can’t figure out how to do that; can anyone point me in the correct direction?
Hi DSR,
There are two different patterns types: old and new. The fancy gradients are newer, and rotate with the shape.
The patterns near the top of the list are old (been around since Windows 3.1) and use some sort of bitmap fill. You’ll notice they change resolution as you zoom in and out – your shape will get more or less lines as you zoom in or out. I think they all print as gray on printers, which have more dpi than monitors.
A third type of fill: custom patterns, built by users will also behave correctly. So you can define your own hatch pattern, and it will rotate properly with the shape.
Go to: [b]File > Shapes > Visio Extras[/b] and you’ll see bunch of “pattern” stencils.
– Custom Line Patterns
– Custom Patterns – Scaled
– Custom Patterns – Unscaled
If you open these stencils, you won’t see anything until you go to [b]Format > Line[/b] or [b]Format Fill[/b], and look in the Pattern drop-down lists.These stencils are just containers for sets of custom-defined line and fill patterns.
They might only be available with Visio Pro, though. I’m not sure.
You can define your own patterns, and you’ll find more info in the articles under this tag:
Visio Guy – Custom Patterns
I am just learning visio and the advanced fill effects tutorials helped a lot! However, I am drawing a 90 degree, 2D pipe elbow. The shading that I am using for the pipes are color #4, Pattern #29 and pattern color #16. I would like the pattern color to follow the curve of the pipe. I can adjust it by using the Off-center Radial Fill effect, but I can’t figure out how to get it to follow the curve. Any help would be appriciated!
Hi
I am using visio 2010 and I am not sure what I am doing wrong, but I can not seem to find the “Drawing Explorer”. Is there some help around for how to make custom patterns in visio 2010?
Hi Grant,
If you go to Customize the Ribbon and turn on the Developer tab, you will find the Drawing Explorer there.
Alternatively, you can use the Customize the Ribbon dialog to just add the Drawing Explorer button to any tab you’d like, or to the Quick Access Toolbar for that matter. Make sure to choose “All Commands” in the “Choose commands from:” drop-down on the left, or you won’t find the Drawing Explorer in the list of controls.
I found your 2nd option easy to follow and use.
Problem was that the custom shape would fill in patches. Then i finally discovered if you draw a line and hover over the end point until it gives a call out “Extend Shape” and continue drawing with the next line or shape segment until you have a closed shape it will see the shape as one and then you can easily use the custom fill pattern you had created earlier.
Good luck to those in the same boat.
Visio Guy,
My following question is loosely tied to the subject…
Is there a way in Visio 2013 to apply a 2 color gradient to a open ended line (not a shape)? I’ve noticed in the Format Shape window that there is a radio button, but its always disabled as far as I can see. I went into the shape sheet and enabled LineGradientEnabled. However, the result is that the radio button is selected but the line attribute control disappears.
Thanks
Hi DN,
Yes, but you have to fiddle with the ShapeSheet. Try this:
1. Use the line tool to draw a “U” (ie: three sides of a rectangle)
Of course it is open and can’t be filled.
2. Make sure the Developer tab is visible
3. Right-click the shape and choose Show ShapeSheet.
4. Look for the cell Geometry1.NoFill and switch it’s value from True to False.
You should now be able to add fill patterns to your shape.
For anyone who may be able to help,
Following question is related to creating and using a custom hatch pattern.
Just created a hatch that successfully fills up my objects, but even though I have the ‘scale’ option selected for my stencil fill property, the hatch is not scaling. When I zoom out the whole hatch pattern merges in a black blob that really eats into the reframe rate.
Does anybody know what’s wrong? And/or how to fix it?
Thanks,
Ian