While Visio is heavily used for flowcharting, network diagramming, org charting and other connected diagramming tasks, it also has a fair amount of capabilities that overlap the CAD arena.
One of the best-kept secrets in this area is the ability to draw tangent lines between two curves.
Today we’re going to expose the secret and show you how to do it!
Visio Does CAD! (a little bit)
It’s pretty easy to discover that Visio can do scaled drawings and perform CAD-like functions. It ships with lots of office-planning, home-planning and site-planning templates, all with appropriately-scaled drawing spaces. If you’ve used any of these, you might have found the automatic positioning of walls, doors and windows to be quite helpful. And layers, background pages and groups help you to organize related shapes, to show and hide details, and to eliminate clutter while you draw. Yes, Visio is clearly more than a flowcharting tool!
If you’ve needed to draw your own scaled shapes from scratch, you might have found the Boolean operations: Fragment, Combine, Union, Intersect, Subtract and Trim to be useful. The Size & Position dialog helps you to control the location, width, height and angle of a shape precisely. And if you’re really brave, you can control a lot more details by using the ShapeSheet.
At some point, however, you’ll start to miss real CAD programs. While the Ellipse, Line, Pencil, Rectangle and Freeform tools are nice, you will find yourself missing point-plotting, chamfers and a host of other CAD features.
If you’ve tried to draw tangent lines between curves, you’ve probably thrown your hands up in frustration and perhaps muttered a few obsceneties. And understandably so. Drawing tangents is a buried feature that is hard to find. But it is there!
The Goal: Draw Tangent Lines Between Two Curves Without Buying a CAD Program!
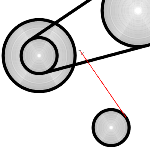
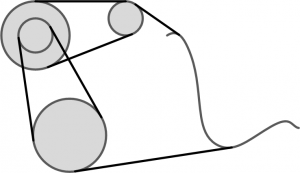
Say we have a bunch of circles that represent hubs on a system of pulleys or belts:
Wouldn’t it be great to be able to draw the belts as perfect tangents?
click to view larger image
That extra curve on the right is just there to show off, but the bottom line is that Visio has a very nice tangent-drawing feature that is not often discovered, documented or discussed! So watch the video or read on to learn how this cool feature works!
Setup Snap & Glue Options
The video shows you how to do this, but for those who like to read, we’ll do a quick run-down of the proces.
Go to the Tools > Snap & Glue menu to bring up the Snap & Glue dialog:

Ensure that the options: Drawing aids, Shape extensions and Shape geometry are checked, as so:
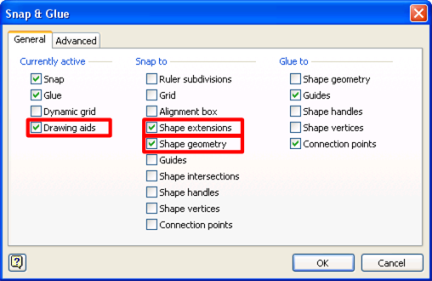
You can also quickly turn on Drawing aids by clicking the toggle button on the Snap & Glue toolbar:

Use the Dynamic Drawing Aids
Once our snap options are properly set, get the Line tool and start drawing.
First, position the cursor along the perimeter of a curve, then click the left mouse button and hold it. You’ll see a dashed tangent extension line appear. It is there to show us the direction of the tangent to the curve at the point we clicked:
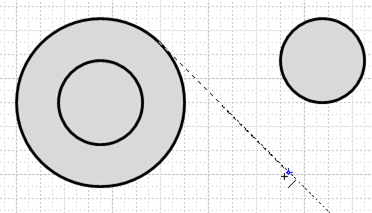
If we rub our cursor along the tangent extension line a little bit –go back and forth once or twice–the extension will turn red. This indicates that we are now drawing a “dynamic tangent line.” No matter where we drag our cursor, Visio will try to connect the point under our mouse to the tangential point on the original curve.
If you drag your mouse around, the red line will follow your cursor, dynamically adjusting the endpoint to land tangentially on the curve:
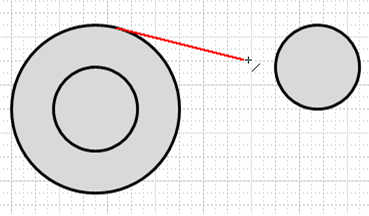
If we move our mouse close to another curve, the line will turn blue. This indicates that we can let go of the button and create a line that is tangent to both curves:
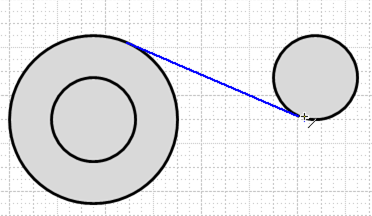
Once you see the blue line, you can let the mouse-button go, and: tada! You’ve got a line that is tangent to two curves!
Update: Another trick, thanks to Barry in the comments below: if you get to the point where you have the blue line, which is constraining your line to be tangent to a second curve, but you don’t want the second tangent for some reason, you can hold down the Ctrl key and revert to the red line. You will then be able to snap the line’s end point to any position on the shape. Your line will be tangent to the first shape, but not to the second shape.
Now get out there and do some technical drawing with Visio!


For completeness : there is also the The Drawing Tools Shapes Stencil.
I remember having found other (Japanese ?) shapes that fill other gaps in the CAD capabilities. e.g. snap to the middle of a line.
But I don’t find them anymore.
Hi Phillippe,
I think you are talking about Junichi Yoda’s shapes. If you go to this article:
Go 3D with Free Isometric Piping Shapes for Visio
I think that will take you to his web page where he’s got some more isometric shapes.
Also, Visio Cafe has some 3D shapes that are worth a look.
Thanks for mentioning the “Drawing Tools Shapes Stencil”. Those shapes are actually my idea/creation from many years ago when I worked for Visio Corp. I am not sure if they are included with the Standard version of Visio, though. Does anybody know for sure? They can be found under: File > Shapes > Visio Extras > Drawing Tool Shapes.
Also, when the line becomes blue because the tangent is constrained by two shapes, you can switch back to red (constrained by one shape) by holding down the CTRL key.
Thanks for the tip, Barry!
I’ve added an update to the article with your tip.
Cheers,
– Chris
“If we rub our cursor along the tangent extension line a little bit –go back and forth once or twice–the extension will turn red.”
So, in order to activate this feature, you need to *rub* your cursor!
This is very weired GUI behaviour. I have never encounter any other software that uses *rubbing* of cursor! I don’t even think that there are other Visio tools that uses *rubbing*.
No wonder when you mentioned “… Visio has a very nice tangent-drawing feature that is not often discovered, documented or discussed!”
Nevertheless, *rubbing the cursor* is a cool GUI invention.
Yousuf.
@Yousuf,
Very FREAKING weird, if you ask me! I made the video because I figured I could NEVER EVER explain this in words!
The rubbing reminds me of the new “window shaking” in Windows 7 that minimizes and restores all open apps on your desktop.
And the AquaSnap utility that I wrote about:
Take Control of Visio Window Arrangement with AquaSnap! has a behavior where you shake a window and it turns semi-transparent. Shake it again and it returns to opaque. Odd but sometimes useful.
This cursor “rubbing” feature does not appear to work in Vis 2013, I can’t get it to work at least. I place the cursor “near the perimeter” click and hold and nothing seems to happen. I have the snap & glue boxes checked as per the screen shot above but tangent extension line does not appear. Can anyone suggest a fix?
Hi GrimsGrin,
It works fine for me in Visio 2013. I have to be drawing a new line, it doesn’t work with existing lines.
The colors are different (Cyan to Yellow), but that shouldn’t matter.
Make sure the settings under View > Visual Aids > Dialog box launcher > Snap & Glue are correct. Drawing Aids seems to be the important one.
Good luck!
Chris