Do you ever have the need to highlight just a portion of a diagram?
Perhaps you want to discuss a certain part of the graphic, and just want to see specific details without being distracted by the rest of the diagram?
In a recent thread in the Visio Guy Forums, folks were talking about how to clip or mask a circular region of a Visio drawing.
The resulting discussion–and mini shape-design contest that spontaneously erupted–resulted in today’s article, complete with a free SmartShape for you to download!
The Spotlight on Part of Your Drawing
The user who originally posted the newsgroup question wanted to focus on just a circular part of a drawing, without seeing all of the other details. This is often called “masking” or “clipping” in the world of computer graphics.
The basic need was to do something like this:

Since Visio isn’t a full-fledged illustration program, it doesn’t have any built-in features for doing this type of thing. But Visio is a very extensible product, and cleverly-built SmartShapes can go a long way towards solving this problem.
SmartShapes to the Rescue!
As often happens in our forums, a few users submitted actual Visio files with their idea of how a Visio SmartShape could help get the job done. As I looked at their uploads, I started to formulate my own ideas, which resulted in the (…trumpet fanfare…) Super Mask!
A basic, easy way to create holes in Visio is to Combine a circle with a larger rectangle. This gives you a hole through which you can see underlying detail.
You can then use the ShapeSheet to get the hole to follow a Control Handle around the page. But it’s hard to create a shape that allows you to use control handles to both resize and reposition the hole. See John Goldsmith’s take on the solution in: Highlighting images using a mask.
Resize Naturally
So I thought to myself; “Why not use the normal, green shape handles to control the size of the hole?”
After some fussing with ShapeSheet formulas that reference the page’s ShapeSheet, that’s just what I did. I was able to get the shape’s Geometry to extend outside of the shape’s alignment box to all four edges of the page!
This is what the Super Mask looks like when you select it:
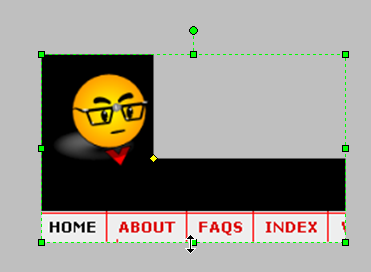
Here we’re showing the “L” format (the mask can take four different forms.) The gray is obscuring an underlying screenshot of a Visio Guy website, and the user can freely resize the “hole” by pulling on the green handles.
Furthermore, the “L” can be adjusted by pulling on the yellow Control Handle.
To reposition the shape, you just have to click on a non-hole portion of the shape and drag. This can be a bit weird at first, since your first instinct is to click and drag the hole. But this will move the underlying shape! So make sure and select the mask, not the hole!
Also, when you drag, it looks like the whole mask is moving off of the page! But not to worry. As soon as you let go of the mouse, the masked-region will automatically snap back to the edges of the page.
This is what it looks like while your are dragging:
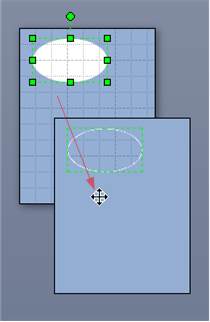
But when you release, the hole will be down and to the right, exactly where you see the ghosted-outline in the picture above.
Super Mask Features
The Super Mask shape creates a mask that exactly fits the size of the page onto which it is dropped. You don’t have to fiddle with the shape to get it to reach the borders of the page.
All you have to do is resize the hole and position it over the details that you want to expose.
But the shape does have some advanced features that will make it more fun, more powerful, and quicker to use.
Context Menu “Right-click” Features
If you right-click on the Super Mask, you’ll see a bevy of features to make your clipping faster, easier, and more enjoyable:
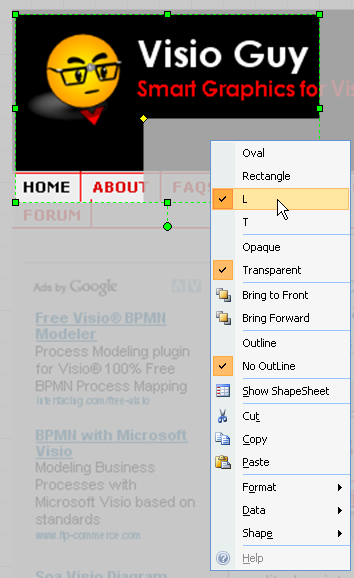
Just make sure that you actually click on the part of the shape where the hole isn’t! If you click on the hole, you’ll just get the context menu of the underlying shape, which will likely be less-than-interesting.
Let’s quickly run over the features that you’ll find in the context menu:
Mask Shape
You can choose from four different formats for the hole:
- Oval
- Rectangle
- L-Shape
- T-Shape
Opacity
To make it easier to see what you’re doing while working, you can make the mask transparent, then switch back again to non see-through when your done. Just right-click the shape and select an opacity option:
- Opaque
- Transparent
If you have the Shape Data window open, and the shape set to Transparent, you’ll be able to set the Transparency Level using the shape data field. 0% means not see-through, and 100% means completely see-through. So pick something like 25%, 50% or 75%.
Z-Order
If you add shapes to your drawing after the mask, you’ll want to bring it back to the top. These handy z-order options are just a right-click away:
- Bring to Front
- Bring Forward
Line style
You may or may not want to show the outline of the hole.
- Ouline
- No Outline
Additional Features
A nice side effect of using the shape’s resize handles to control the size of the hole is that you can also rotate the mask! The ShapeSheet formulas that control the Geometry happen to also work if the shape is rotated or flipped. This makes the Super Mask very flexible!
The following diagram shows a few variations of size, position and rotation that you can achieve with the Super Mask shape:
click image to see larger version
Also, you can control most of the shape’s features through the Shape Data window:
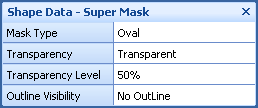
The Transparency Level only shows if you’ve set Transparency to Transparent. (Say that ten times fast!). If Transparency is Opaque, Transparency Level is hidden.
Download “Super Mask Visio Clipping Shape”
s!Aj0wJuswNyXlhilTd0sAQGWaNxUk – Downloaded 4321 times – 103.00 B


Very nicely done; a lot of nice features. In the instructions, the repositioning feature is a little understated, so, I’ll emphasize it here: when you drag the opening, it looks like the entire mask is shifting off-page. That’s expected behavior, and as soon as you release the mouse, the view window stays put and the mask reshapes to fill the page borders.
Good point, WD,
I’ve added another screen shot to help illustrate the funny drag behavior.
– Chris
Very nice. What would it take to modify it so more than one could be on a diagram? Currently, if a second Super Mask is put on a diagram, it masks the content revealed through the first Super Mask.
I second Chris’ request. Having multiple masks on one page would make this even more useful…
I think I need to make a version that allows free resizing of the opaque portion — the part that is outside the mask. Then several masks could be placed on a page.
How about a shape that when pulled into the document, sets the transparency levels, then allows the user to ‘select’ where the document should be allowed to bleed thru. If the super mask object is already part of the document, those transparency properties would be adopted and simply not increased. You could reuse the object as often as necessary to get the job done.
How can I use this mask to do the reverse? i.e. dim what appears in the hole, everything else on the page is ‘bright’?
Hi jp,
Er….just draw a square, rectangle or circle and give it a transparent fill via Format > Fill
Hey, great work with this!… Have you had any luck with producing a version that allows resizing of the opaque area? I could REALLY do with that right now!! lol
Hi,
I want to add my vote for a version that allows the outer, opaque or transparent, box to be resized.
A few times I have gone to use the mask shape, but didn’t because I needed a shape that wouldn’t cover up headers, footers or columns on the page. At these times (of course) I don’t have time to play with the shapesheet.
I’m ShapeSheet beginner, and would be glad to give it a try. Perhaps you or another reader could outline the steps necessary to give me a head start?
A thought (wish) about how the shape might work: It would be ideal to extend (rather than just remove) the automatic “resize to page” function. I’d like to be able to set an arbitrary “page” and let the shape continue to resize itself to the borders I choose instead of the actual page size. Maybe also a way to “Lock/Unlock Mask Size” and “Reset to Default Size (whole page)”.
I’ll post back if I decide to dive into the ShapeSheet on my own.
Many thanks for this fantastic site.
–Mac
Loved it. Would also have loved the option to resize the outer shape.
Unless I’m missing something, I also could not adjust the transparency level (just able to toggle it on and off).
Still, VERY useful stencil. Kudos!