A coding problem that Visio developers often stumble upon recently reared its ugly head yet again in the newsgroups. The question, very simply, was:
How do you programmatically detect sub-selected shapes?
The usual place to start is with a simple line of code, like:
Visio.ActiveWindow.Selection
But as it turns out, this line surprisingly does not return sub-selected shapes. So let’s dig deeper into the problem so that you can get your projects finished!
Two Three Modes of Selection
If you’ve used Visio for any amount of time, you’ve probably encountered the two types of selections that you can make in the UI. Normal selection, where you get the bright green handles, and sub-selection, where you delve into a group to select a sub-shape.
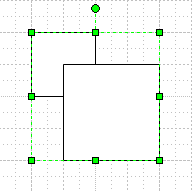
For the uninitiated, normal selection is the simplest, most-encountered case, and it looks like this when you select only one shape:

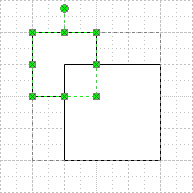
We can see that this shape is a group that contains two squares. If we click again on the smaller square, we will see slightly different selection handles: green boxes, each with a little x in the middle. This indicates that you have selected a shape within a group, i.e. you have sub-selected the shape:

But when it comes to coding, or seeing things from an internal, Visio-engine point of view, there is a third notion of selection: Super-selected shapes.
If you look closely at the sub-selection illustration above, you might make out a black dashed line surrounding the group. While you might only care that you have sub-selected the little square, Visio is still keeping track of the parent-group. In Visio geek terminology, this parent shape is Super-selected.
So when it comes to programming Visio and dealing with selections, keep the three modes of selection in mind: Selected, Sub-selected and Super-selected!
Tweak the Selection Object With IterationMode
It turns out that we can finely-tune which selected objects we want to know about by altering the IterationMode property of a Visio Selection object. The ItereationMode can have a combination of four values, enumerated in the VisSelectMode enumeration:
- visSelModeSkipSuper Selection does not report superselected shapes
- visSelModeOnlySuper Selection only reports superselected shapes
- visSelModeSkipSub Selection does not report subselected shapes
- visSelModeOnlySub Selection only reports subselected shapes
By default, a Selection object has an iteration mode of:
VisSelectMode.visSelModeSkipSub + VisSelectMode.visSelModeSkipSuper
which explains why we don’t get any sub-selected shapes in a default selection – the argument says to skip them!
To get the result that many of us are probably looking for, namely normally-selected shapes and sub-selected shapes, we would use an IterationMode of:
VisSelectMode.visSelModeSkipSuper
This is the mode that is commented as “get all shapes together” in the code listing below. The idea is that we want a selection object that contains all of the shapes that a user specifically clicked on. Super-selected shapes are ignored, since I don’t think a developer cares about them all that often.
Code Listing
Below is the code listing for the VBA code that is in the download at the very end of this article. The code requires a button and a text box. When the user clicks the button, a string containing information about the current Visio selection is returned by m_detectAllSelectedShapes. This string is then pushed to the text box control.
The function m_detectAllSelectedShapes returns overlapping results. First, it separates normally-selected shapes from sub-selected shapes, then it puts them all together at the end. So the resulting string can have up to three different lists.
Just look for where sel.IterationMode is set to see the differences.
Private Sub CommandButton_DetectSelectedShapes_Click()

  Dim sReport As String
  sReport = m_detectAllSelectedShapes()
  Me.TextBox_Output.Text = sReport

End Sub

Private Function m_detectAllSelectedShapes() As String

  Dim s As String
  Dim win As Visio.Window
  Dim sel As Visio.Selection
  Dim shp As Visio.Shape

  '// Use the ActiveWindow:
  Set win = Visio.ActiveWindow

  '// Get the normally selected shapes:
  Set sel = win.Selection
  sel.IterationMode = Visio.VisSelectMode.visSelModeSkipSub + _
        Visio.VisSelectMode.visSelModeSkipSuper

  '// Header:
  If (sel.Count > 0) Then
    s = s & "Normally-selected Shapes:" & vbCrLf
  End If

  '// Shape info:
  For Each shp In sel
    s = s & vbTab & shp.NameID & vbCrLf
  Next

  '// Get the sub-selected shapes:
  sel.IterationMode = Visio.VisSelectMode.visSelModeOnlySub + _
         Visio.VisSelectMode.visSelModeSkipSuper

  '// Header:
  If sel.Count > 0 Then
    If (s <> vbNullString) Then s = s & vbCrLf
    s = s & "Sub-selected Shapes:" & vbCrLf
  End If

  '// Shape info:
  For Each shp In sel
    s = s & vbTab & shp.NameID & vbCrLf
  Next

  '// Get all selected shapes:
  sel.IterationMode = Visio.VisSelectMode.visSelModeSkipSuper

  '// Header:
  If sel.Count > 0 Then
    If (s <> vbNullString) Then s = s & vbCrLf
    s = s & "All Selected Shapes Together:" & vbCrLf
  End If

  '// Shape info:
  For Each shp In sel
    s = s & vbTab & shp.NameID & vbCrLf
  Next

  m_detectAllSelectedShapes = s

 End Function
Again, to be technically complete, there should also be information about super-selected shapes returned by the code above, but I don’t think that is information that most developers are interested in. The main concept is to be able to detect sub-selected shapes.
You can play with this code in a ready-to-go format by downloading the following Visio document:
Download “Detect Sub-selected Shapes”
s!Aj0wJuswNyXlhTM3ydAIbHAIpPGt – Downloaded 3266 times – 103.00 B

Thanks, Great article and the code is well annotated. While it is clear from the context, I would like to point out to others that there is a small typo second reference to “normally selected shapes” in the annotation below. This annotation should read “sub-selected shapes”.
‘// Get the normally selected shapes:
sel.IterationMode = Visio.VisSelectMode.visSelModeOnlySub + _
Visio.VisSelectMode.visSelModeSkipSuper
Please advise if I am mistaken in my interpretation.
Please keep up the good work, I am hoping to get up to speed someday.
Thanks Steve,
I’ve corrected the comment, as you correctly specified!
– Chris
Hi,
For some reason, I can’t change the IterationMode of the page in my own application. It is always 1280 (the default) no matter what I do. So far I’ve tried to change it before any selections are made (right after the page was created) and in the SelectionChanged event handler.
Any ideas what might cause this kind of behavior? Are there any other ways of detecting sub-selected shapes?
Thanks.
Ok an opposite approach. I have a VBA mess of procedures that draw a rectangle called large retangle, then in my large rectangle I draw another smaller rectange with a verysmall rectagle likeshape in the smaller rectangle. then duplicate the two smaller rectangles by an i value lets say 9 of them in a vertical row on the left hand edge of the larger rectangle. now I want to select the bigger rectangle and all of the smaller rectangles with in it then do one rectangle group.
What I find on the Web hasn’t helped and I am stuck. ie
The web has me select all the shapes on my page which there is alot and I don’t want that…. I just want to select all of the shapes in the newly drawn rectangles and then group them. I nameded each shape sheet The larger rectagle “large_rectangle, the Smaller rectangle small_rectangle and the verysmall rectangle V_S_Rec. each one comes up with a .## for indexing, my question is how canI use VBA to select the large rectangle, then select all of the 9 smalls and 9 very smalls then group them?
thanks in advance
Hi Eric,
You can add the rectangles to a selection object as you draw:
[code lang=”vb”]
Sub DoEricsStuff()
‘// Create an empty selection:
Dim sel As Visio.Selection
Set sel = Visio.ActivePage.CreateSelection( _
Visio.VisSelectionTypes.visSelTypeEmpty)
‘// Draw some rectangles and add them to the selection:
Dim i As Integer
Dim shp As Visio.Shape
For i = 1 To 10
‘// Draw the rectangles according to i, just for testing
Set shp = Visio.ActivePage.DrawRectangle( _
i, i, i + 0.5, i + 0.5)
‘// Add the shape to the selection:
Call sel.Select(shp, Visio.VisSelectArgs.visSelect)
‘// Select sel in the active window:
ActiveWindow.Selection = sel
Next i
End Sub
[/code]
i have to ungroup the shapes but its giving error.
i have added a shape and created a description box and grouped that two objects. next time if i try to ungroup it give me error “Requested operation is presently disabled.”
Plz help
Hi sachin,
The shape in question is probably locked/protected from ungrouping. You can change this via the Protection dialog or via the ShapeSheet (Protection section).
However, the shape designer probably locked it for a reason. Visio shapes have formulas in cells, similar to Excel, that govern they’re behavior. They control formatting, positioning, sizing, text display and shape of the various pieces of a shape.
Some of these formulas depend on a group-container being present. If you ungroup a shape, you destroy this container, and the sub-shapes can end up flying around and being unpositionable/unsizable (they often go to the lower-left of the page)
Visio shapes that are grouped aren’t always just collections of clip art. They have smart behaviors, so don’t be surprised if ungrouping gives you unexpected results!
Hi Chris,
Thanks for the great shape.
I’m wondering how did you manage to make the alignment box of the group of shapes to not include the circle that counts shapes ?
And is this the reason why the connectors are centered only on the divided box (not including the circle callout)?
Thanks in advance for your help,
Hi Raphaël, are you taking about this article or this one? http://www.visguy.com/2009/11/25/super-smart-visio-divided-box-shape/
Anyway, when you create a group in Visio, you can move the subshapes outside of the alignment box. For adornments that don’t have to do with the “physicalness” of the shape, this can be quite useful.
Hi, thanks a lot for your answer.
And yes, I was talking about the divided box, I mixed up the two windows.
I know you can move a shape out of the align box in groups of shapes, but then when you add a shape below with the blue arrow (autoconnect feature), they are centered on the center of the whole group of shapes. And then the arrows are not straight.
Do you see my point ? (If not I can provide a Visio file) Any solutions ?
Thanks again 🙂
Hi again, Raphaël,
Ah, I see what you mean.
I just made (in Visio 2010) a shape with a small rectangle that is up-and-to-the-left of the group, outside the alignment box. When I use AutoConnect to drop and connect it, it is aligned according to the alignment box, not according to the overall size of all the subshapes.
I just fired up a Virtual PC with Visio 2007 installed and tested it, only to find that the AutoConnect drop-and-connect-feature doesn’t exist in that product (I had forgotten!) Nevermind!
Anyway, not sure why you’re getting this behavior. One idea would be to make an invisible object (100% transparent line and fill) on the other side of the group to offset the offset, so to speak.
Hi again Chris,
I am using Visio 2010 too. I made the same test, and it works well (with “classical” subshape).
In fact, it apears that I have this problem only with Data graphics. My master shape has a data graphic already applied, and it is hidden/displayed if the corresponding data shape is empty/fulfilled. And the alignment takes in account the data graphic, hence my problem.
Is this the same on your side ?
The solution might be to directly create a smart shape, not using data graphics, but I didn’t find a really easy and detailed tutorial on the internet…
Thank you Chris for your help 🙂
@RN,
Ok, I made a Data Graphic with an icon set off to the right. Applied it to a shape, made a master out of the shape.
Sure enough, when I do AutoConnect, the entire width of the shape is taken into account, so that the shapes don’t appear properly aligned, as you’ve said.
This is potentially a bug. The workaround would be to apply Data Graphics to shapes *after* they are added to the page, instead of including them with masters. Not sure if this is a workable solution for you.