Download this free template that will help you to create a Venn-inspired, hierarchical bubble diagram! The nifty Visio SmartShape behavior makes creating these types of diagrams fun and easy!
I recently created a spoof of a “data visualization” that I spotted on social media. A few things in Visio frustrated me mildly, so I decided to create a shape that had some intelligent features that would make the diagram easier to build. The final result is offered here for free, but be sure to read the rest of the article, because it is essentially the Help File!
History and Inspiration
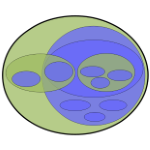
I ran into this diagram on Facebook the other day. The actual source fails me, as social media has a way of referencing references that reference other references. Anyway, it was an interesting visualization of “All That is Britain and Confusing Thereof”:

I immediately set about creating this snarky version “for the 100s of millions of people who don’t care”. A not-serious jibe specifically aimed at the British folks that I know in this fair city of Munich:

While creating this diagram (in Visio, of course!) I ran into several nagging issues:
- What to call it? The social media post called it a “Venn Diagram”, but I’m not sure if that is strictly correct.
- Resizing ellipses is a pain, because there is no size-from-center feature in Visio. So you have to resize an ellipse using the left, top, right, bottom or any corner handles. This usually shifts the shape, so you then have to move it back to where you want it.
- Moving text is a pain (as a first-world-problem, anyway). You have to use Visio’s Text Block Tool, which is fine, but it gets old quickly.
- Maintaining visual consistency could be better. I don’t want lots of different sized ellipses, if I can avoid it, and I’d like them to have a small number of aspect ratios, even if they are different sizes. This would keep the visual cacophony to a minimum.
- You have to manually arrange ellipses back to front, even though there is a clear hierarchy of “big ones at the back, small ones at the front”. I.e. it’s a problem that automation could handle…or if we just had a big Artificial Intelligence in the cloud watching us draw…
What is It?
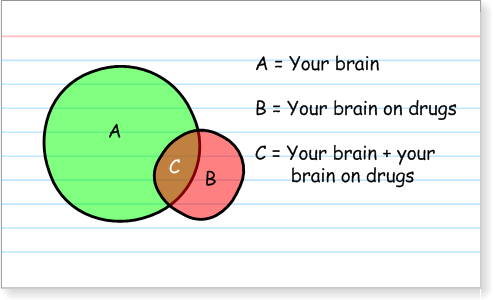
Ok, it does have some partially overlapping, semi-transparent ellipses, like the ones in the article ‘Indexed’ Shapes – for that Hand-drawn Look:
But so many of the ellipses are inside other, larger ellipses, which adds an element of hierarchy to the diagram, which many Venn diagrams do not have. So I’ve settled on this for the time being:
Venn Bubble Diagram Hierarchy Thingamajig Template
Please feel free to suggest more appropriate names in the comments below!
Center-based Resizing
Visio does not have “center-based” resizing. This means that if you try to make a shape wider or taller, there is no way to maintain its centered position. You often have to 1. Make a shape bigger or smaller, 2. Reposition it back to it’s original horizontal and/or vertical position.
Imagine a vertical stack of flowchart shapes. One step has lots of text, so you want to make it wider, but still keep it horizontally aligned with the stack. As far as I know, even as of Visio 2016, this is not possible. There are not even modifier key combinations to help you do this. If I’ve missed something please let me know.
Before we pooh-pooh Visio too much, there are quite a few Visio shapes that try to such a feature irrelevant. A lot of flowchart shapes automatically grow in height when the amount of text overflows the default size of the shape. And they stay vertically centered while doing this. Also, some grow horizontally when the text grows, staying centered horizontally. However, this behavior requires you to manually enter line feeds (hit Return), which may or may not be ideal.
I came up with a new way of solving this problem. I added a control handle to the corner of the ellipse shapes in this template. Using serious ShapeSheet black magic, I was able to leave the normal alignment box handles in place, so you can resize the ellipses like any other Visio shape. But now one of the corners has a yellow control handle that you can also pull on to resize the shape, and keep it centered. Have a look at the animation that shows normal Visio behavior, and the special behavior built into this template’s ellipse shapes:
The center-based sizing was especially needed for this diagram, because it began life by tracing over an imported image. If you are just creating the diagram from scratch, it might not be so critical. However, when you want to
Text Features
For the shapes in this template, I built in some special text sizing.
- The text block automatically resizes in both width and height. This means you have to manual enter any line feeds you might need, but you don’t have to horse around with Visio’s Text Block Tool (which, for the curious, is located on the Home tab, Tools group in the ribbon.)
- There is a built-in control handle for easy positioning of the text.
- There are right-click context menu items for easily snapping the position of the text to the edges of the ellipse. This takes into account the size of the text block and the curvature of the ellipse, so that the shape still looks good.
Here are the custom right-click actions for the shape. The text positioning items are in the top-most group:

Custom right-click/context menu items for our SmartShape
Here we can watch the control handle being used to reposition the the text, and how the context menu presets behave smartly:
Aspect Ratio Presets: Size Consistency
If you look at the context menu screenshot above, notice the third group down from the top. It has these five entries:
- Wide Ellipse: 2 x 1
- Wide Ellipse: 1.5 x 1
- Circle: 1 x 1
- Tall Ellipse: 1 x 1.5
- Tall Ellipse: 1 x 2
You can use these items to set your shape to one of the five preset aspect ratios. The aim was to cut down on visual busy-ness and make your diagrams appear cleaner. Note: this doesn’t set the shapes to absolute sizes, however. So you could have umpteen differently-sized ellipses that all have 2 x 1 aspect ratios.
The thinking, though, is that for like-sized ellipses, you would simply copy an existing one (say, by Ctrl + Click-dragging), then simply edit the text.
Unfortunately Visio’s Format Painter feature does not have the ability to copy sizes of shapes.
Back-to-front Sorting Features
Manually Setting Back-to-front Positions
Visio has four functions for managing “Z-Order” (back-to-front positioning):
- Send to Back
- Send Backward
- Bring to Front
- Bring Forward
These functions are conveniently located on the ribbon under the Home > Arrange group. So they’re not that hard to find and use. Nevertheless, I’ve added them to the context menu of our Venn ellipse shapes. You’ll find them in the middle group of the context menu, which I’ve shown in the previous section.
I generally just use these two keyboard shortcuts:
- Bring to Front: Ctrl + Shift + F
- Send to Back: Ctrl + Shift + B
As far as I know, there are no keyboard shortcuts for Bring Forward nor for Send Backward.
Automatically Setting Back-to-front Positions Using VBA Macros
As I drew my various sample drawings with the shape, I noticed that I was doing a lot of Bring to Front and Send to Back. I also noticed that the big shapes were at the back, and the little shapes were at the front. So I wrote some fairly basic code to automatically sort the selected shapes in a back-to-front order, based on their sizes. I used the built-in Visual Basic for Applications scripting environment to do this. The code and macros are included in the template, and are accessible from the context-menu of the ellipse shape.
There are good, security-related reasons why you might not be able to use this feature. But if you get it working, all you have to do is:
- Select a set of ellipses
- Right-click, and choose Arrange Back to Front : Large to Small from the context menu
If you are allowed to run the macros, this will automatically arrange your shapes for you!
More About VBA Macros
If you’re not technology-shy, and you are trusting of the content offered by this site, then you can allow the macros contained in the download to run:
The first few times you open the diagram, you should see something like this:
![]()
If you trust me, or are running Visio in a protected environment, you can click Enable Content, and the smart behavior behind the macros will be enabled.
If you don’t see the warning, you may have very high security settings. See the article VBA Macro Security for more information. Note: I believe macros can be turned off as a system-level policy, which your in-house IT guys will know more about. In this case, it is very unlikely that you’ll be able to take the macro-related features for a ride.
At worse case, Arrange Back to Front : Large to Small will do nothing, and you’ll have to resort to Ctrl + Shift + F and Ctrl + Shift + B to get the job done. Not earth-shattering by any means.
Get the Template!
The download contains a zip file with two template files inside:
- Venn Bubble Hierarchy Template_M.vstm
- Venn Bubble Hierarchy Template_U.vstm
The “_M” indicates that the page is set to A4, millimeters. The “_U” means Letter-sized paper, with inches as the units.
“.vstm” means a Visio template (in Visio 2013 or newer format), with macros, which were discussed in a section above. At present, there are no versions of the template for Visio 2010 or older. Although Microsoft does provide the Microsoft Visio Compatibility Pack, which allows Visio 2010 to read files in the newer format, (and then save them out as the older .vsd) but I haven’t tested it myself in a long time.
After unzipping the file to a location of your choice, you can start a new drawing by simply double-clicking the file of your choice. That should open an unsaved copy of your drawing, that you can edit to your heart’s content. There is no danger of hurting the original (but keep a backup of the .zip file just in case!) Sometime soon, I hope to post more information on how to better integrate Visio templates into Visio’s own user-interface, namely the New/Start page and template gallery. Or I could create an installer that “publishes” these templates, so that they show up automatically!
When you open a new drawing based on the template, you should see something that looks like this:
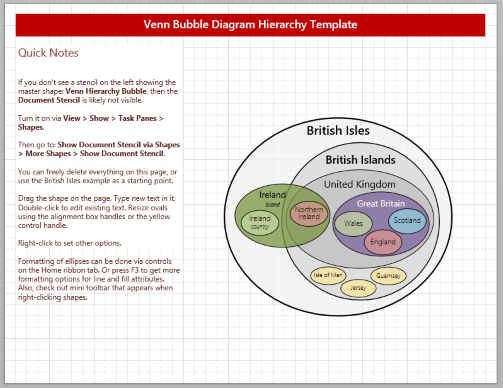
Feel free to delete all the shapes on the page, or use the existing shapes as a starting point. There is a title block, and some help notes and hints on the left.
Download “Venn Bubble Hierarchy Template”
s!Aj0wJuswNyXlhjl9dhToDnbKTrwQ – Downloaded 2526 times – 103.00 B

Awesome template – solves so many problems with the Venn diagrams! Thank you!