Visio 2010’s Ribbon interface is very customizable, but it can be tricky finding the command you need.
We’ve published the complete list of commands in this article so that you can easily search the list!
Visio 2010 uses the “new” Ribbon user interface, which we love, hate and love to hate.
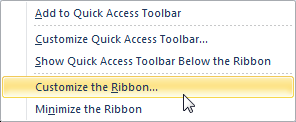
The great thing about the ribbon is that when it fails you, it is very customizable. Just right-click the ribbon and choose Customize the Ribbon.

The bad thing about the ribbon is that customizing it can be a pain in the neck.
click to view larger image
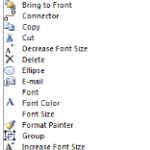
There are 554 items that can be added to the ribbon, and this list is not searchable. So if you don’t know the name of the item you are seeking, you’re in for a long, slow, visual, scrolling search. I find it really difficult to concentrate on that list and search for items. Especially in a world where I can Ctrl + F for just about anything!
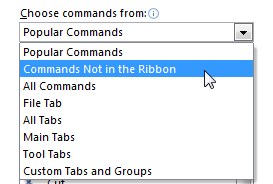
You can narrow this list down by selecting Commands Not in the Ribbon from the drop-down list atop the dialog:

But wouldn’t it be nice if we could just search this list of commands?
Say you know you need a text-related command. There are at least 14 commands related to text, but only half of them begin with the word “text”.
- Convert to Text
- Draw Horizontal Text Box
- Draw Vertical Text Box
- Edit Text
- Left-to-Right Text Direction
- Right-to-Left Text Direction
- Rotate Text
- Text…
- Text
- Text Block
- Text Box
- Text Box Text
- Text Direction
- Text Style
The key to finding items in the customization list is to know the first letter of the item’s name. That way you easily can find it in the list.
Fortunately, Visio Guy is on the ball, and we’ve published a huge list of all the items. You can quickly and easily search this page to find the item you want, then attack the customize the ribbon dialog with confidence.
The Mega List
- <Separator>
- 100%
- 2 Sides
- 3 Sides
- 4 Sides
- 5 Sides
- 6 Sides
- 7 Sides
- About
- Actual Size
- Add Jumps To
- Add to Group
- Add-Ins
- Add-Ons
- Adjust
- Align Bottom
- Align Center
- Align Left
- Align Middle
- Align Objects
- Align Right
- Align Top
- All Caps
- Allow Themes
- Always Fit to Contents
- Apply after Linking Data to Shapes
- Apply Theme to New Shapes
- Arc
- Arc
- Area Select
- Arrange
- Arrange
- Arrange All
- Array Shapes…
- Arrows
- Assign to Layer…
- Assign to Layer…
- Auto Align & Space
- AutoBalance
- AutoConnect
- AutoCorrect Options…
- Auto-Create Ink Shapes
- Automatic Resize
- Automatically Link…
- Back
- Back
- Background Color
- Background Page…
- Backgrounds
- Backgrounds
- Behavior…
- Blank Page
- Bold
- Borders & Titles
- Brightness
- Bring Forward
- Bring Forward
- Bring to Front
- Browse to Other Document…
- Bucket Tool
- Bullets
- CAD Drawing…
- Calendar…
- Callout
- Capitalize Each Word
- Cascade Windows
- Center Drawing
- Change Case…
- Change Row Type
- Check Diagram
- Check Diagram
- Check In
- Check In
- Check Out
- Clear
- Clip Art…
- Clipboard
- Clipboard
- Close
- Close
- Close
- Close
- Close Icon Editor
- Close Ink Shape
- Close Ink Tools
- Close Ink Tools
- Close Print Preview
- Close Stencil
- Code
- Color Palette…
- Colors
- COM Add-Ins…
- Combine
- Comments
- Compress Picture
- Connect Shapes
- Connection Point
- Connection Points
- Connector
- Connectors
- Container
- Container Styles
- Container Styles
- Contrast
- Control Properties
- Controls
- Convert
- Convert to Group
- Convert to Group
- Convert to Shape
- Convert to Text
- Copy
- Corner Rounding
- Create
- Create New Data Graphic…
- Create New Subprocess
- Create New Theme Colors…
- Create New Theme Effects…
- Create Shortcut
- Create Subprocess from Selection
- Crop Tool
- Current Printer
- Current View
- Curved Lines
- Custom Toolbars
- Cut
- Dashes
- Data Graphics
- Decrease Font Size
- Decrease Indent
- Decrease Paragraph Spacing
- Define Styles…
- Delete
- Delete
- Delete
- Delete All Markup Overlays in Document
- Delete Comment
- Delete Markup
- Delete Markup Overlays on Current Page
- Delete Markups
- Delete Pages…
- Delete Shape ScreenTip
- Design Mode
- Developer Reference
- Developer Reference
- Diagram Parts
- Diagram Validation
- Direction
- Disband Container
- Discard Check Out
- Display Data
- Distribute Center
- Distribute Middle
- Distributed
- Document
- Document Stencil
- Double Strikethrough
- Double Underline
- Double-Click…
- Draw Horizontal Text Box
- Draw Vertical Text Box
- Drawing Explorer
- Drawing Page…
- Drawing Tools
- Drawing Tools
- Duplicate
- Dynamic Grid
- Edit Background
- Edit Comment
- Edit Data Graphic…
- Edit Formula
- Edit Icon
- Edit Link…
- Edit Links to Files
- Edit Master
- Edit Object
- Edit Text
- Editing
- Editing
- Effects
- Effects
- Ellipse
- E-mail as PDF Attachment
- E-mail as XPS Attachment
- Equation Editor
- Event Monitor
- Exit
- Expand as Needed
- Expand Row
- Export
- External Data
- External Data Window
- Fill
- Fill Options…
- Fill Style
- Find…
- Find
- Find Similar Shapes
- First Line
- First Tile
- Fit Curve
- Fit Curve…
- Fit to Contents
- Fit to Drawing
- Fit to Window
- Font
- Font
- Font
- Font Color
- Font Size
- Foreground
- Format Ink…
- Format Painter
- Format Picture
- Formula Tracing
- Formula Tracing
- Formulas
- Forward
- Forward
- Fragment
- Freeform
- Gantt Chart…
- Gap
- Glue to Connection Points
- Glue to Guides
- Glue to Shape Geometry
- Glue to Shape Handles
- Glue to Shape Vertices
- Go to Page
- Grid
- Group
- Group
- Guides
- Header & Footer…
- Heading Style
- Highlighter
- Horizontal in Vertical…
- Horizontal Lines
- Icon Area Select
- Icon Lasso Select
- Icons & Details
- Icons & Names
- Icons Only
- Ignore Issue
- Ignore Rule
- Ignore This Issue
- Illustrations
- Import
- Import Rules From
- Increase Font Size
- Increase Indent
- Increase Paragraph Spacing
- Ink
- Ink Color
- Ink Tools
- Insert
- Insert
- Insert a Field…
- Insert After
- Insert Cell Name
- Insert Chart
- Insert Controls
- Insert Function
- Insert Hyperlink
- Insert Legend
- Insert Object
- Insert Page…
- Insert Picture from File
- Insert PivotDiagram…
- Insert Symbol
- Insert Symbol from Dialog
- Intersect
- Issues Window
- Italic
- Join
- Jump Style
- Justify
- Language
- Language
- Language Preferences…
- Lasso Select
- Last Line
- Last Tile
- Last Zoom
- Layer
- Layer Properties…
- Layers
- Layout
- Layout & Routing…
- Left Button
- Left-to-Right
- Left-to-Right Text Direction
- Line
- Line
- Line Style
- Link Data to Shapes
- Link Shape to Existing Subprocess
- Links
- Lock Container
- Macro Security
- Macros
- Margins
- Markup
- Master Explorer
- Master Shape
- Membership
- Menu Commands
- Message Bar
- Minimize the Ribbon
- More Layout Options…
- More Lines…
- More Windows…
- Move Other Shapes Away on Drop
- Multiple Select
- Names Only
- Names under Icons
- Never Reroute
- New
- New…
- New Master…
- New Page…
- New Stencil (Metric)
- New Stencil (US Units)
- New Stencil (US units)
- New Window
- Next
- Next Markup
- Next Page
- Next Tile
- No Automatic Resize
- No Lines
- Normal
- Offset…
- Open
- Open in Visio
- Open Recent File…
- Open Stencil
- Operations
- Options
- Organization Chart…
- Organize My Shapes
- Outline Weight
- Page…
- Page
- Page Auto Size
- Page Breaks
- Page Default
- Page Orientation Gallery
- Page Setup…
- Page Setup
- Page Size Gallery
- Page Width
- Pages
- Paint
- Pan & Zoom
- Paragraph
- Paragraph
- Paste
- Paste
- Paste as Hyperlink
- Paste Special…
- Pause Recording
- Pen
- Pen Pressure
- Pencil
- Pencil Tool
- Pens
- Persistent Events
- Picture Corrections Options
- Picture Styles
- Pointer Tool
- Position
- Preview
- Preview and Print
- Previous
- Previous Markup
- Previous Page
- Previous Tile
- Print Preview
- Print Preview Page Setup
- Print ShapeSheet
- Proofing
- Properties…
- Protect Document…
- Protection…
- Publish as PDF or XPS
- Quick Print
- Reconvert
- Record Macro
- Rectangle
- Reduce File Size
- Refresh
- Refresh All
- Refresh Data…
- Re-Layout Page
- Re-layout Shapes
- Remove from Group
- Remove Hidden Information…
- Remove Theme
- Reorder Pages…
- Replace…
- Reports
- Reroute as Needed
- Reroute Freely
- Reroute on Crossover
- Research…
- Reset Connector
- Resume Recorder
- Reverse Ends
- Reviewing Pane
- Right Angle
- Right Button
- Right-to-Left
- Right-to-Left Text Direction
- Rotate
- Rotate Diagram
- Rotate Shapes
- Rotate Text
- Routed line
- Routing Style
- Rows
- Ruler
- Ruler & Grid…
- Rules to Check
- Save
- Save As
- Save As Other Format
- Save As Other Formats
- ScreenTip…
- SDK Tools
- Sections
- Sections
- Select
- Select
- Select All
- Select by Type…
- Select Contents
- Send
- Send Backward
- Send Backward
- Send to Back
- Server
- Set Proofing Language…
- Shadow Color
- Shadow Options…
- Shape
- Shape
- Shape Action
- Shape Actions
- Shape Data
- Shape Data
- Shape Data Sets…
- Shape Data Window
- Shape Design
- Shape Name
- Shape Reports
- Shapes
- SharePoint Workflow
- Show
- Show Ignored Issues
- Show Line Jumps
- Show Markup
- Show New Screen
- Show ShapeSheet
- Show Window
- Show/Hide
- Show/Hide Data Windows
- Single Tile
- Size
- Size & Position
- Small Caps
- Snap & Glue…
- Snap to Alignment Box
- Snap to Drawing Aids
- Snap to Grid
- Snap to Ruler Subdivisions
- Snap to Shape Intersections
- Space Shapes
- Spelling…
- Square
- Stamp Tool
- Stencil
- Stencil
- Stencil Explorer
- Stop Ignoring Rule
- Stop Ignoring This Issue
- Stop Recording
- Straight Lines
- Strikethrough
- Stroke Eraser
- Style
- Style…
- Style Explorer
- Subprocess
- Subscript
- Subtract
- Superscript
- Switch Windows
- Task Panes
- Text…
- Text
- Text Block
- Text Box
- Text Box Text
- Text Direction
- Text Style
- Themes
- Themes
- Thesaurus…
- Timeline…
- Toggle Full Screen View
- Toggle Glue
- Toggle Snap
- Toolbar Commands
- Tools
- Trace Dependents
- Trace Precedents
- Track Markup
- Translate
- Transparent
- Transparent
- Trim
- Underline
- Ungroup
- Union
- Update Alignment Box
- Update Icon
- Values
- Vertical Lines
- View
- View
- View Code
- View Direction
- View Macros
- View Version History
- Views
- Visio 2000-2002 Drawing (*.vsd)
- Visio Drawing (*.vsd)
- Visio Guy
- Visio Template (*.vst)
- Visual Aids
- Visual Basic
- Weight
- Whole Page
- Window
- Window
- Zoom
- Zoom…
- Zoom
- Zoom In
- Zoom Out
Creating the List
If you’ve scrolled down here, you know that 554 items is a lot! And if you think that I slowly typed each item from that huge list by hand, then you overestimate my generosity.
So how do you grab a bunch of text from a big ListBox? One way is to train Lemurs from Madagascar and feed them nutmeg beans. I hear they are fast and accurate typists. Another way is to use automation…
For the visuals on this website, I use Visio’s Save As… feature to create PNG files, and I use TechSmith’s legendary SnagIt application (currently version 9.1.3) for screenshots that show the user interface.
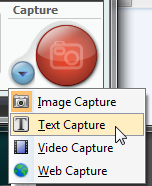
While pondering how to text-ify this gargantuan list, I poked around SnagIt’s features. Luckily, I found the Text Capture feature.
AHA!
Unfortunately, I still had to scroll the list box 20 or so times to capture all the text page-by-page, so to speak. SnagIt does handle capturing extra-long images from scrollable windows and lists, but I had trouble getting it to work in the Customize the Ribbon dialog.
I also ended up with a lot of blank lines between each item. I was surprised that I couldn’t find a way to get rid of the blank lines in Word 2010. Perhaps there is a simpler way, but I had to resort to a few lines of VBA code that looked for paragraphs that had a length of 1, and then delete them.


Do you have any of the pics of the Lemurs attempt to complete the same task?
@artbraune
Hi, Lemmi here. I’m one of the lemurs.
We’re kinda nocturnal, so no pics this time, sorry.
@visioguy
The beans sucked!
Remove blank paragraphs/lines:
Search and Replace (Ctrl-H) “^p^p” with “^p”. If your line consists of a single space, change the first string to “^p ^p”
I learnt this technique while converting old-style text files with a return at thened of every line (no word-wrap!). In this example I would replace “^p^p” with “~~”, replace all remaining “^p” with ” ” (space) and then replace all “~~” with “^p^p” to get a line between each paragraph. No VBA!
Cheers
Thanks AJD,
I’ll have to try. I did tried searching for ^p^p and replacing with nothing, but it didn’t work. Maybe first replacing with *something* is the key.
And this is the reason I absolutely loathe Office 2007 and later. I spend way too much time trying to find the command I need rather than being able to drill down through a menu structure. I never had any trouble finding what I need using Office 2003 menus but waste significant amounts of time Googling for answers when using any of the office 2007+ applications. Dumbing down office for the lowest common denominator has ruined it
New add-in to find visio commands:
http://visguy.com/vgforum/index.php?topic=3088.msg12642
I tried to customize the Fonts Ribbon. I use subscript and superscript *all the time*, so it’s a pain to click into the full Fonts dialog.
I tried to add Subscript and Superscript to the Fonts Ribbon, and it said:
Commands can only be added to Custom Groups.
Why doesn’t Microsoft allow its customers to modify their workflow to make it more efficient for themselves?
Then, while as I was making the interface more efficient for myself, I thought I would take all the Position commands (align [objects] left/center/right/top/bottom/middle) and bring them up to the top of my new ribbon. I use these commands even more than sub/superscript, so avoiding the cumbersome user interface of having to click Position, then navigate down to the option I want, I would be able to just click on the button directly!
Unfortunately, this is also a NO-GO from Microsoft! All the user gets to choose is the top-level Position button and its time-consuming interface.
I think this clunky interface, while powerful, is why it takes me hours to create my drawings in Visio.
A button I’d really like to see is one where I could set the width of an object to “textwidth(thetext)” and the height to “textheight(thetext,width)”. It would be nice to generalize this, but when I set these two fields in the ShapeSheet, these are the values I use 99% of the time.
Chris — I was just pondering the same task, and you saved me the trouble, not to mention cluing me in to SnagIt’s text capture. Nice!
— Graham
Glad to save YOU a bit of time, after all the time your book has saved me!
Always nice to have a visit from the author of:
Visio 2003 Developer’s Survival Pack
Thank You!!! I was searching for 1/2 hour to add footers to visio 2010 and once I found your site, it was a breeze!
hi was wondering i wanna set a reference to the page’s zoom so my shape will grow as the user zooms out is there anyway to do that.
@Tlarkin,
Only using automation (code).
The problem is that you can have multiple windows into the same page, so you can’t tie shape size to zoom in a natural way.
What happened to “Document Location”. Office 2010 kept it for Word, but I can’t find it for Visio or Access. Does it exist or have an equivalent? It is awfully handy to know a file’s location without multiple steps.
thank you
Hi Diana,
It’s buried, but still there.
1. File > Info in the Backstage area.
2. Far right, top find Properties, and click the teeny down arrow.
3. Click Advanced Properties
4. Click the General tab. You’ll see the Location field there.
If you want to see it on a drawing, draw a rectangle, then select Insert > Field. In the Field dialog, select Document Info on the left, and Directory on the right.
You can copy this shape into any document, and the directory-path text will update automatically for the document. Note, if the document isn’t saved, the text will be blank!
Yes, or I could do a Save As and it would show me. What I am looking for is a way to make it more obvious, like in the Quick Access (always visible in Word) or Ribbon for one click. I want to avoid having to do more than just see where it is.
Check out Word, Options, Quick Access Toolbar, All Commands, Document Location.
Diana
Please forgive my tone, but I am so pumped with infuriation I can hardly stand it. Viso was great before Microsoft bought it. It has since improved in functionality, but increased in infuriation and frustration cubically!
I s there a way to RUN these commands that are not in the ribbon menus (Or I might add the F1 documentation)? How is the user to know that they even exist, and how are they to run them without building a huge personal addition onto the ribbon system?
Putting commands in a custom tab just makes a person kludge! I don’t want to re-design visio, then when I have to re-install for any reason, or go to another PC, nothing is as I am used to! I can learn ANYTHING, just put it all there to be found – perhaps in a hierarchy of menus, where each level of abstraction is aptly named – what a concept! Instead of back to the future, perhaps the future could be back to the past and we could get work done.
Microsoft just keeps making things harder and harder to actually use as they strive to make them more user friendly.
Agh! The customize ribbon functionality is great; the display not so much. Actually, the display sucks and looks like something out of Windows for Workgroups 3.11.
Now that I just dated myself, how do we get the new commands to line up under each other with small icons instead of 4 new commands occupying half the freakin’ ribbon?
It’s as if they put a noob on the ribbon design. I mean, seriously. Or did I just miss the “make the ribbon pretty” checkbox??
IMPORTANT: with the Secret Law of Attraction, each and every dot is weighted the same.
Few important things you need to start a virtual office are :
. In addition, work interfaces, when well designed will
result in predictable human behavior patterns that will be routine and systematic,
thus resulting in a reduction of human error and the
enhanced quality and consistency of worker performance.
Look at my page meble biurowe
I have an unusual issue, office 2013 doesn’t show the insert pop up when using org to add a picture. I have tried it a number of ways and it fails, even the multiple picture option fails to bring the browse window for picture insertion.
Uninstalled and re-installed Visio and this failed to make a different, created a new Visio document this too failed.
Any idea who might be able to help me figure this out.
Mark
In Visio 2010, my boss has a ‘Database’ tab with a ‘Reverse Engineer’ command that allows him to access one of our databases and show all of the joins, primary and foreign keys, and fields. This is very helpful, but I cannot find how to add it to my ribbon. Can you assist?
I have found the answer to my problem above – my boss has the premium edition while I have the standard.
Thanks anyway.