 Do you need to number shapes automatically? Do you need to connect shapes in the order that they are numbered?
If you are developing an automated, graphical solution on top of Visio, you might face these requirements. This article and accompanying download will help you to meet them.
Or if you just want tools for step-numbering and ordered connecting, you might be able to modify and extend the VBA code contained in today’s download to help you get the job done.
Fellow Microsoft MVP Dave Edson sent me another example of how you can programmatically deal with Visio shapes and the connections between them. Dave’s demos are regularly polished and “ready to ship”, but in today’s case, I couldn’t help tweaking and adding features. So today’s article is a joint effort, but it is Dave’s fault:)
Connect Numbered Visio Shapes in Order
The point of the demo is to connect shapes in the order that they are numbered. The Visio document in the download at the end of the article contains a special Step Bubble master shape that has a Shape Data field called Step Number. Step Number is the index that you need to change in order to set the order of the shapes.
Once you’ve got shapes on the page, the code will analyze the shapes’ step numbers, then connect the shapes in the proper order.
Dave did the shape and connection code, and I added a button to automatically place and number shapes, another one to connect them, and some visual aids to the shapes to help you see (and check) that the code did the job correctly.
These ease-of-use features allow you to set up the demo-environment more quickly, but are no excuse for not digging into the ShapeSheet behind the Step Bubble, or looking into the VBA code stored in the document.
Adding Numbered Shapes
First we need shapes with indices, otherwise there will be nothing to connect!
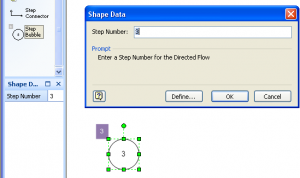
If you manually drag a Step Bubble master from the Document Stencil into the drawing page, you will be presented with a pop-up dialog that allows you to set the Step Number for the shape:
click to view larger image
The connect code will then try to follow your shapes in order of their step numbers. But if you don’t feel like individually numbering all of your shapes, just click the button at the bottom-left of the page.
When you click the 1. Add Step Bubbles button, the VBA code stored in the document will automatically drop a step shape onto a random spot on the page, and set the shape with the next available step number, automatically!
Note: The drawing contains VBA (Visual Basic for Applications) code that your Visio security settings may prevent from running. If you are not familiar with VBA macros, please read: VBA Macro Security. It will help you to understand in-document macros, related security issues, and how to allow them to run when they come from trusted sources.
Connecting the Shapes
Now that your page is full of numbered, just click the second button: 2. Connect Step Bubbles.
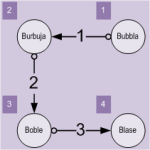
Your shapes will be connected in the order of their Step Number properties. I’ve added numbers to the connectors, so you can see which were drawn first, which were drawn last. Also, the connectors have different line ends to show direction: white circle at the beginning, double-black arrowhead at the end.
click to view larger image
Digging In to the Code
The quickest way into a Visio document’s VBA project is via: Alt + F11. Once you’re there, I thought I’d point out some of the more interesting procedures to help guide your exploration:
- ThisDocument.Button_AddSteps_Click
This is the code behind button #1 – it calls the other subroutines that drop step shapes, set step numbers, and add random text. It looks at existing step bubbles and notes existing step numbers so as not to create a duplicate. It also selects a random location to drop the new step, such that it is on the page, but not on top of the buttons. - ThisDocument.Button_ConnectSteps_Click
This is the code behind button #2. It deletes all of the existing connectors on the page, then it connects the step bubbles in order. - ThisDocument.m_deleteAllConnecors
This is the low-level sub that actually deletes all of the connectors. It selects all “Step Connector” masters, then deletes them. Worth a look if you need to select or delete shapes of a particular type. - ThisDocument.m_getRandomText
Picks a random foreign word for bubble. If you are relatively new to VBA programming, this might be interesting for you to look at. - ThisDocument.m_getUniqueStepNumber
This picks a new, ordered, unique step number for the “next” step shape that lands on the page. It “fills in gaps” in that if a step number is missing, ie: 1, 2, 3, 5, it will pick the lowest missing step number first. “4” in this example. - ConnectCode.ConnectTheDots
This where the order-searching is done, and the shapes are connected. Note that if a step is missing, no connector is drawn.
Download “Connect Shapes in Order.zip”
s!Aj0wJuswNyXlhnS_ET8SY_T9Vbap – Downloaded 7492 times – 103.00 B


Thank you so much for publishing this! I have a need to do something similar, but didn’t have a clue on how to do it. This will be so helpful!
JD
Thanks a lot for this. This feature wil be incorporated to the next version of our work.
Thanks for providing this. I am trying to look at the code, and when I click Alt-F11 all I see is the connect the dots portion of the code. How do I see the other “ThisDocument” related code?
Thanks!
Hi John,
The VBA project can have all sorts of classes, modules and forms. This one has two code “files” or code blobs.
You need to see the project explorer to be able to get at all of the code modules. This is available under: View > Project Explorer
dear Visio Guy
i have 10 shape and i want to chose from them to put on top of each other ,it is not always the 10 shape so i want to position the shapes in the middle automatically and i want the software to resizing them depend on the amount of shape and i want him to show me the length of each shape (will will have it in data base or exel)and i want from software to show the distance from the bottom shape to each shape
is it possible to be made
Many thanks indeed. Begs the question as to why this sort of functionality is not already in the product as it so very very useful?
Well done chaps! This site has allowed me to learn/use visio that bit more. Many thanks.
Marque
Thanks a lot for this code !
Very usefull.
This is close to what I was looking for but is there a way for the connector shape properties to take on the “where from” connection point and the “where to” connection point? I would like to tie the data from all of these to an MS Access database.