 In the US, March 14th is known to math fans as “Pi Day”, because in the US, we have a “special” date format (that makes dates much easier to sort and scan–trust me on this…)
Anyway, March 14th is written as: “3/14”, or perhaps 3.14. Pi Day. Get it?
Sadly, the rest of the world has no cause to celebrate, as March 14th is simply “14.3”–just another day on the calendar.
But today is May 1st, which could be abstracted to April 31st, which would be written in non-believing countries as 31.4. Pretty close. So I”m nominating today as “Metric Pi Day”.
To celebrate, I’m going to talk about Pi- and circle-related features in Visio! Today’s article is a hodge-podge of many end-user and ShapeSheet-related topics that have to do with circles and angles and Pi!
Pie Chart Shapes
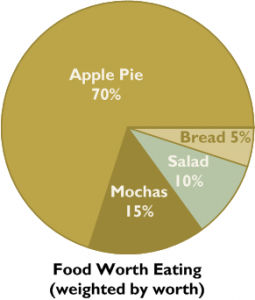
Visio has a built-in Pie chart master shape that you can use for quickly illustrating small data sets. You’ll find it on the Charting Shapes stencil, which you can get to by following the menus: Files > Shapes > Business > Charts and Graphs > Charting Shapes.
With the Pie chart shape, you can make simple illustrations like this:
The shape isn’t very easy to use, so I’ll offer you some tips.
- You have to first specify the number of slices, then enter the values. You can do this by right-clicking the shape.
- You are responsible for making the values add up to 100%.
- The shape toggles the visibility of Shape Data fields on and off depending on whether or you are setting values or choosing the number of slices. So right-click the shape if the Shape Data fields shown don’t make sense.
- You can individually format slices by subselecting wedges. Click on the shape, wait a half-second, then click again on a wedge. Now you can format it.
- You can add to the text by sub-selecting as well. Sub-select a wedge, then press F2 to enter text-edit mode. Now move the cursor to before or after the number value and type your text. Make sure not to overwrite the % value or you won’t be able to get it back!
- You can move the position of each wedge’s text using the Text Block Tool. This is located under the big “A” on the Standard toolbar (you have to drop-down the little arrow to get to the “A” with a circle around it) Now you can sub-select and move text blocks around.
Circle, Arc and Ellipse Tools
If you haven’t drawn a circle in Visio before, pay a visit to the Drawing toolbar. There you’ll find the Ellipse Tool, right between the Rectangle tool and the Line tool:![]()
For keyboard shortcut lovers, Ctrl + 9 will get you the Ellipse tool instantly. Once you’ve got it, just click and drag a circle or ellipse in the drawing page. (Ctrl+1 will get you back to the Pointer tool afterwards)
Constrain to Circle
If you hold down the Shift key while drawing a circle, Visio will ensure that you get a perfect circle and not an ellipse.
But the circle will remain a circle forever, even if you try to independently resize the width or height! This is because Visio (somewhat annoyingly) locks the aspect ratio.
If you need to “un-circle” a circle, try one of these methods:
- Go to Format > Protection and uncheck Aspect ratio\
- Go into the ShapeSheet and set the LockAspect cell in the Protection section to FALSE
- My favorite method: Alt + S, N, F which invokes Shape > Operations > Fragment. This blows away the shape and replaces it with a cut-out of the very same shape, but without the locked aspect. Weird, I know.
Arc Tool
The Arc Tool button is between the Line Tool and the Freeform Tools on the Drawing toolbar. You can quickly draw quarter-ellipses and quarter circles with this. The shortcut for this tool is: Ctrl + 7
Pencil Tool
The Pencil Tool (shortcut: Ctrl + 4) offers some gesture recognition. With it, you can draw straight lines or circular arcs, depending on which way you move the mouse and how fast.
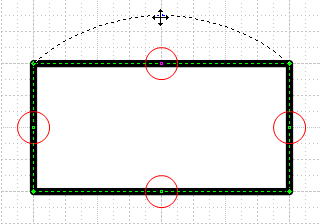
You can also change straight lines into circular arcs by selecting shapes that have already been drawn and manipulating the midpoints along segments.
These points only show when you have the pencil tool. Here we can see a rectangle getting a domed roof, thanks to the Pencil Tool:
Angle, Rotation and Insertion Points
Rotation and Pin Handles
You can rotate a shape by pulling on the green lollipop handle that sticks out of the top, when the shape is selected. And you can change the point about which the shape rotates by moving the pin point.
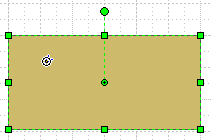
When you select a shape, pause the mouse over the lollipop at the top for a second or two. The rotation point will then show (usually in the middle) like we see here:
Once the pin appears, you can drag it to a different location, relative to the shape. Above, it looks as if we’re going to move the rotation point to the upper-left corner of the shape.
ShapeSheet Cells For Position and Rotation
You’ll notice that I’ve mentioned pin, insertion point and rotation point all in the last few sentences. That’s because they are all related, and in some sense are different sides of the same thing!
There are a few ShapeSheet cells that have to do with angles, rotation and placement of shapes. Despite seemingly separate concepts, they are actually all related.
When you place a shape on a page, you pin it to the page, so to speak. The location at which you drop the shape is specified by the PinX and PinY cells in the Shape Transform section of a shape’s ShapeSheet. PinX and PinY are in the coordinate space of the page.
But the pin must also pass through the shape at some point. This location is called the local pin, and is specified by the LocPinX and LocPinY cells, also in the Shape Transform section. The LocPin is specified in the shape’s coordinate space. It allows you to place the insertion point anywhere on the shape. An insertion point is where a shape drops relative to the mouse when you drag it from the stencil.
Normally, the LocPin is located right in the middle of a shape, at (LocPinX = Width*0.5, LocPinY = Height*0.5). But you could move it to the upper-left corner by changing the formulas to (LocPinX = Width*0, LocPinY = Height*1.0). You can see a nice 3D illustration of the Pin and LocPin relations on the Visio Art Page and look for the Pin and LocPin Illustration near the bottom.
As we saw with the shape handles, the insertion point/pin is also the point about which a shape rotates. When you rotate a shape, the value in the Angle cell changes accordingly. Or, of course, you can change the value in the Angle cell and the shape will rotate!
Text Block Position and Rotation
As the shape sticks to the page via the Pin and LocPin, the text block of a shape is located analogously relative to shape.
Each shape has a text block that can be manipulated with the Text Block Tool. You’ll find it under the “A” on the Standard Toolbar.
click to view larger image
When you select the Text Block tool and work with a shape, you’ll be able to resize, reposition, rotate the text similar to the way you can with the shape. (Note: you can’t change the text’s relative rotation point using this tool) As the shape is positioned and rotated relative to the page, the text block is positioned and rotated relative to the shape.
Inside of the ShapeSheet there is a Text Transform section, which contains the cells TxtAngle, TxtPinX, TxtPinY, TxtLocPinX and TxtLocPinY cells. These govern the text block just as the similarly named cells in the Shape Transform section govern the shape.
Note: by default, the Text Transform section is not visible in the ShapeSheet. You’ll either have to “Insert > Section” it inside of the ShapeSheet, or manipulate the text block using the Text Block tool. Once you’ve changed the default text block, the section will be visible in the ShapeSheet.
Rotation Constraints
When you rotate a shape, there is some control over the snapping of the angle. The closer you are to the pin while rotating, the rougher the angle-snapping. This is easier to see if you glance down at the Status bar in the lower-left corner of the main Visio window. You can change the angle snapping from 5° to 0.1° just by changing the radius of your cursor from the pin!
You can also quickly rotate a shape 90° by using the keyboard shortcuts Ctrl+L and Ctrl+R. I think of them as L = Left and R = Right for 90° counter-clockwise and clockwise, respectively.
Corner Rounding
If you want to soften the look of your shape and take the rough edges off, you can add corner rounding to the shape.
The easiest way to do this is via the Format Shape toolbar, which contains the Corner Rounding button. This offers a drop-down list of various pre-set corner roundings, or you can specify a custom measurement by clicking on More Corner Roundings….
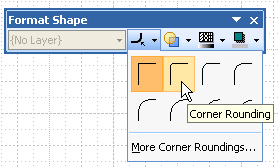
You can also specify corner rounding via the Format > Line dialog, and if you specify line styles (Format > Define Styles…, Developer mode only in Visio 2007), they can also include corner rounding.
ShapeSheet Trigonometric and Angle-related Functions
Visio’s ShapeSheet is replete with functions to help you get your circle-related operations done in a flash. Here’s a run-down of what’s on offer.
Built-in Functions
These functions can be typed directly into ShapeSheet cells. Or you can use the Insert > Function menu in case you forget. The insert feature also gives you dummy arguments to help remind you of what arguments the function requires.
ACOS( number )
Arccosine, returns the angle whose cosine is number. Result is an angle between 0 and PI radians ( 0° and 180°). Number must be between -1 and 1.
ANG360( angle )
Normalizes an angle to be between 0 and 2PI radians (0° and 360°). If no units are specified, then the result is in radians. Use “deg” to get results in degrees.
ANGLETOLOC( srcAngle, srcRef, dstRef )
Transforms an angle from local coordinates in a source shape to local coordinates in a destinati0n shape. srcRef and dstRef can be references to any cell in the source and destination ShapeSheets, for example: Sheet.4!Width or ThePage!PageHeight.
ANGLETOPAR( srcAngle, srcRef, dstRef )
Transforms an angle from local coordinates in a source shape to parent coordinates in a destinati0n shape. srcRef and dstRef can be references to any cell in the source and destination ShapeSheets, for example: Sheet.4!Width or ThePage!PageHeight.
ASIN( number )
Arcsine, returns the angle whose sine is number. Result is an angle between -PI/2 and PI/2 radians ( -90° and +90°). Number must be between -1 and 1.
ATAN( number )
Arctangent, returns the angle whose tangent is number. Result is an angle between -PI/2 and PI/2 radians ( -90° and +90°). Usually you think of number as the slope of a line, but watch out for divide-by-zero situations (ie: 0° and 180°). This function can also give bad results for geometric applications, because it doesn’t distinguish between angles in the 1st/3rd quadrants or 2ne/4th quadrants. Use ATAN2 instead.
ATAN2( dy, dx )
A nicer version of the arctangent function, takes separate “rise over run” arguments, avoids divide-by-zero problems and returns the real angle of the line, in the proper coordinate. Ie: the result is between 0 and 2PI ( 0° and +360°)
COS( angle )
Cosine, returns the “adjacent over hypotenuse” ratio for a given angle. You can specify units for the angle, or default to radians if no units are given.
DEG( angle )
Converts the value of an angle in radians to degrees.
GRAVITY( angle, limit1, limit2 )
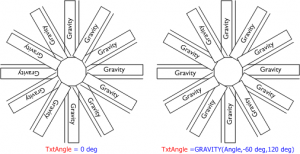
Returns 0° or 180°, depending on where angle falls between the limits. GRAVITY is intended primarily for text blocks, often used in the TxtAngle ShapeSheet cell of the Text Transform section. The idea is that as a shape is rotated, it’s text should orient towards the right-side or bottom of a page.
Think about a shape rotated to 10°, fairly horizontal. The text is easily read as “right side up.” At 70°, the shape is starting to get vertically oriented, and the text is oriented toward the right side of the page – you could read it if you rotated the page to the right. If you rotate the shape further to 150° the text looks upside down–you’d have to rotated the page a half-turn to read the text. The GRAVITY formula will return a text-flipping, 180° in this instance.
You can see GRAVITY at work here:
Many Visio shapes use GRAVITY as follows: TxtAngle = GRAVITY(Angle, -60 deg, 120 deg)
PI( )
When you need our old friend 3.1415926535898, just type PI(). The parentheses are empty, but it’s a function so you need them!
RECTSECT( width, height, x, y, option )
Returns the “sector” of a point within a rectangular region. By “sector” it is meant one of the regions formed when you make an X by connecting the diagonals of a rectangle. The result is 1 for the “3 o’clock” zone, 2 for the “12 o’clock zone, 3 for the “9 o’clock” zone and 4 for the “6 o’clock” zone.
SIN( angle )
Sine, returns the “opposite over hypotenuse” ratio for a given angle. You can specify units for the angle, or default to radians if no units are given.
SQRT( number )
Square Root. Not directly related to circle-stuff, but you often run into triangle situations when creating Visio SmartShapes. You can use SQRT with the Pythagorean theorem to calculate hypotenuses using hyp = SQRT( dx^2 + dy^2).
TAN( angle )
Tangent, returns the “opposite over adjacent over” ratio for a given angle. You can specify units for the angle, or default to radians if no units are given. Watch out for divide-by-zero situations!
Derived Functions
If you are missing some trignometric relations from the ShapeSheet’s function set, you can derive them! The VBA help offers a bunch of suggested derivations that I thought followed nicely here:
- Secant, Sec( angle ) = 1 / COS( angle )
- Cosecant, Cosec( angle ) = 1 / SIN( angle )
- Cotangent, Cotan( angle ) = 1 / TAN( angle )
- Inverse Sine, Arcsin( val ) = ATN( val / Sqr( –val * val + 1) )
- Inverse Cosine, Arccos( val ) = ATN( -val / SQR( -val * val + 1) ) + 2 * ATN(1)
- Inverse Secant, Arcsec( val ) = ATN( val / SQR( val * val – 1) ) + SIGN( (val) – 1) * (2 * ATN1) )
- Inverse Cosecant Arccosec( val ) = ATN( val / SQR( val * val – 1)) + (SIGN( val ) – 1 ) * ( 2 * ATN(1) )
- Inverse Cotangent Arccotan( val ) = Atn( val ) + 2 * ATN(1)
You could even get fancy and define these as custom ShapeSheet functions. Learn about those here: User-defined ShapeSheet Functions in Visio 2007.
Visio Guy Circle-related Articles
While we’re talking about circles and PI, let’s not forget these past articles on the theme:
- Circular Text Generator (version 1)
- Circular Text Generator (version 2)
- Circular Multi-arrows
- Circular Multi-arrows in PowerPoint
- Visio Squircles
- Super Mask Visio Clipping Shape
More Pi Stuff
More reading, viewing and stuff about 3.14159265358:

Hi Visio guy,
In Australia we write our dates dd/mm/yyyy, so July 22 would be our Pi day. 22/7 = 3.14
One little thing – locPin can be outside the shape which can be useful if you want to rotate a copy of a shape around a point external to the shape (e.g. petals on a flower) – just have width*1.5 etc. Great article as always 🙂
Good point, Miles!
In the illustration for “gravity” text, I moved the pin/rotation point off of the left side of the rectangle (the one at 3 O’ Clock), made 11 in-place duplicates, then rotated them into position.
Having the out-of-box pin made it easy to make a circle of non-overlapping rectangles!
Hi Visioguy,
in the article you show how you can add gravity to txtangle.
I think I also read somewere on your site about lock the txtangle with -angle.
Is this also posible with the text of Shape Data Graphics ?
I am a visio 2010 user.
greets
Hi Jack,
Data graphics and data graphic items are stored as hidden masters in the Document Stencil of each drawing. You can access them via the Drawing explorer, and certainly customize their ShapeSheet formulas.
If what I just said sounds obscure, that is because it is. If you are already a seasoned meddler with the ShapeSheet, then perhaps I’ve given you some clues as to what you can do. Otherwise, I’m probably sounding like a crazy man.
I can’t cover everything in detail in a short comment, the topic is too deep and involves too much black magic, hehe!
A bit of trivia – 3.14 is less accurate for Pi than 22/7, so 22nd of July is a better Pi day in the parts of the world that use dd/mm ….. (groan).
@Bruno, love it!