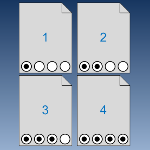
 It’s nice to let your audience know where they are in a document, and how much further until the end. This is especially true if your Visio document does double-duty as a presentation.
A progress bar-style graphic does a nicer job of this than “Page 1 of 4” or “Page 3/4” or “75%”. The audience gets a real feel for how much is complete and how much remains.
Today’s article will show you some ShapeSheet techniques for creating a visual page-numbering shape. We’ll modify the Circle-text Title shape from an earlier Visio Guy article so that it shows you how far along you are in a document. You’ll also learn how to get the shape to position itself automatically on the page, so that it is even easier to use!
So go get a fresh cup of coffee and read on!
Start With Something Old…
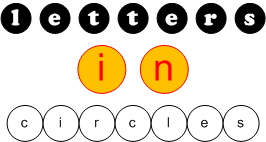
If you’ve read the recent post: Run Circles Around Your Text With the Circle-text Title SmartShape, then you know how easy it is to create graphics like this:
using the Circle-text title shape. For every character you type, a nice and tidy circle appears around it.
An interesting feature of this shape is that even spaces will show up inside of circles. If you type “fat cat”, you will get seven circles.
…Create Something New: A Visual Page Numbering Shape
That “space concept” is what triggered the idea for the visual page numbering shape. Spaces could be used as place holders, thus allowing a progress-bar graphic to be created from the Circle-text Title shape.
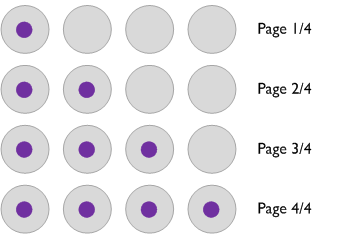
To illustrate the concept, have a look here:
Bullets show the page number, spaces show the remaining pages. Voila! We’ve got a page-numbering progress bar!
The only problem remaining was how to get bullet characters and spaces to repeat themselves automatically.
If you’re good with Visio’s ShapeSheet, this isn’t too hard to do. But if you are new to making SmartShapes (and are curious, and find it a little bit addicting), then this is a good little exercise to learn some ShapeSheet formulas and some tactics for creating shapes.
Analyze Your Document’s Pages
There are two ShapeSheet functions that help you “do page numbering”. PAGENUMBER() tells you what page you are on, and PAGECOUNT() tells you how many pages are in your document, excluding background pages.
Incidentally, these two functions coincide with fields that you can enter via the Insert > Field dialog. When you insert these fields using that dialog, Visio puts these formulas into Text Field Section cells inside of the ShapeSheet.
Because I like to have my custom logic in as few places as possible, I added two User-defined cells to my Circle-text Title shape to hold page-metric data:
User.pg = PAGENUMBER()
User.pgs = PAGECOUNT()
The value returned by PAGENUMBER() in User.pg depends on which page the containing shape is on. Once we get the logic correct, and the text hooked up, we’ll only need to drop this shape inton any page in the document, and the dots and circles will automatically work!
Create Repeating Text
The Circle-text Title shape shows circles for as many characters as are typed into its text block. That means we need bullets up to the page we are on, and spaces for the pages that come afterwards. Ie:
# of bullets + # of spaces = # of pages
Visio has a nice ShapeSheet function for repeating text. It is oddly named: “REPT”, and takes a string and a number as arguments.
So:
= REPT(“Bob”, 4)
will give you:
BobBobBobBob
Easy enough.
To get the proper text, I inserted another User-cell, then made use of the REPT function twice: once for the bullets, and once for the spaces:
User.txt = REPT("o",User.pg)&REPT(" ",User.pgs-User.pg)
You can see how User.pg and User.pgs were used to calculate the number of repeats necessary. The effect is to create strings like this:
Page 1/4: o _ _ _
Page 2/4: o o _ _
Page 3/4: o o o _
Page 4/4: o o o o
Note: in the User.txt formula above, I’ve shown a lower-case “0”, but a bullet works a lot better. The circular bullet seems to be more centered and more circular, where o’s can be slightly off-center and oval.
To get a bullet character, you can just go to Visio’s own: Insert > Symbol menu, or fire up Character Map under Start > All Programs > Accessories > System Tools.
Show the Smart Text on the Shape
Once User.txt is up-and-running properly, we just need to link it to the shape’s text. This is simply a matter of inserting a text field that refers to the cell.
To link a user-cell to a shape’s text, just select the shape and start typing or just hit F2 to enter text-edit mode. Then click the menu: Insert > Field > User-defined cells, and choose User.txt from the list of possible cells.
Since your Circle-text Title shape now has smart text, linked to ShapeSheet calculations, it is also a good idea to protect the text from being edited by the user. You can protect the shape against text edits by clicking the Format > Protection menu, then checking the Text check-box. Now users won’t be able to stomp all over your carefully crafted smarts!
Place the Shape Automatically
A page-numbering shape is a kind of title-block shape, or a foot-note, or a header of sorts. That means it should always appear in the same place on a page to ensure visual consistency. If you’ve got a lot of pages in your document, you’ll have to paste the shape, then carefully place it many, many times. This could get tedious.
But with some clever ShapeSheet formulas, you can get the positioning to take care of itself. Then you just have to paste-paste-paste!
The following sets of formulas show you how to get a shape to anchor itself in one of the four corners of a page. The PinX and PinY cells control the position of the shape, and their formulas are GUARDed so that the shape automatically positions itself, and can’t have its position altered (or the formula blown away!)
Top-left Corner
PinX = GUARD( User.Margin)
PinY = GUARD( ThePage!PageHeight - User.Margin )
LocPinX = Width * 0
LocPinY = Height * 1

User.Margin = 0.25 in
Top-right Corner
PinX = GUARD( ThePage!PageWidth - User.Margin )
PinY = GUARD( ThePage!PageHeight - User.Margin )
LocPinX = Width * 1
LocPinY = Height * 1

User.Margin = 0.25 in
Bottom-left Corner
PinX = GUARD( User.Margin )
PinY = GUARD( User.Margin )
LocPinX = Width * 0
LocPinY = Height * 0

User.Margin = 0.25 in
Bottom-right Corner
PinX = GUARD( ThePage!PageWidth - User.Margin )
PinY = GUARD( User.Margin )
LocPinX = Width * 1
LocPinY = Height * 0

User.Margin = 0.25 in
The LocPinX and LocPinY cells specify where the anchor point of the shape is. To avoid having to subtract-off or add-on half of the shape’s width and/or height, we just move the location of the “loc pin” around to simplify the PinX and PinY formulas.
Also, I’ve thrown in parameter “User.Margin” to keep the shape from being in the non-printing area of the page. By creating this variable, it will be easier to change the margin setting in the future, without having to check through many cells and formulas for hard-coded values.
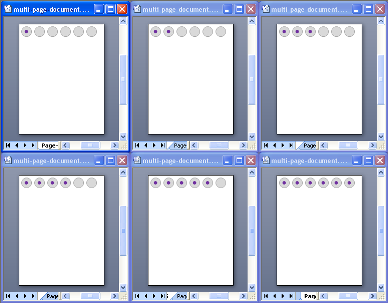
Once I had all the text and location smarts working, it was child’s play to copy and paste the shape into many pages. Below is a six-page document. It took about five seconds to duplicate the page-numbering shape onto each page. The purple dots updated automatically, and I didn’t have to fuss with the location of the shape at all.
If you like the way this automatic page location works, you can see another example of it in this article: Design Web Pages With This Visio Breadcrumbs Shape.


Doesnt this have problems if the pages are out of order?
some like 1,4,2,3
What happens if the pages have names…not page x but cool pic 1
Hi Ted,
In a Visio document if you move a page named “Page-1” so that it is between “Page-2” and “Page-3”, then it becomes, numerically, page #2 in the document. “2” becomes #1, and “3” stays #3.
I understand that.
I was just curious if pagenumber() triggers off the pages as ordered in the doc or triggers off the name of the page.
So in essence, pagenumber() is the relative order, regardless of actual page name, of the pages in the document.
I guess something like pagename() would return the name of the current page.
Hi,
This is a great webpage and all your tutorials are excellent. Can I ask you something? I want to create a smart shape which will placed on each page of my visio document. The user shall put his information on the first page and all the other pages shall have the same information like the first one. Is there any way to link the shape from page X to X+20 back to the first page? If so, what is the syntax for this? Do you know what I mean? In the former tutorials you linked your shape always to the same page and I was wondering if it is possible to link it to a different page.
Could you help me with this?
Thanks in advance, Bob
Hi Bob,
You could just put a shape on a background page, if the information isn’t changing from page to page.
But it sounds like you want to have a “control” page or a title-page.
So say you’ve got a shape on the title page, and it has an id of 4. You enter some info into that shape’s text block.
You could make another shape on another page, then “Insert > Field” this custom formula:
=SHAPETEXT(Pages[Page-1]!Sheet.4!TheText)
The problem is that the reference seems to break every time you copy it to a new page (ie: copying breaks the formula.) But if you DRAG the shape to a new page, the reference stays intact.
Another technique is to add user-cells to the document’s ShapeSheet, then refer to them.
The doc ShapeSheet can be found via: Shift + Window > Show ShapeSheet. References to cells in the doc ShapeSheet seem to be more robust, and are written like this: TheDoc!User.Row_1, etc.
Hi Visio Guy,
Thanks for responding. You are right. I’ve got one title page with information like revision, description, creation date, name, …. These information shall be displayed on all pages. Every time the document will be changed the user needs to add a new revision, the revision data and so on. But instead of changing each page the user shall change date on the first page (title page) and all other pages in the visio document shall change accordingly.
Right now I’m working with the ShapeSheet and I’m refering to cells. I also saw that by copying and pasting (regardless of pasting it to the same page or to any other page in the document) the reference is lost.
(The title page contains a sheet with ID 50)
Here my code for the ‘Text Field’ section for all other pages in the document which are refering to the title page:
Pages[Page-1]!Sheet.50!Prop.Description_1
And I found sth out: If you use the duplicate option (Edit–>Duplicate or ‘CTRL+D’ Visio creates a copy of your selected sheets and pastes it on the same page. With the duplicate option Visio still knows where the references are. As you said then afterwards you can drag and drop it to any other page.
Thanks again and I hope I could help anyone who wanted to know the sth about it.
Regards,
Bob
Hi VisioGuy,
This is great! I’ve been using the Page Numbers code for a while, but now i want to track version numbers.
For example:
I create a document and it automatically comes up as Version 1.0. Every time i edit that document, i write on the revision notes that version 1.1 contains these edits. But currently i have to go through every page and change the version number from 1.0 to 1.1, etc. When i have a 20 page document, this is quite time consuming.
Is there a way to automate this process?