A recent Visio Guy forum post asked about a creating a hexagonal grids. The poster wanted to create some new Visio network shapes that show-off the groovy new hexagonal ventilation grids that you see on modern-looking servers. As I considered all the subtle, yet elegant, ways in which I could hint, guide, steer—teach the man to fish—I finally caved-in and whipped up a hexagonal Visio custom fill pattern that you can download (for free) right here! Ok, you just knew that the download link wouldn’t be right at the top of the article now, didn’t you? We’ve got to at least go through the motions of educatin’…
How the Pattern Was Created
In order to create a custom fill pattern, we need to create the smallest possible element that can be repeated horizontally and vertically to create the grid. There’s a fairly simple recipe to do this:
- Create a portion of the repeating grid
- Identify where the pattern repeats
- Slice and dice
Unfortunately, item #2 isn’t always that easy…
Manually Create Some Grid
First, I whipped out the Basic stencil, located under: File > Shapes > General > Basic Shapes. On that stencil was a ready-to-eat Hexagon shape, which saved me the time of messing with *gasp* trigonometry. Then, using Visio’s alignment functions (see the Action toolbar) and some tricks with the Size & Position window (look under the View menu), I was able to manually piece together a small, repeating grid of hexagons.
Where Does it Repeat?
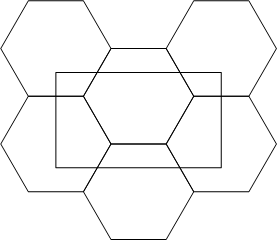
At this point, I could identify where the pattern repeated, both in the horizontal and vertical directions. For hexagons, this was fairly easy. The rectangle shows a region that will repeat in both directions to create a hexagonal grid. For other shapes, it can be a lot harder to find where the repeating happens. I’m sure there’s a science behind this, certainly somebody has come up with an algorithm (that we need to code in VBA and offer for download), but I have yet to do that research.
Chop, Toss, Recombine
With the pattern drawn, and the rectangle identifying where the repeats occur, I then used a few “boolean operations” to extract my pattern. Located under the Shape > Operations menu, Trim, Join, and Combine performed their work admirably to give me this:

Trim sliced all of the lines at their intersections. This gave me a lot of line segments, most of which were summarily deleted. Join was then used to create continuous paths out of segments with coincident endpoints. This was mostly done for efficiency – to make the shape smaller and simpler. Finally, all of the pieces were Combined into a single shape. You could just as easily group them together, but I like to Combine, since it creates a single shape, with a single ShapeSheet. It’s smaller on disk, and probably adds slightly to performance, since there’s less data to read.
Creating the Custom Pattern (Master?!)
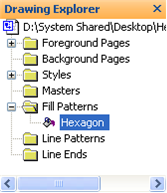
Yes, custom patterns are stored as Visio masters. You don’t really need to know that. So just ignore that. But they used to be accessed via the document stencil, and you still edit custom patterns the same way that you edit normal masters. These days they are accessed via the Drawing Explorer window, which you can show from the View menu. In today’s download, you’ll already see the Hexagon master in place when you expand the Fill Patterns tree node:
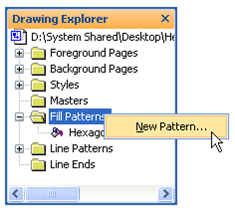
Creating a new pattern is just a matter of right-clicking the Fill Patterns node, and choosing New Pattern… You’ll see a dialog that allows you to enter a name, and choose from a few options that I won’t go into right now, but you might experiment with when you get a second.
To edit the pattern, just double-click on the Hexagon node. There you can change the line-weight and the size of the pattern to meet your needs. It is good to leave the color black, though. Any element of a fill pattern that is black will take on the fill color of the shape to which it is applied. If you changed the Hexagon pattern to have red lines, then you couldn’t change the color of the pattern when it was applied to a shape. It becomes less flexible for end-users who don’t know how to edit the pattern itself.
Applying the Custom Fill Pattern
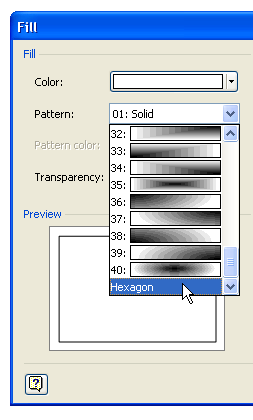
Once your pattern is created, you can apply it via the Format > Fill dialog. The pattern will show as text waaay down at the bottom of the Pattern drop-down list:
If you apply it to a rectangle, it will look like this:
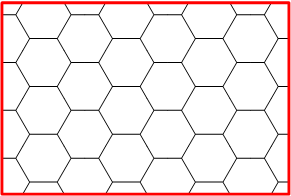
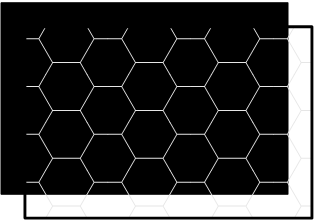
Note that the hexagonal fill pattern takes the fill color of the shape, not the line color of the shape. I’ve made the rectangle’s line color red just to illustrate this point. This rectangle actually has a black fill! I know this seems a bit weird, but it actually makes sense. Since the hexagons are actually what is “in the fill”, so to speak, they should take the color of the fill pattern! We could add a solid-fill background to our custom pattern, but this would make it hard to control the color of the hexagons and the color of the background. Below, we have two rectangles: one is black-filled with a solid-pattern. On top of that, we’ve placed a white-filled, hex-pattern rectangle. This is a good start towards making some chic looking ventilation grids!
Download “Hexagon Custom Fill Pattern for Visio”
s!Aj0wJuswNyXlhVQT4G-al7AbEEUz – Downloaded 4510 times – 103.00 B

Thank you for the tutorial! It helps a lot now that I don’t have to be dependent on the un-customizable visio patterns.
In Visio 2013 the hex pattern is always a light blue, regardless of what foreground color you pick. Any idea why?
It makes the hex not visible at all.