 If you are designing your own shapes, you’ll spend a lot of time manipulating text.
And the more you learn about Visio’s capabilities, the more you’ll want to control shape text. Oh yes, you’ll want to rotate it, reposition it, evaluate it, make it reflect data, make it resize with the shape, and much, much more.
Today we have a treatise on twelve text tips for both end-users and ShapeSheet fans.
The Top Twelve Tips
This list could have easily been twenty-two tips long, but we had to trim. In today’s top-twelve Visio text tips, we’ll address these issues in moderate detail:
- Using the text block tool to reposition text on a shape
- Quick text-editing using F2 to get into text-edit mode
- Setting double-click to edit the text of a shape
- Linking shape data fields to shape text
- Keep text on the level
- Find out: how big is your text block?
- Evaluate shape text as input data
- Comparing strings in the ShapeSheet
- Gravity text
- Process and manipulate lists of values with lookup and indexing functions
- Resize font with shape
- Reposition text with a control handle
1. The Text Block Tool
Just as you can move and rotate a shape relative to the page or to a group, you can move a text block relative to a shape! The text block is the conceptual rectangle that holds a shape’s text. It can be moved and rotated independently of the shape.
Sitting at the top of the Standard toolbar, just below the big black A is the the Text Block Tool. You have to click the little drop-down triangle to get at it, like this:

Give it a try. Note: some shapes have protection and guarding that prevents you from doing this, so practice on simple shapes that you yourself have drawn until you get familiar with the tool.
ShapeSheet junkies will want to know that changes you make with the Text Block tool are reflected in the Text Transform section of the ShapeSheet.
2. F2 Enters Text-edit Mode
Sure it’s easy to select most Visio shapes and simply start typing. But sometimes you want to edit text that is already there, and double-clicking doesn’t always get you into text-edit mode.
For these cases, F2 is a shortcut that will get you into text-editing mode. Just select a shape and press F2, and your shape’s text will become highlighted–ready and waiting for you to edit it.
Escape (Esc) will get you out of text-edit mode.
3. Setting Double-click to Edit Text
When you draw a simple rectangle or circle, the default double-click behavior is to enter text-edit mode. But if you draw a group, then double-clicking will probably just sub-select one of the group’s sub-shapes.
If you have text-heavy drawings with lots of text-containing shapes, you might want to set all shapes so that double-clicking enters text edit mode.
This is really easy to set up. All you need to do is:
- Select a bunch of shapes
- Go to: Format > Behavior > Double-click tab
- Check the radio button: Edit shape’s text
- Click OK
Inside of the ShapeSheet, an event cell will receive a new formula. It looks like this:
EventDblClick = OPENTEXTWIN()
So if you’re making automation tools that set this behavior automatically, just set the EventDblClick cell!
4. Link Text to Shape Data Fields (Custom Properties)
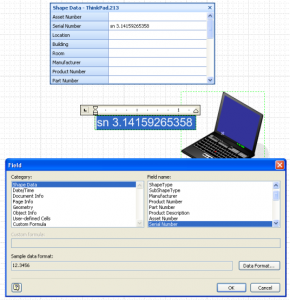
If you want to display data stored behind your shape in the shape’s text, it’s as easy as inserting a field. Here’s the short list of what to do:
- Select a shape that has shape data fields, like the ThinkPad shape shown below
- Hit F2 to get into text-edit mode (like in tip #2!)
- Go to: Insert > Field
- Select Shape Data or User-defined cells (or other info about the shape or document) in the Category column
- Choose the info you want and specify formatting
You can insert more than one field by moving the text-edit cursor around and going back to the Field dialog. You can also enter custom ShapeSheet-valid expressions if you don’t find what you need in the pre-defined set of fields.
5. Level With Your Text!
Sometimes you want your text to stay level — that’s right-side-up and readable without neck pain — no matter how the user rotates those darn shapes. For instance, if you rotate a shape that has “normal” or default text, you’ll get something that looks like this:
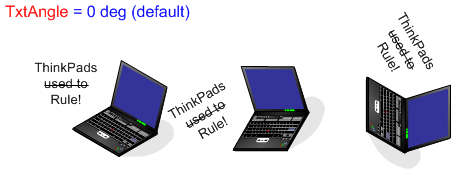 But if you set up “Anti Rotate” text, you’ll get this pleasing result:
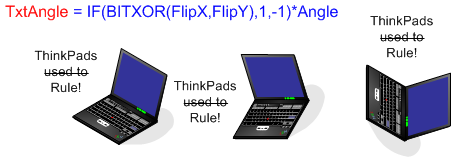 As you might guess from the hints in the images above, you can cause text to anti-rotate using ShapeSheet formulas.
We’ve already mentioned that the Text Block tool causes changes to cells in the Text Transform section. Well one of those cells specifies the angle at which the text is rotated, relative to the shape: TxtAngle.
The easiest make text anti-rotate is to get it to compensate for any rotation of the shape by anti-rotating the text. The expression is pretty simple: just make the text rotate in the opposite direction as the shape:
TxtAngle = -Angle
Your shape rotates, your text anti-rotates. Pretty simple.
But, if your users get tricky, they might flip the shape, which will break this formula. A more robust version looks like this:
TxtAngle = IF(BITXOR(FlipX, FlipY), Angle, -Angle)
One note about the Text Tranform section. If your shape’s text block is default–ie: it hasn’t been manipulated, then you won’t see the section in the ShapeSheet. Oddly, you have to add it (as opposed to show it) but this is simply a matter of going to Insert > Section, and checking the Text Tranform box.
6. How Big is Your Block?
It’s very helpful to know just how big your text block is. Two lovely ShapeSheet functions will help you get there: TEXTWIDTH and TEXTHEIGHT.
They don’t have to live in the TextTransform section, but they’re often found there:
TxtWidth = TEXTWIDTH(TheText)
TxtHeight = TEXTHEIGHT(TheText, TxtWidth)
Normally, TxtWidth and TxtHeight are as big as the shape itself, but if you want to position text tightly against an edge of the shape, and have it react to any text the user might input, then you’ll want to learn these formulas.
The formulas shown above will cause your text to tightly enclose any text you type on the shape, plus the top, bottom, left and right margins. With these formulas, you can position text exactly against an outside edge of the shape.
So, for instance, to place text on the right side of a shape, you could set the TxtPinX cell as follows:
TxtPinX = Width + TxtWidth/2
As the text grows, TxtWidth will grow, and the text will move off of the edge of the shape (the text’s pin is in the middle of the text)
Similarly, you can position text off of the bottom of the shape like this:
TxtPinY = -TxtHeight/2
Note that the last two examples assumed that the text’s pin was at the center of the text block. This is handy if you are also going to implement anti-rotating text.
But if your shapes will always be right-side up, you can do some simplification by playing with the TxtPin and the TxtLocPin. The TxtPin is the position at which the text block is located, relative to the shape. The TxtLocPin is where that pin is located inside of the text block itself.
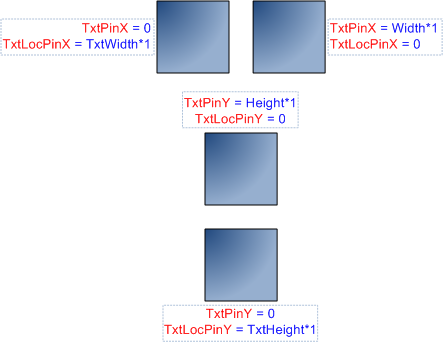
I know, it’s a bit cumbersome to describe with…erm…text, so try it out for yourself!
7. The Value of Words
The text on your shapes can be more than just a bunch of pretty characters. It can specify meaningful quantities.
As long as the text adheres to valid ShapeSheet syntax, then it can be validated. Now I know that “valid ShapeSheet syntax” sounds ominous and daunting, but it doesn’t look much different then, say, Microsoft Excel formula syntax. So this won’t be anything new to lots of you.
To convert shape text to numbers, you use the EVALTEXT function. It will try its very best to make numerical sense out of the text you type. For instance, this formula:
Width = EVALTEXT(TheText)
Will cause your shape to grow in width to the size of whatever your shape’s text evaluates to. The obvious danger is that your text will evaluate to zero (ie, you type: “Schmoosabbfgrfflk”) and your shape will disappear! But it is still a pretty cool feature, plus you can use IF statements to trap zero evaluations.
You can easily try this out by doing this:
- Draw a rectangle on a page
- Type “1.5” or “25mm” or something in the shape’s text (so our shape doesn’t disappear in step 4!)
- Open up the ShapeSheet via: Window > Show ShapeSheet
- In the Width cell, enter the formulas shown above
- Close the ShapeSheet window, and start typing on your shape
Now have some fun. Try typing: Sin(45deg) + PI()^2 – 3417-4/9, or something equally obscure.
As long as the text is valid ShapeSheet syntax, then you’ll get an evaluation. If you don’t type in any units, then the result will be in inches, but you should be able to type mm, m, cm, in, yd, etc. as well as formulaeic expressions.
You can build a scientific calculator with just two shapes: one shape takes your input, the other displays the output. And the output evaluates as you type! This is described in detail in this article: Evaluate Shape Text With EvalText
8. Comparing Strings
A lot of people jump head-first into the ShapeSheet, only to surface minutes later in the newsgroups. They set up a shape with Shape Data fields like “Color” and allow values such as “Red”, “Blue” and “Pink”.
Then they try to make decisions on these named values and format the shape accordingly. They try stuff like:
FillForegnd = IF(Prop.Color = “Red”, RGB(255,0,0), …)
And it doesn’t work!
The problem is that Visio evaluates text as best as it can. So “Red” = “Red”, but “Red” = “Blue” as well, because they both evaluate to ZERO!
If you want to compare strings, you need to use the STRSAME( ) function, which was added in Visio 5.0 (I think). Here’s an example:
FillForegnd = IF( STRSAME( SHAPETEXT( TheText ), “Red”, TRUE), 2, 0 )
This will turn your shape red if you type “Red” or “red” into the shape. Pretty cool, huh? Note, the TRUE argument is optional, and allows for case-sensitivity. TRUE ignores case, and FALSE respects it.
9. The Gravity of the Situation
If you’ve got lots of shapes on a page, and they are rotated at arbitrary angles, then the drawing can get visually confusing, very quickly. Sure, you could try the anti-rotate technique from tip #5, but sometimes text should orient along the shape.
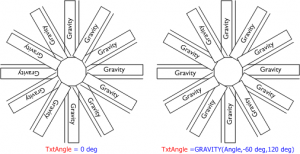
Have a look at this mess:
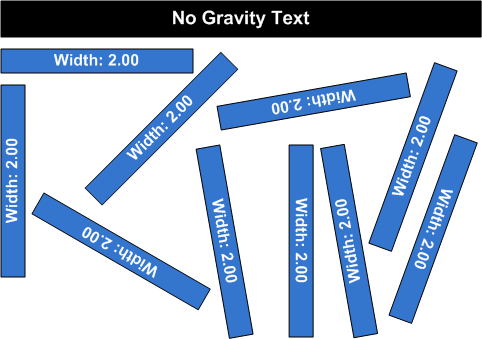
See how the text “points” in all directions? It is very jumbled to look at.
Now take a gander at this:
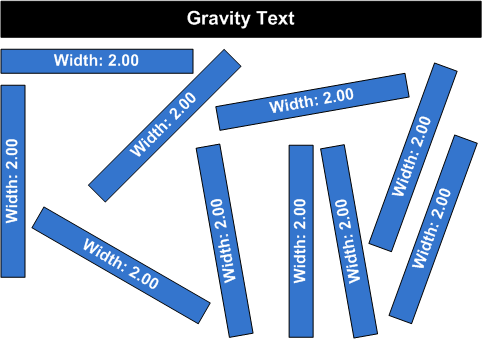 The shapes are arranged exactly as in the first example, but the text is cleaner. It tends towards the bottom or the right-side of the page. The text appears more consistent, is more readable, but still orients along the axis of the containing shape.
This effect is achieved using the GRAVITY ShapeSheet function, which essentially rotates the text 180 degrees, under certain conditions.
The shapes in the second example use the GRAVITY function in the TxtAngle cell as follows:
TxtAngle = GRAVITY(Angle, -60 deg, 120 deg)
What happens is that TxtAngle is 0 deg between -60 and 120 deg, but flips 180 degrees for angles not in the range. Your text stays in-line with your shape, but is readable from the bottom or right-side of the page. That’s a lot less turning and flipping of the page, and less pain in your neck as well!
An illustration that was recently posted in Happy Pi Day…Sort Of, shows how GRAVITY effects text as a shape is rotated:
10. Process Lists With LOOKUP and INDEX
If you want to work with lists of values then Visio’s ShapeSheet provides the LOOKUP and INDEX functions to help you out.
Often times you need to know where an item is in a list, or retrieve a specific item from a list.
LOOKUP tells you where an item is in a list. So LOOKUP(“three”,”one;two;three;four”) returns 2, as the list positions are zero-based. If the first argument isn’t in the list, the function returns -1. Notice that you can use LOOKUP to do text comparisons too, if you are into code obfuscation.
INDEX tells you the “Nth” item in a list. So INDEX(1,”one;two;three;four”) returns “two”.
By default, the semi-colon is the ShapeSheet’s list-separator of choice, but both functions have optional arguments that let you specify a custom list-separator.
We can highlight both functions in a text-translation example. We’ve got two lists of numbers: one in English, one in German. Using LOOKUP and INDEX, we can get the German value, given the English
User.numsEN = “zero;one;two;three;four;five;six;seven;eight;nine”
User.numsDE = “null;eins;zwei;drei;vier;fünf;sechs;sieben;acht;neun”
User.valEN = “five” …this could come from ShapeText, or a Shape Data field, for example
User.valDE = INDEX(LOOKUP(User.valEn, User.numsEN), User.numsDE)
As long as the lists match up, this will work. We get a number that indicates where User.valEN is in the list of English numbers. This index is then used to grab the German equivalent. So: “five” gives us an index = 4, which then points to “fünf”
11. Resize Font With Shape
ShapeSheeters often ask how to get their text to resize with the shape. Normally, font-size is independent of shape size, but sometimes text should behave less like information and more like graphics.
So the technically re-worded question is: “How do you get font size to change with shape size?”
The easiest way to do this is to build a ration between the current height of the shape and the original height of the shape, and multiply that by the original font size. The formula can live in the Char.Size cell and might look something like this:
Char.Size = 12pt * Height / 0.75 in
Here, 12pt is the original font size, and 0.75 in is the original height of the shape. The expression will increase or decrease with the current Height of the shape, and the font size will correspondingly grow or shrink. You might want your text to react with the Width of the shape, or some combination of Height and Width.
There are lots of other factors to consider too, so luckily you can read the whole story here: Text Resizing with ShapeSheet Formulas
And if you have text that won’t be edited, you can use this technique: Resize Text With Metafiles!
12. Reposition Text With Control Handles
Lots of Visio shapes come with a feature that lets you easily reposition text using a little, yellow control handle. You can see it in action on this ThinkPad shape. See the yellow diamond peeking out from behind the cursor cross-hairs?
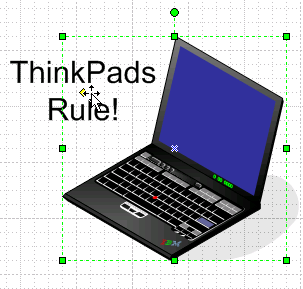
The problem that beginning shape developers have is that they try to hook a control handle to the text. But the paradigm is actually the reverse of this: you hook the text (location) to the (position of the) control handle.
Since this topic warrants a full article (and several utilities, probably), I”ll briefly describe the process of getting text to be repositionable via a control handle.
First, you add a control handle by inserting a row in the ShapeSheet. Then you set the TxtPinX and TxtPinY cells to refer to the position of the control handle. Now, when you move the little yellow diamond, your text will follow along!
In detail, it goes something like this:
- Create or select a shape (duh!)
- Open the ShapeSheet via Window > Show ShapeSheet
- Go to: Insert > Section and check Controls and Text Transform (if it isn’t grayed out)
You should now see both the Controls section and the Text Transform section in the ShapeSheet. - In the Text Transform section, set the TxtPin cells as follows:
TxtPinX = Controls.Row_1.X
TxtPinY = Controls.Row_1.Y - In the drawing window, reposition the control handle to a suitable default position. The text should follow along!
- Apply other text-handling techniques to the text block, as discussed in the other 11 items in this article!
But Wait, There’s More!
Well, that’s all we have time for this century today. But you’ll be glad to know that Visio Guy is choc-full of text-related articles. If you’ve had fun with our Top Twelve Text Tips, then I urge you to read these:

@Filippo,
You can store text in any User cell you create, it doesn’t have to be the Prompt cell. The prompt cell is intended as a comment for what the user cell is for – so that shape designers can come back and maintain/modify a shape in the future and remind themselves of what the variables (User-cells) are for.
Hi Pete,
I can’t follow your description well enough to answer it right now. I can’t tell if you are talking about rectangular shapes on the page or rectangles in the data graphics that are applied to shapes.
We are a group of volunteers and opening a new scheme in our
community. Your site provided us with valuable information to work on.
You have done an impressive job and our entire community will be grateful to you.
Hi Visio guy
Visio 2010 question :
I’m having trouble keeping text horizontal when I rotate a group of shapes. I get the text horizontal for individual shapes ( thankyou!!!) but when I group shapes ( a desk, a chair) the textangle box disappears.
Any suggestions?
thanks
Bill M
Hey Visio Guy;
Can you show me the fastest way to insert text with the click of a button, and have it change when you click another button? I figure a macro is good for this, but my issue is I can’t figure out how to change the text once it’s written in the visio document. Maybe you have a better way of writing text and then clearing it and writing others.
example:
I click a button that says Virginia, The Visio text shows population and demographic. When I push another button, I want to see the demographics for another state or county. Let me know, thanks.
Hi,
Is there any way I can slant the text?
Thank you for all your great articles and examples.
//Peter
Using Visio 2013 Professional but cannot find any way to display shape data other than through the Shape Data window, which does not resize to fit all the data or display text as multiple lines of text. What I would like would be a pop-up that appeared (and disappeared) when you click on a shape and displayed multiple lines of text information.
Is this possible anywhere?
Here’s a macro to set the text to Anti-rotate on a shape using the formula shown above.
Sub AntiRotateText() Dim shp As Visio.Shape If Visio.ActiveDocument Is Nothing Then Exit Sub Else If Visio.ActiveWindow.Selection.Count = 0 Then 'Abort if there is no shape selected MsgBox "You must select a shape to set text to anti-rotate. ", vbOKOnly, "Select a shape" Exit Sub Else Set shp = Visio.ActiveWindow.Selection.Item(1) If Not (shp.RowExists(Visio.VisSectionIndices.visSectionObject, Visio.VisRowIndices.visRowTextXForm, Visio.VisExistsFlags.visExistsAnywhere)) Then Call shp.AddRow(Visio.VisSectionIndices.visSectionObject, Visio.VisRowIndices.visRowTextXForm, Visio.VisRowTags.visTagDefault) End If shp.CellsSRC(visSectionObject, visRowTextXForm, visXFormAngle).FormulaU = "=IF(BITXOR(FlipX, FlipY), Angle, -Angle)" End If End If End SubHello Visio Guy,
I am trying to find out if Visio can directly import the position of each element?
Ex:
– For a service X the director (N) is at the top. Then there is N-1, N-2, N-3, N-4, N-5.
– For service Y which is simpler, there is just the director (N) and an employee (N-5).
If I want to present the two structures (X and Y), I have to put both N-5 on the same level.
Can Visio import the function level and take it into account in the presentation?
Thank you very much for your answer.
Thanks a lot
We upgraded from MS Visio 2007 to 2016. We are experiencing several issues with previously created docs as follows:
* The comment boxes are not attaching. They are displaying in a list format.
* The sub process boxes are not linking to the actual processes.
* Uploads are failing when adjusting any vision map.
Have a great day.
When I bring in my data and then import to link, the Data Graphic Field is greyed out as in the Configure button. I am using Visio 2016 and trying to create an org chart that has different color names depending on location. I have 550 associates in the org but am trying to import it into one sheet so I can make all the formatting changes and then copy to other pages. Any help is appreciated.